Tutorials
Tutorials
Overview
This section contains tutorials on how to setup various cool solutions on the
cloud.
Feedback & Inquiries
To ask questions or suggest new features,
join the discussion
on github. For issues with the brainhack cloud, please open a
new issue.
Acknowledgments
Funding
Thank you to Oracle for Research for providing Oracle Cloud credits and related
resources to support this project.

What is Oracle for Research?
“Oracle for Research supports academic, educational, and institutional researchers in all aspects of discovery. We’ve made it simple for them to host, store and analyze their data with our cloud infrastructure solutions. Our research customers are changing the world – and we’re proud to help them do it.”
License
CC BY License 4.0
1 - Virtual machines
Virtual Machines
Overview
Running a Virtual machine on the Oracle cloud is the basis for many other
things.
Setup
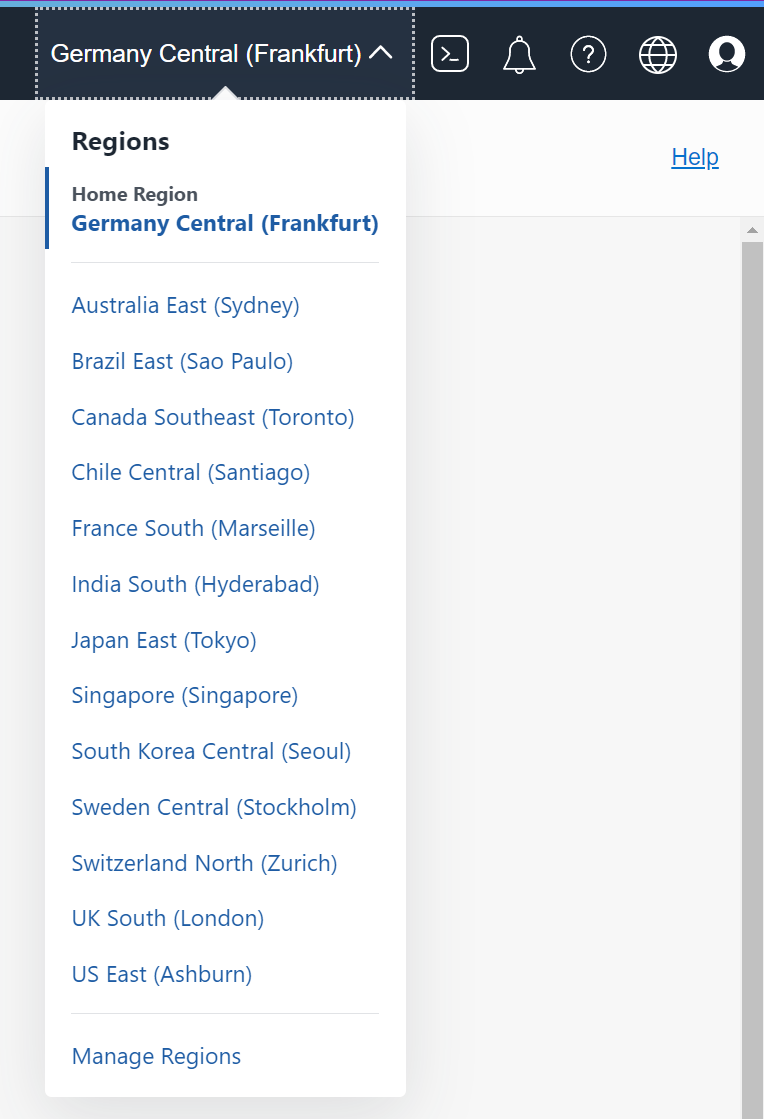
Make sure you selected the geographic region where you would like to create the
resource.
Here I create it in the Home Region, Frankfurt.
Notice
Ideally, you want the region to be as close to you (or your users) as possible to have low latencies. So, you should change the default from Frankfurt to another region from the list.
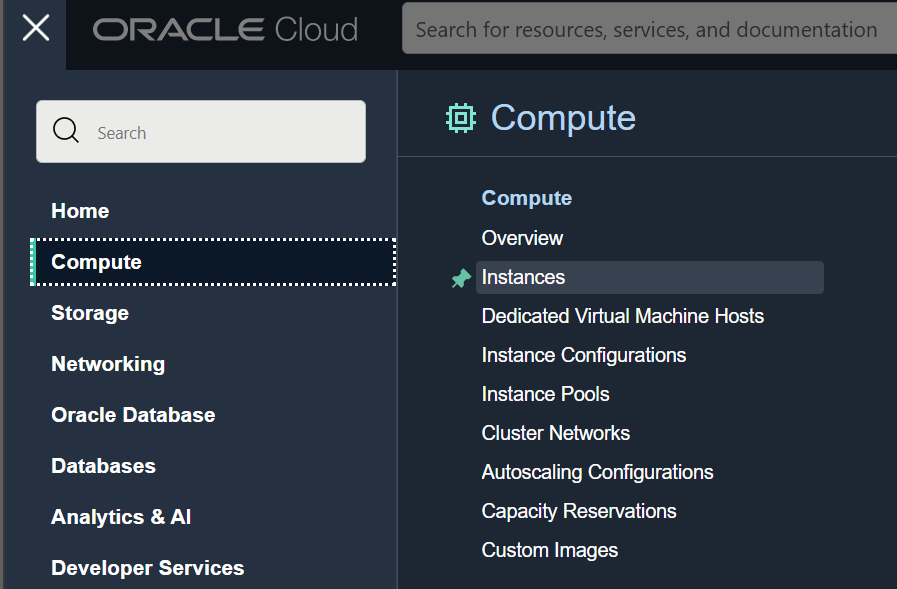
Head to Compute -> Instances
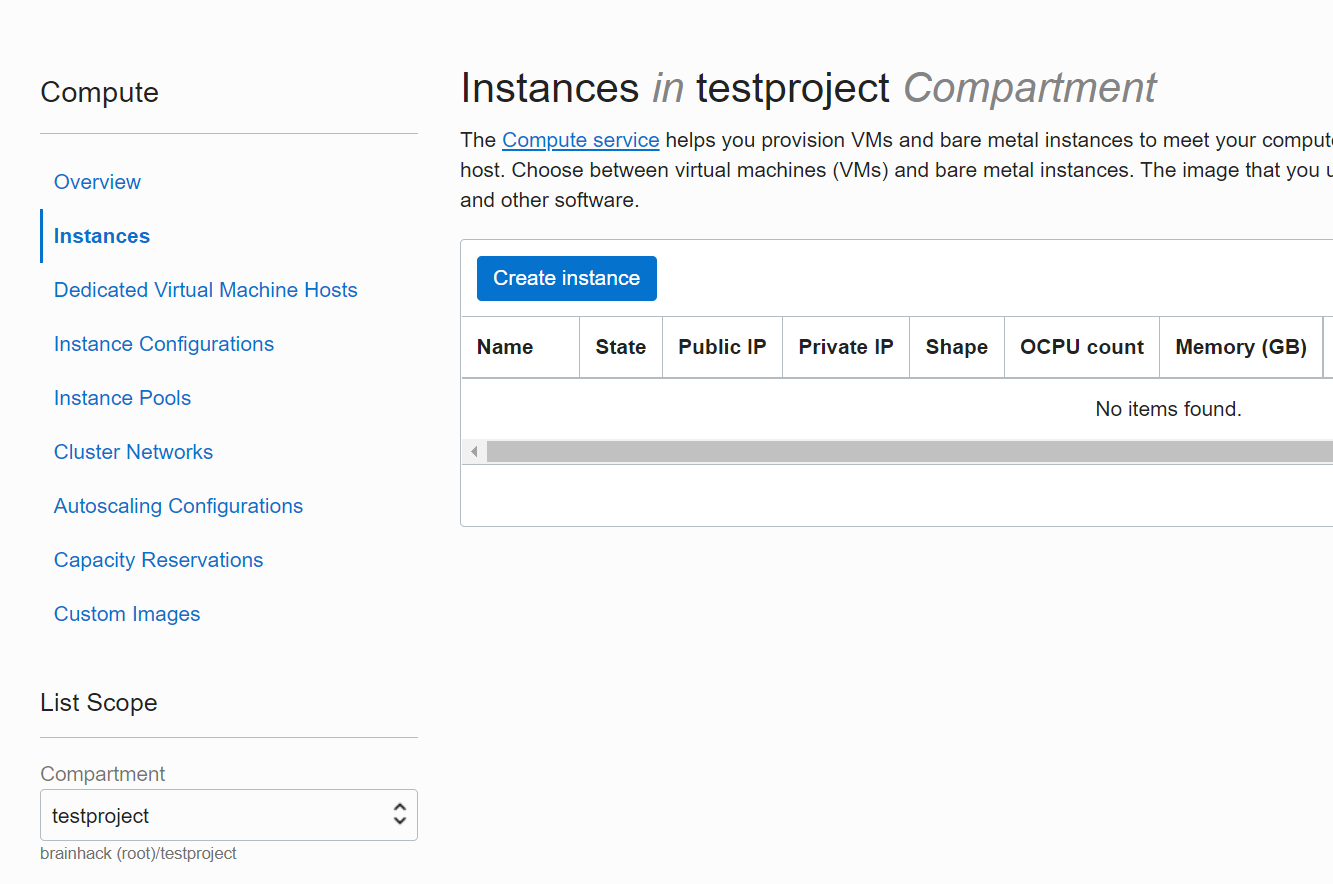
Check that you selected YOUR project compartment (testproject, is the example
here - but you need to change this!) and click Create Instance
Selecting an image and a shape
You can name the instance and then select an Image (Oracle Linux is a good
starting point as it has many tools installed that make it work very well on the
Cloud) and select a Shape.
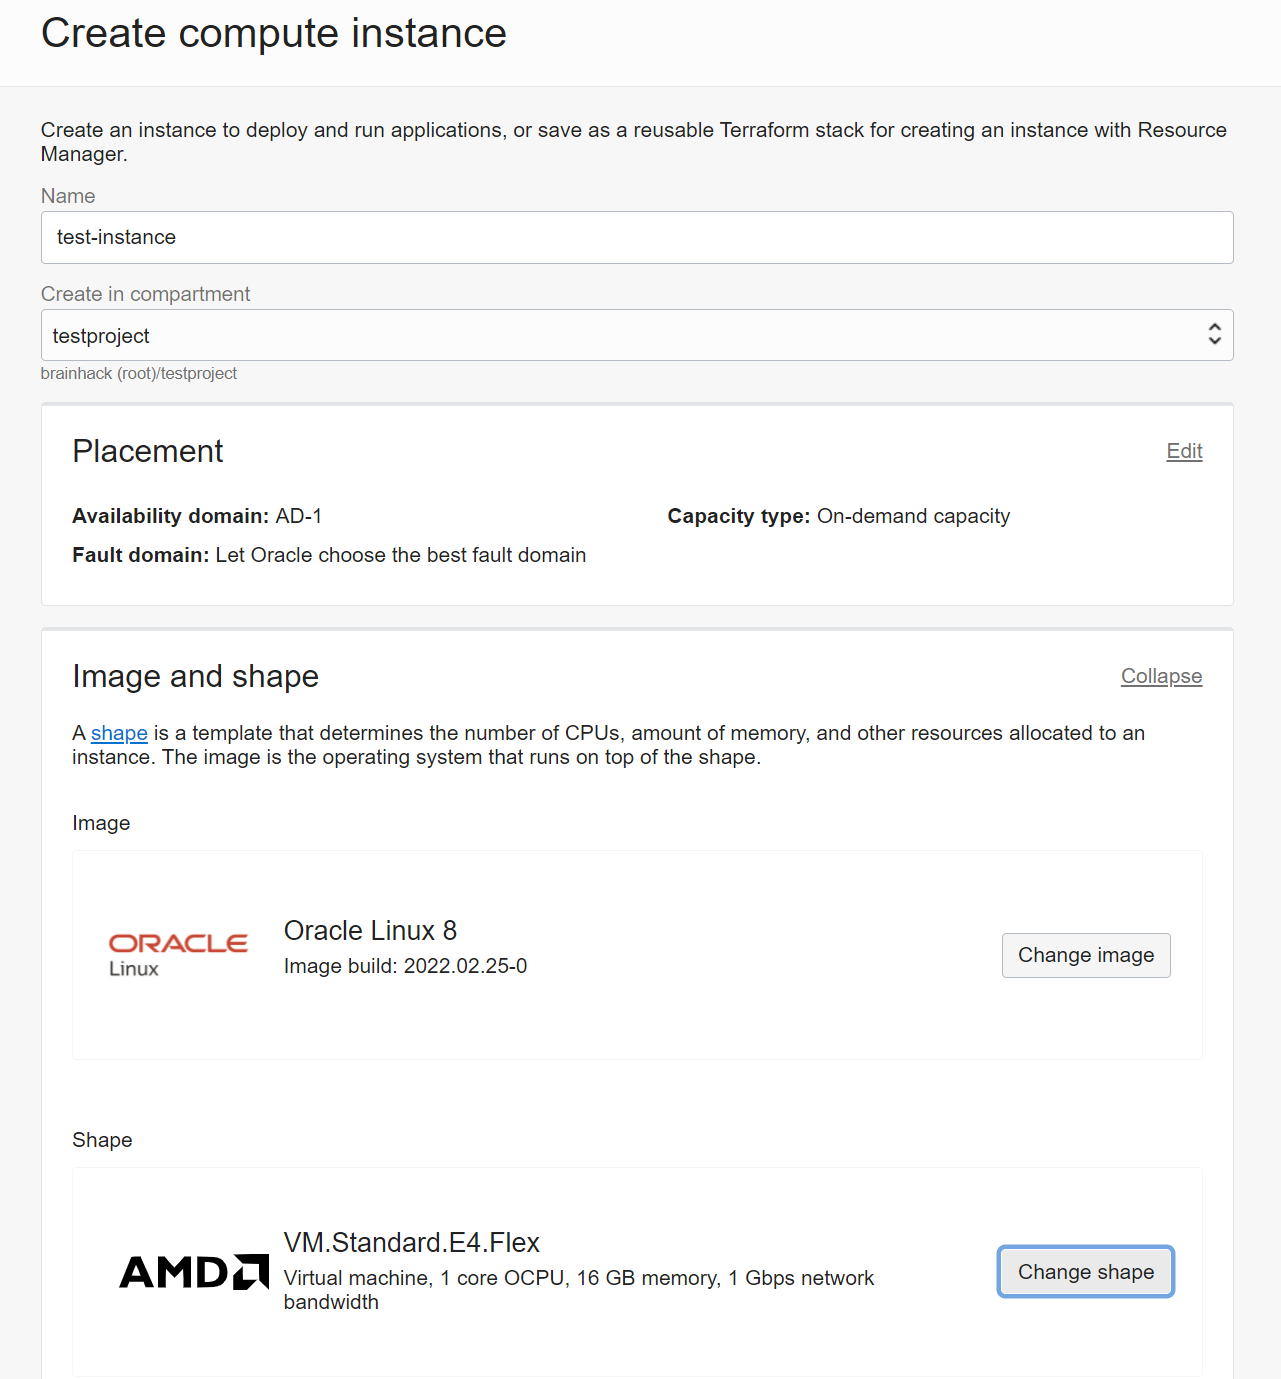
VM.Standard.E4.Flex is a good starting point.
Warning
The default is Ampere and this is an ARM architecture, so most of your applications wouldn’t work out of the box - it is therefore important to change the default Shape to an x86 architecture, like the VM.Standard.E4.Flex.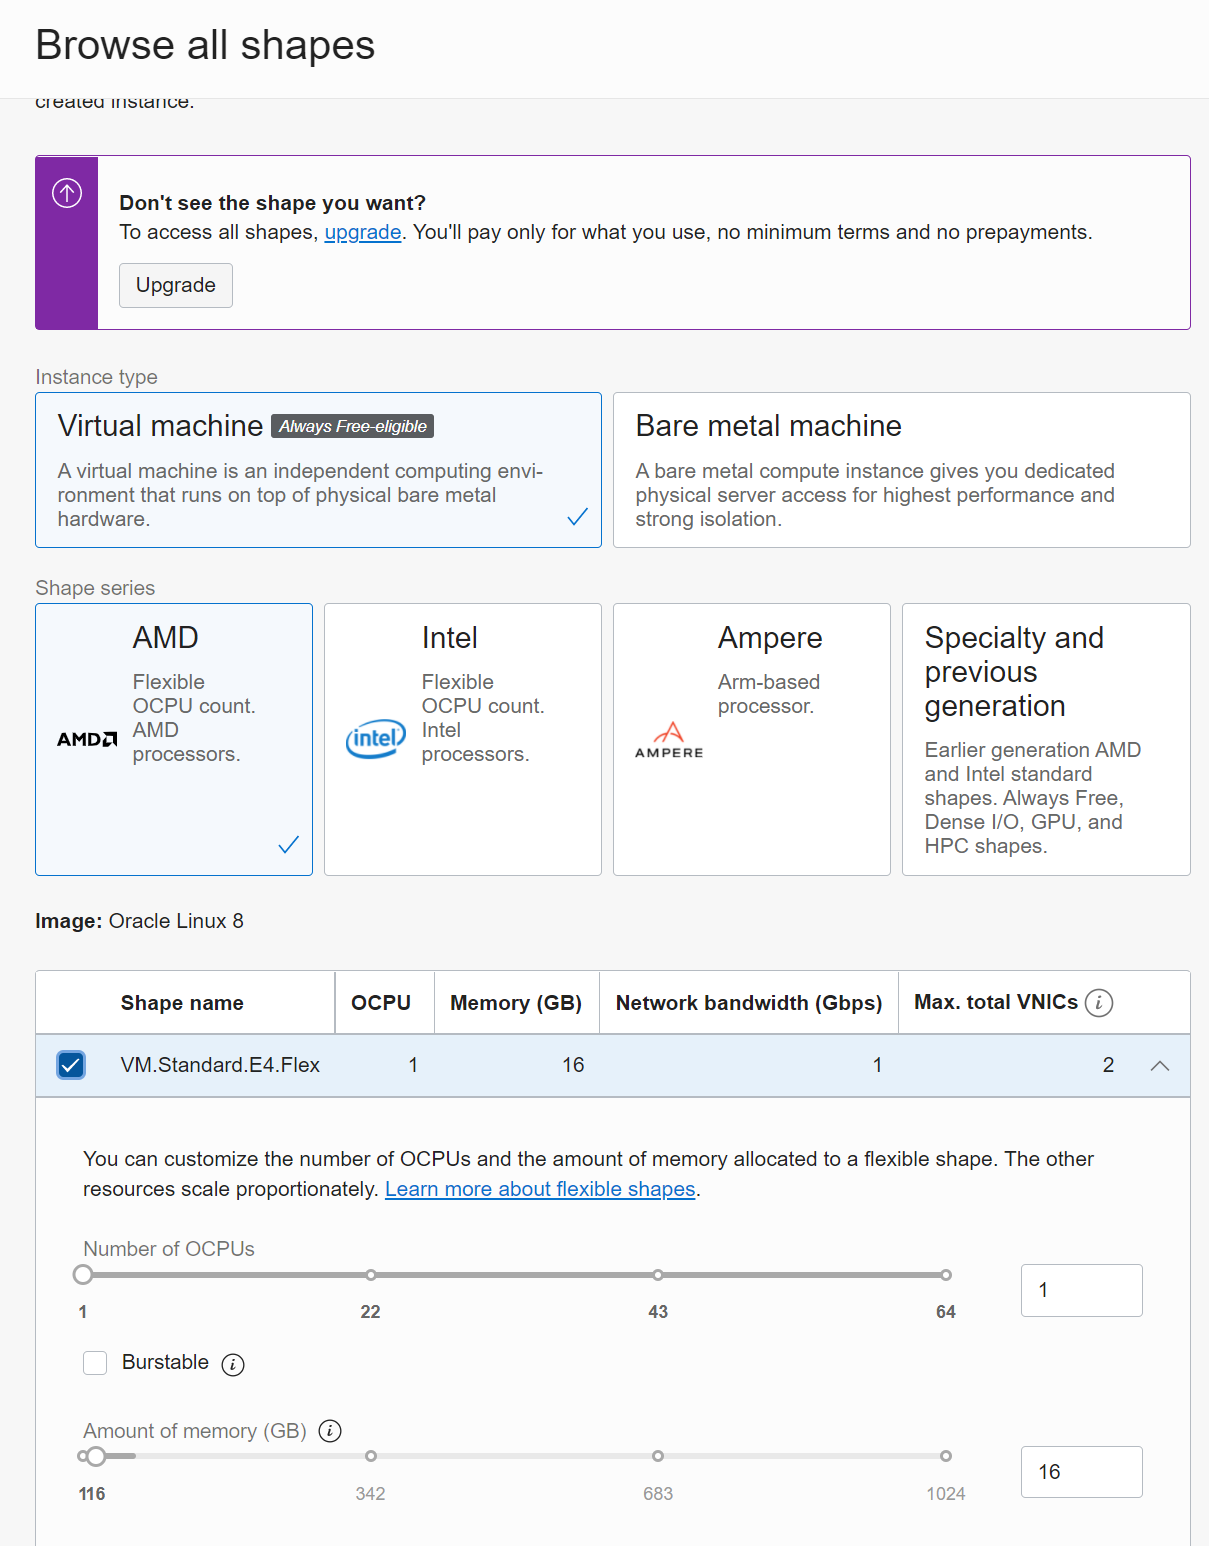
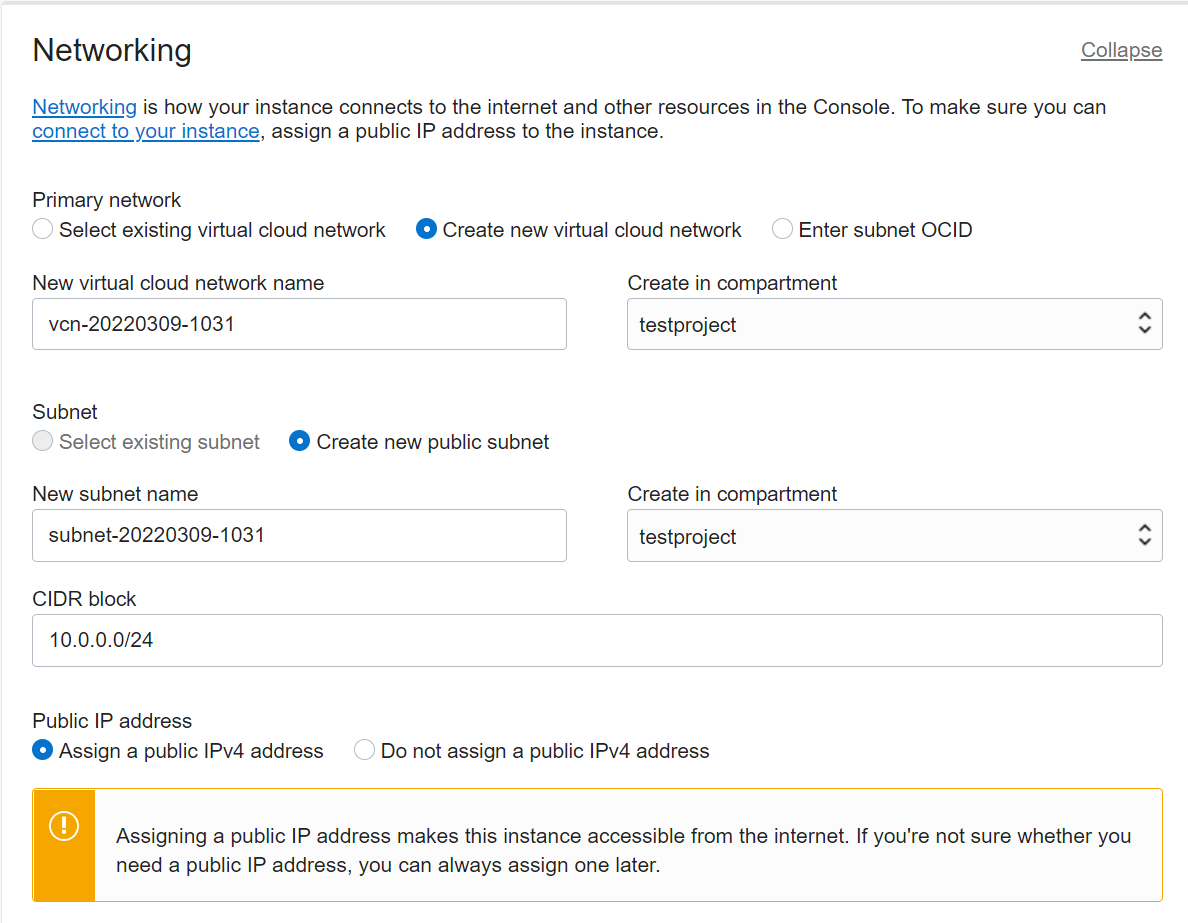
The network setup has sensible defaults to start with
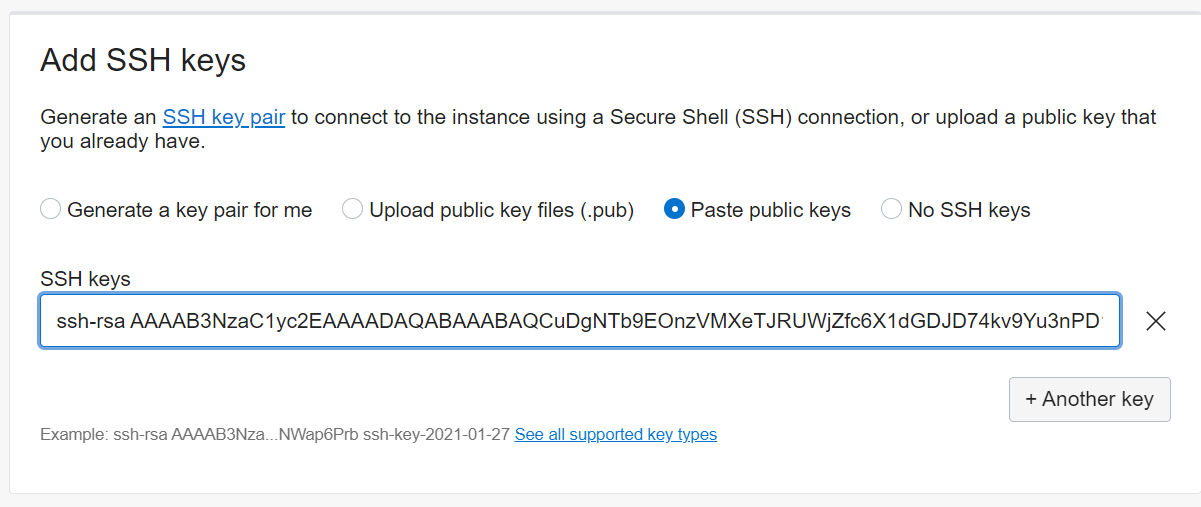
You can either paste a public key you already have to access to this VM or create a key by choosing the option Generate a key pair for me under Add SSH Keys section.
Connect to the VM using the Oracle key pair
If you would like to use the key pairs the instance creation procedure generates, you can use the following steps based on your operating system.
First download and install an SSH client to your machine (for Linux and Mac, use OpenSSH and for Windows use Putty).
From the Instances dashboard, find your VM you would like to connect with ssh, and click to find and note its Public IP address.
If you are using Linux or Mac, run the following command on your local terminal to change the file permission on the private key file that you downloaded from the Oracle dashboard.
Warning
If you chose the option generate a key pair for me you need to change the permission on the file after downloading - otherwise it will result in a Permission denied (publickey,gssapi-keyex,gssapi-with-mic) error triggered by Load key "*.key": bad permissionschmod 600 /path/privateKeyFileName
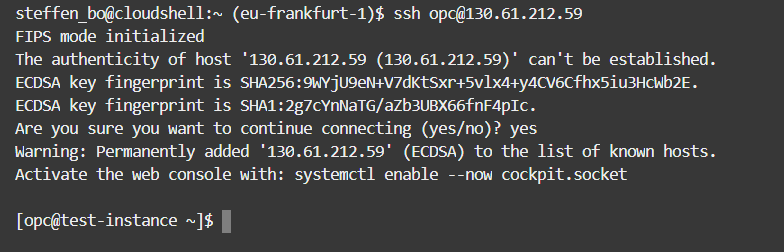
Then Run the below command to access the VM via SSH by pasting the IP address of the VM you created.
ssh opc@IPADDRESS -i /path/privateKeyFileName
If you are using Windows use the PuTTY Key Gen generator to generate a PuTTY Private Key file (.ppk).
Open the PuTTY Keygen Generator.
Load the downloaded private key file to the PuTTY Generator.
Enter a phasephrase if you prefer to secure the private key to the Key passpphrase and Confirm passphrase fields, otherwise leave these as empty.
Then click Save private key to save the private key file it produces.
Go to your local command line (PowerShell) and connect to your VM with the below command
putty -i C:\Path\privateKey.ppk opc@IPADDRESS.
Now you are good to go!
Create your own public key
If you don’t have a public key yet - this is how you can create one (for example in
the cloudshell)
Open the Cloud Shell (this will take a few seconds the first time)

Run ssh-keygen to create private/public key pairs (the defaults are sensible,
so just hit Enter a few times)
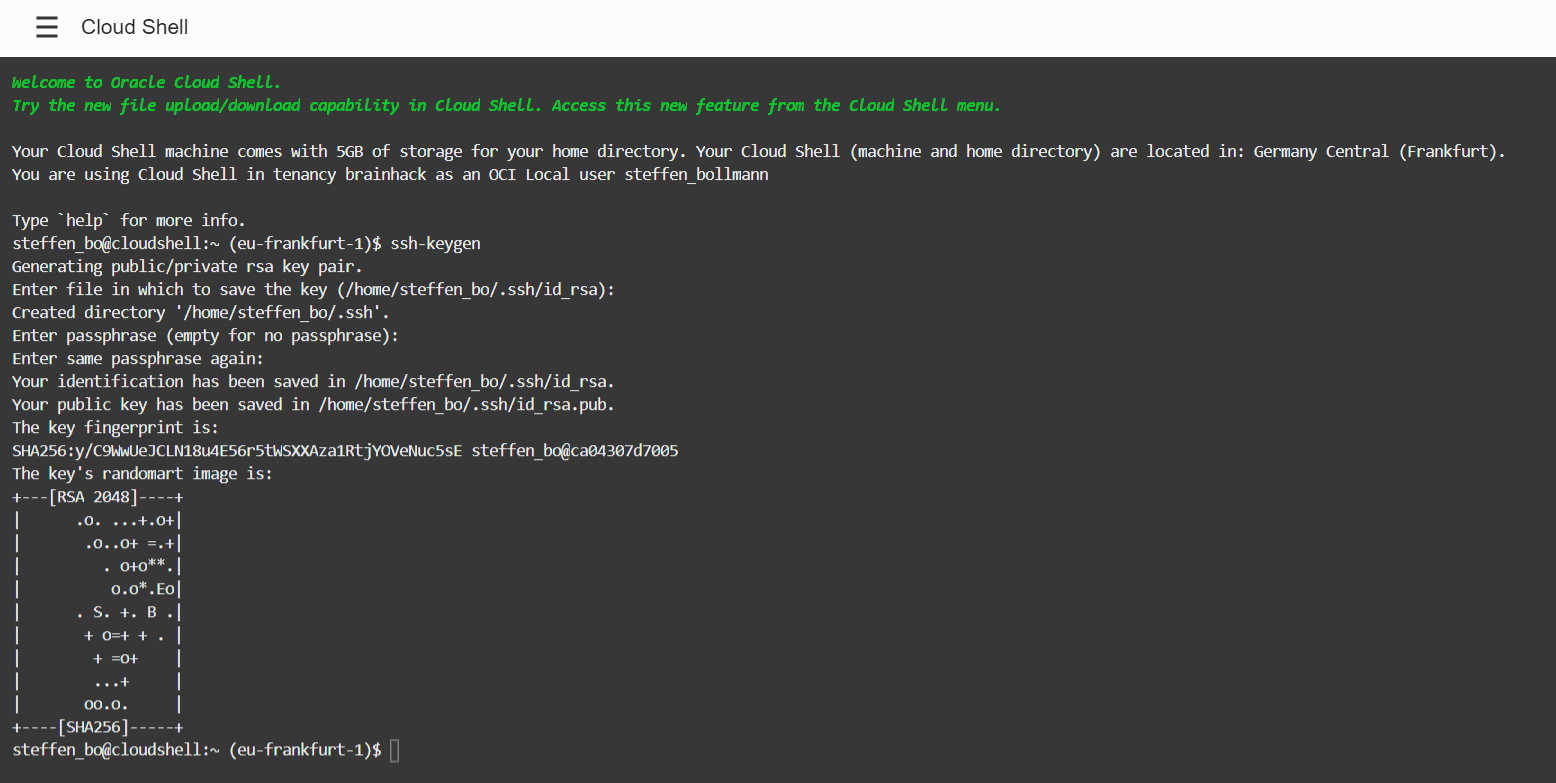
Now print the public key with cat ~/.ssh/id_rsa.pub and copy it to the
clipboard.

Warning
Never share the private key with anyone, which is in id_rsa!Paste it in the Add SSH keys section
Disk size
You can specify a custom boot volume size, but you can also increase this
later (described below).
Note: it’s not possible to shrink a volume! Only increasing the size is
possible, so start small and increase when needed. Increasing the size is even possible while the instance is running and will not interrupt your work :)
The rest of the defaults are
sensible.

Create the VM
This will now create the machine.
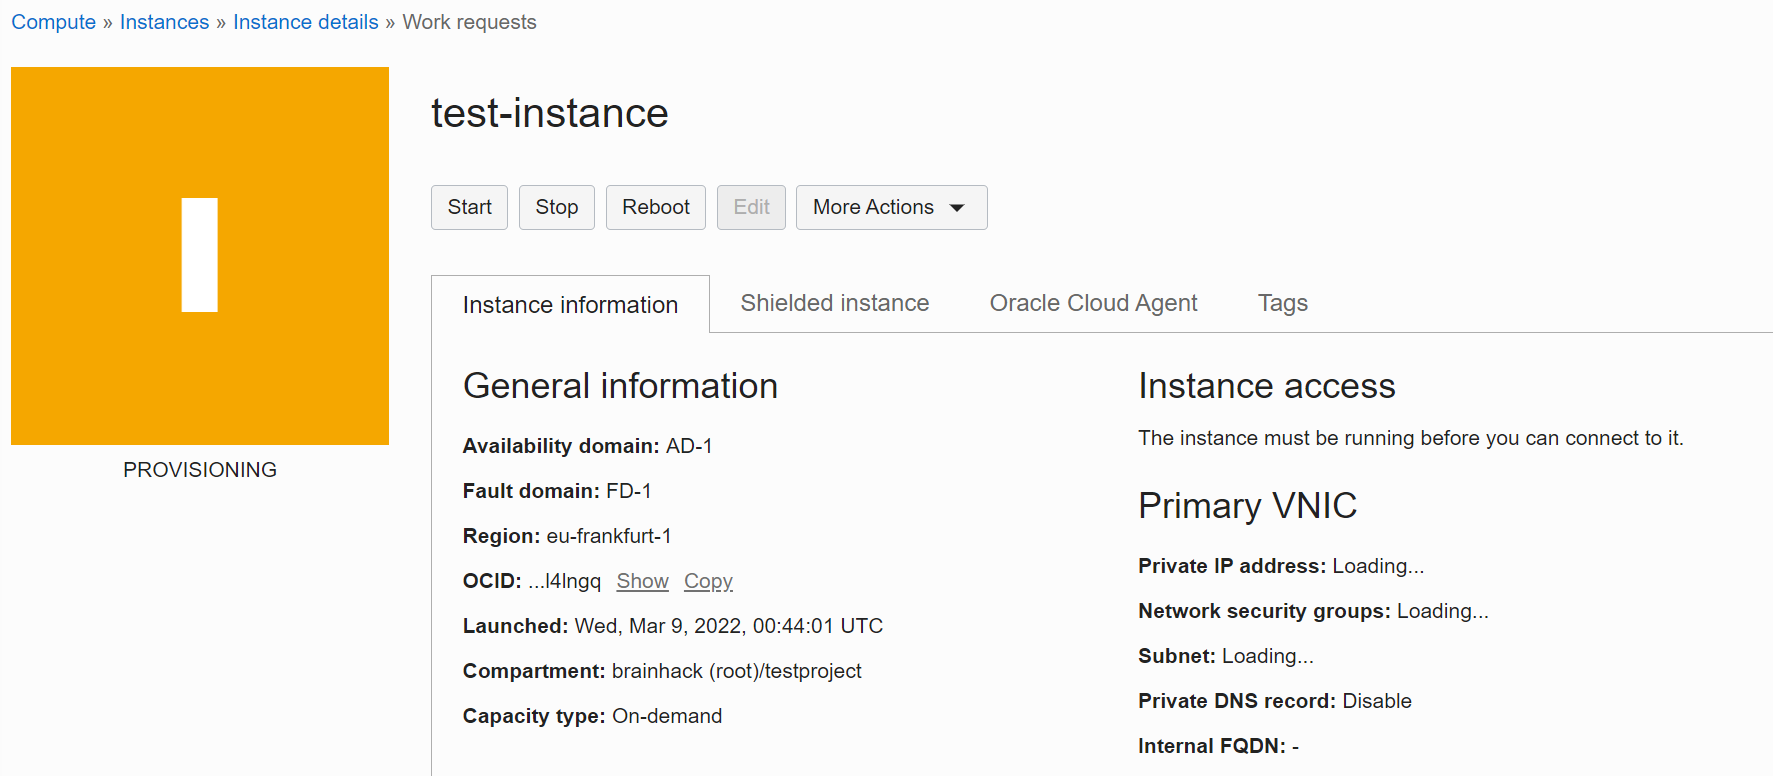
Connect to Instance
You can now use an SSH client on your computer to connect to the Instance, or
the cloudshell.
You find the connection details in.
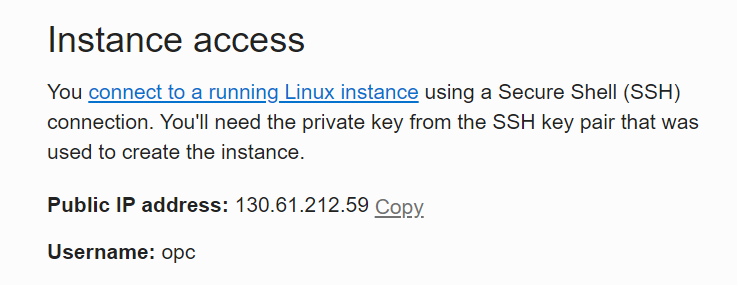
So in this case you would connect to your instance by typing.
If you are planning on running web services on the instance (like a jupyter notebook service) - then it’s easiest to connect to the instance via a port forwarding and then opening the web service in your local browser at localhost:portnumber.
ssh -L portnumber:127.0.0.1:portnumber opc@130.61.212.59
Accept the fingerprint and you should be connected.
Keeping a process running even when disconnecting:
For this you can use tmux:
install tmux with:
then start a tmux session with:
then run whatever process or tool you need
you can disconnect from tmux by hitting CTRL-B and then d. Then you can disconnect from your SSH session (and this also happens when for example your internet connection gets disconnected).
you can reconnect to the tmux session using:
Expand disk
By default, the instance will not utilize the whole disk size!
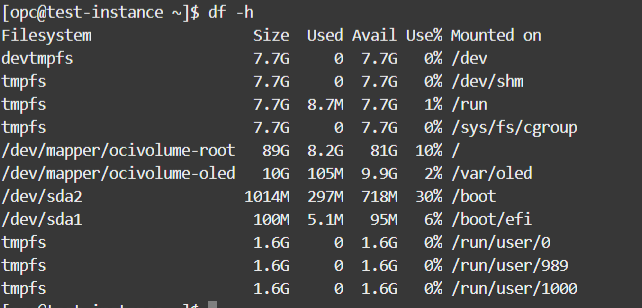
You can check with df -h.

But it can expand the disk with the following commands.
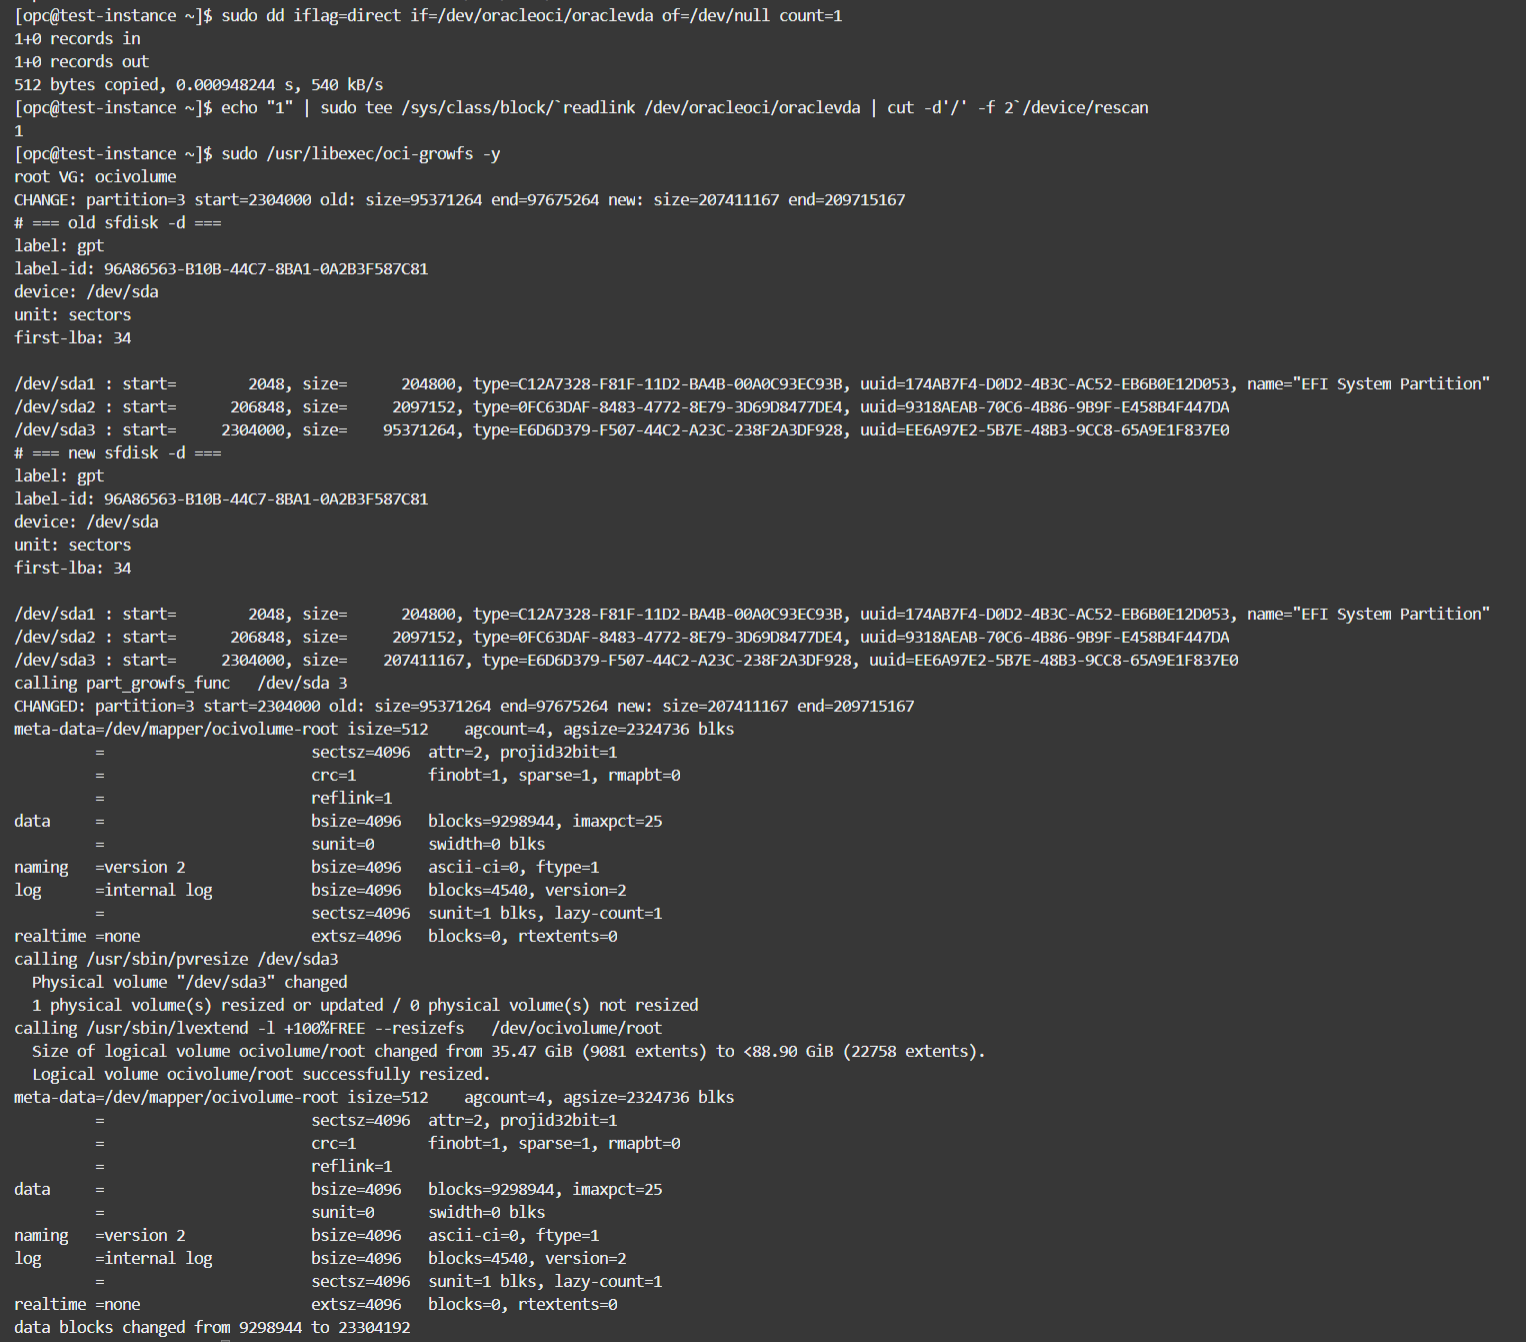
sudo dd iflag=direct if=/dev/oracleoci/oraclevda of=/dev/null count=1
echo "1" | sudo tee /sys/class/block/`readlink /dev/oracleoci/oraclevda | cut -d'/' -f 2`/device/rescan
sudo /usr/libexec/oci-growfs -y
If you are not using an Oracle Linux image, then oci-growfs will not be installed. You can create the script manually by copying this:
#!/bin/bash

# oci-utils
#
# Copyright (c) 2018, 2020 Oracle and/or its affiliates. All rights reserved.
# Licensed under the Universal Permissive License v 1.0 as shown at http://oss.oracle.com/licenses/upl.

ASSUME_YES=0
ASSUME_NO=0

# Print usage message
usage()
{
cat <<EOF
Usage: $0 [OPTION]

Expand the root filesystem to its configured size.

Option:
  -y                           Assume "yes" for all questions.
  -n                           Assume "n" to all questions (used for preview).
  -h                           Print this message.

EOF

}

# Prompt for action confirmation
confirm()
{
    [ ${ASSUME_YES} -eq 1 ] && return 0
    [ ${ASSUME_NO} -eq 1 ] && return 1

    while true
    do
        # force use of a tty, if we are inside a 'read loop' already the prompt is never display and we loop forever
        read -p "Confirm? [y/n]" input < /dev/tty
        case ${input} in
            [yY][eE][sS]|[yY])
                return 0;;
            [nN][oO]|[nN])
                return 1;;
        esac
    done
}

part_growfs_preview(){
    if [ $# -ne 2 ]; then
        echo "Invalid disk or partition."
        exit 1
    fi

    growpart $1 $2 --dry-run
    return $?
}

part_growfs_func(){
    if [ $# -ne 2 ]; then
        echo "Invalid disk or partition."
        exit 1
    fi

    growpart $1 $2
    if [ $? -eq 0 ]
    then
        xfs_growfs /
    fi
    return $?
}

if [ "$EUID" -ne 0 ]; then
    echo "This script needs root privileges to execute."
    exit 1
fi

while [ "$#" -gt 0 ]; do
    case "$1" in
    -n|-N)
        ASSUME_NO=1
        break
        ;;
    -y|-Y)
        ASSUME_YES=1
        break
        ;;
    -h)
        usage
        exit 0
        ;;
    -* | *)
        echo "unknown option: $1" >&2;
        usage;
        exit 1
        ;;
    esac
done


# first get storage type used for root FS
_storage=`/usr/bin/findmnt --canonicalize --noheadings --output SOURCE /`
# expecting lvm or part,
/usr/bin/lsblk --noheadings -o TYPE,NAME $_storage | while read _type _sto
do
    case "${_type}" in
        part)
            part_growfs_preview /dev/${_sto//[0-9]/} ${_sto//[^0-9]/} || exit 1
            confirm
            if [ $? -eq 0 ]
            then
                part_growfs_func /dev/${_sto//[0-9]/} ${_sto//[^0-9]/}
                exit $?
            else
                exit 0
            fi
            ;;
        lvm)
            # 1. find LV and VG of the device
            #     we pipe to  awk  to strip away any leading space
            _root_vg=`/usr/sbin/lvs --noheadings --options vg_name --select lv_dm_path=$_storage | awk '{print $1}'`
            echo "root VG: ${_root_vg}"
            [ "${_root_vg}" == "" ] && echo "Cannot find root volume group." && exit 1

            # 2. find all PVs involve in the VG used for root
            for _pv in `/usr/sbin/pvs --noheadings --options pv_name --select vg_name=${_root_vg}`
            do
                # 3. find device of PVs
                _device=`/usr/sbin/pvs --noheadings --options devices --select pv_name=${_pv}`
                # device is suffixed with extne number like /dev/sda3(0) , just keep disk information parts
                _device=${_device//([0-9]*)/}
                # 3.1 extend the partittion
                part_growfs_preview ${_device//[0-9]/} ${_device//[^0-9]/} || exit 1
                confirm
                if [ $? -eq 0 ]
                then
                    echo "calling part_growfs_func ${_device//[0-9]/} ${_device//[^0-9]/}"
                    part_growfs_func ${_device//[0-9]/} ${_device//[^0-9]/}
                    [ $? != 0 ] && echo "Cannot extend physical volume disk partition." && exit 1
                else
                    exit 0
                fi
                # 3.1 extend the PV
                echo "calling /usr/sbin/pvresize ${_pv}"
                /usr/sbin/pvresize ${_pv}
                [ $? != 0 ] && echo "Cannot extend physical volume." && exit 1
            done
            # 4. extend the LV and the FS
            _lv_path=`/usr/sbin/lvs --noheadings --options lv_path --select lv_dm_path=$_storage`
            echo "calling /usr/sbin/lvextend -l +100%FREE --resizefs ${_lv_path}"
            /usr/sbin/lvextend -l +100%FREE --resizefs ${_lv_path}
            exit $?
    esac
done

exit $?
into /usr/libexec/oci-growfs by doing this:
sudo vi /usr/libexec/oci-growfs
# hit i to activate insert mode, then paste, then hit SHIFT-Z-Z to exit and save
sudo chmod a+x /usr/libexec/oci-growfs
then execute the expansion command:
sudo dd iflag=direct if=/dev/oracleoci/oraclevda of=/dev/null count=1
echo "1" | sudo tee /sys/class/block/`readlink /dev/oracleoci/oraclevda | cut -d'/' -f 2`/device/rescan
sudo /usr/libexec/oci-growfs -y
Now it’s using the full volume.
Increase disk size
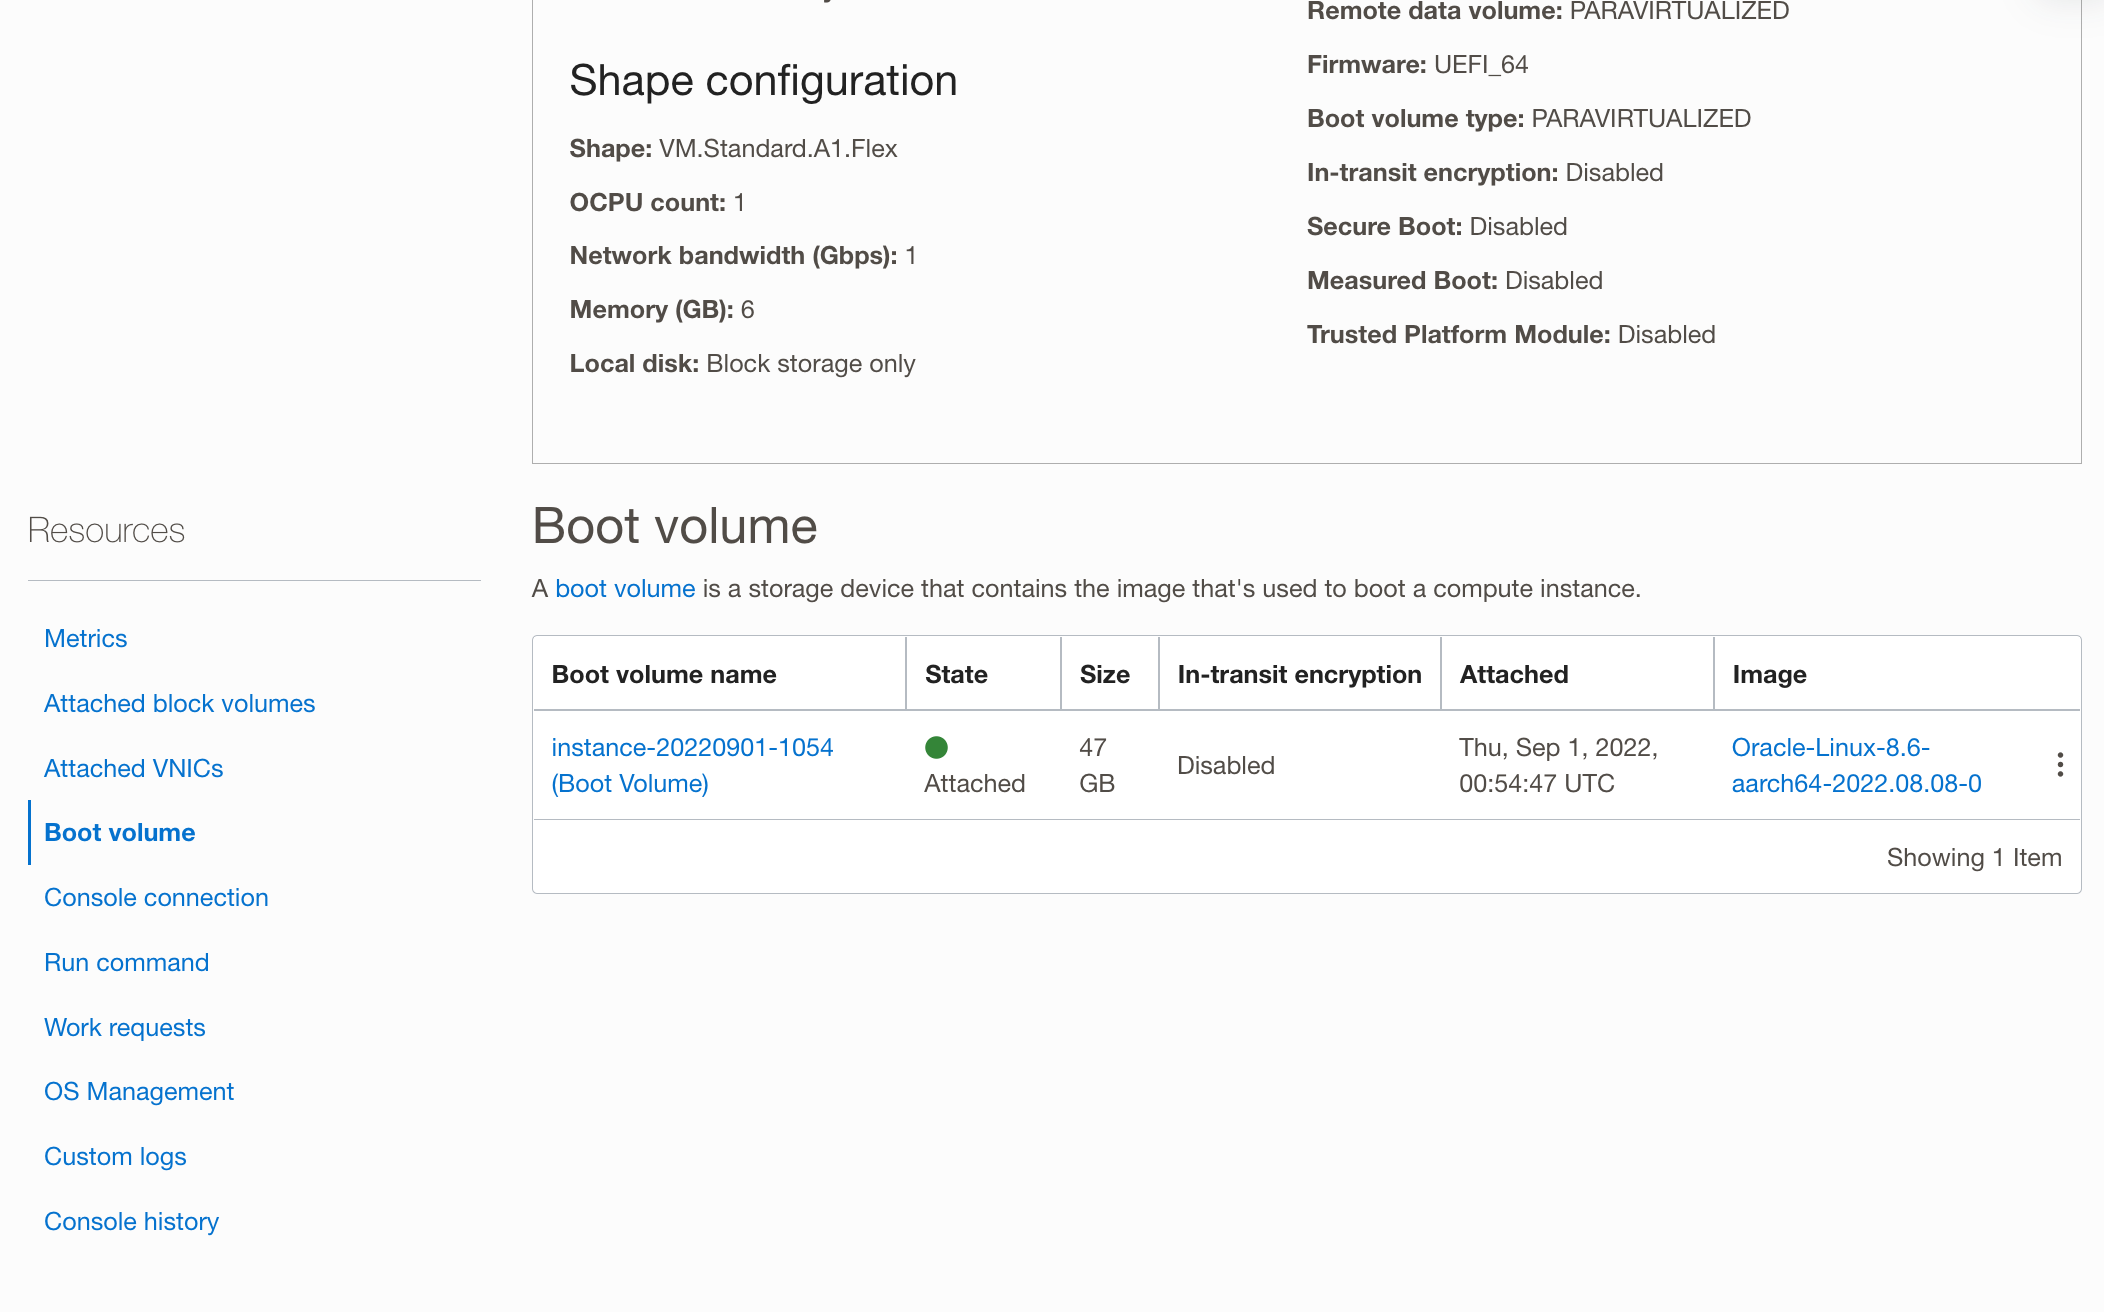
If you want to increase the disk space beyond the size that you initially set you need to first change the disk size in OCI. You can do this while the instance is running! Go to the instance and select Boot volume from the menu on the left:
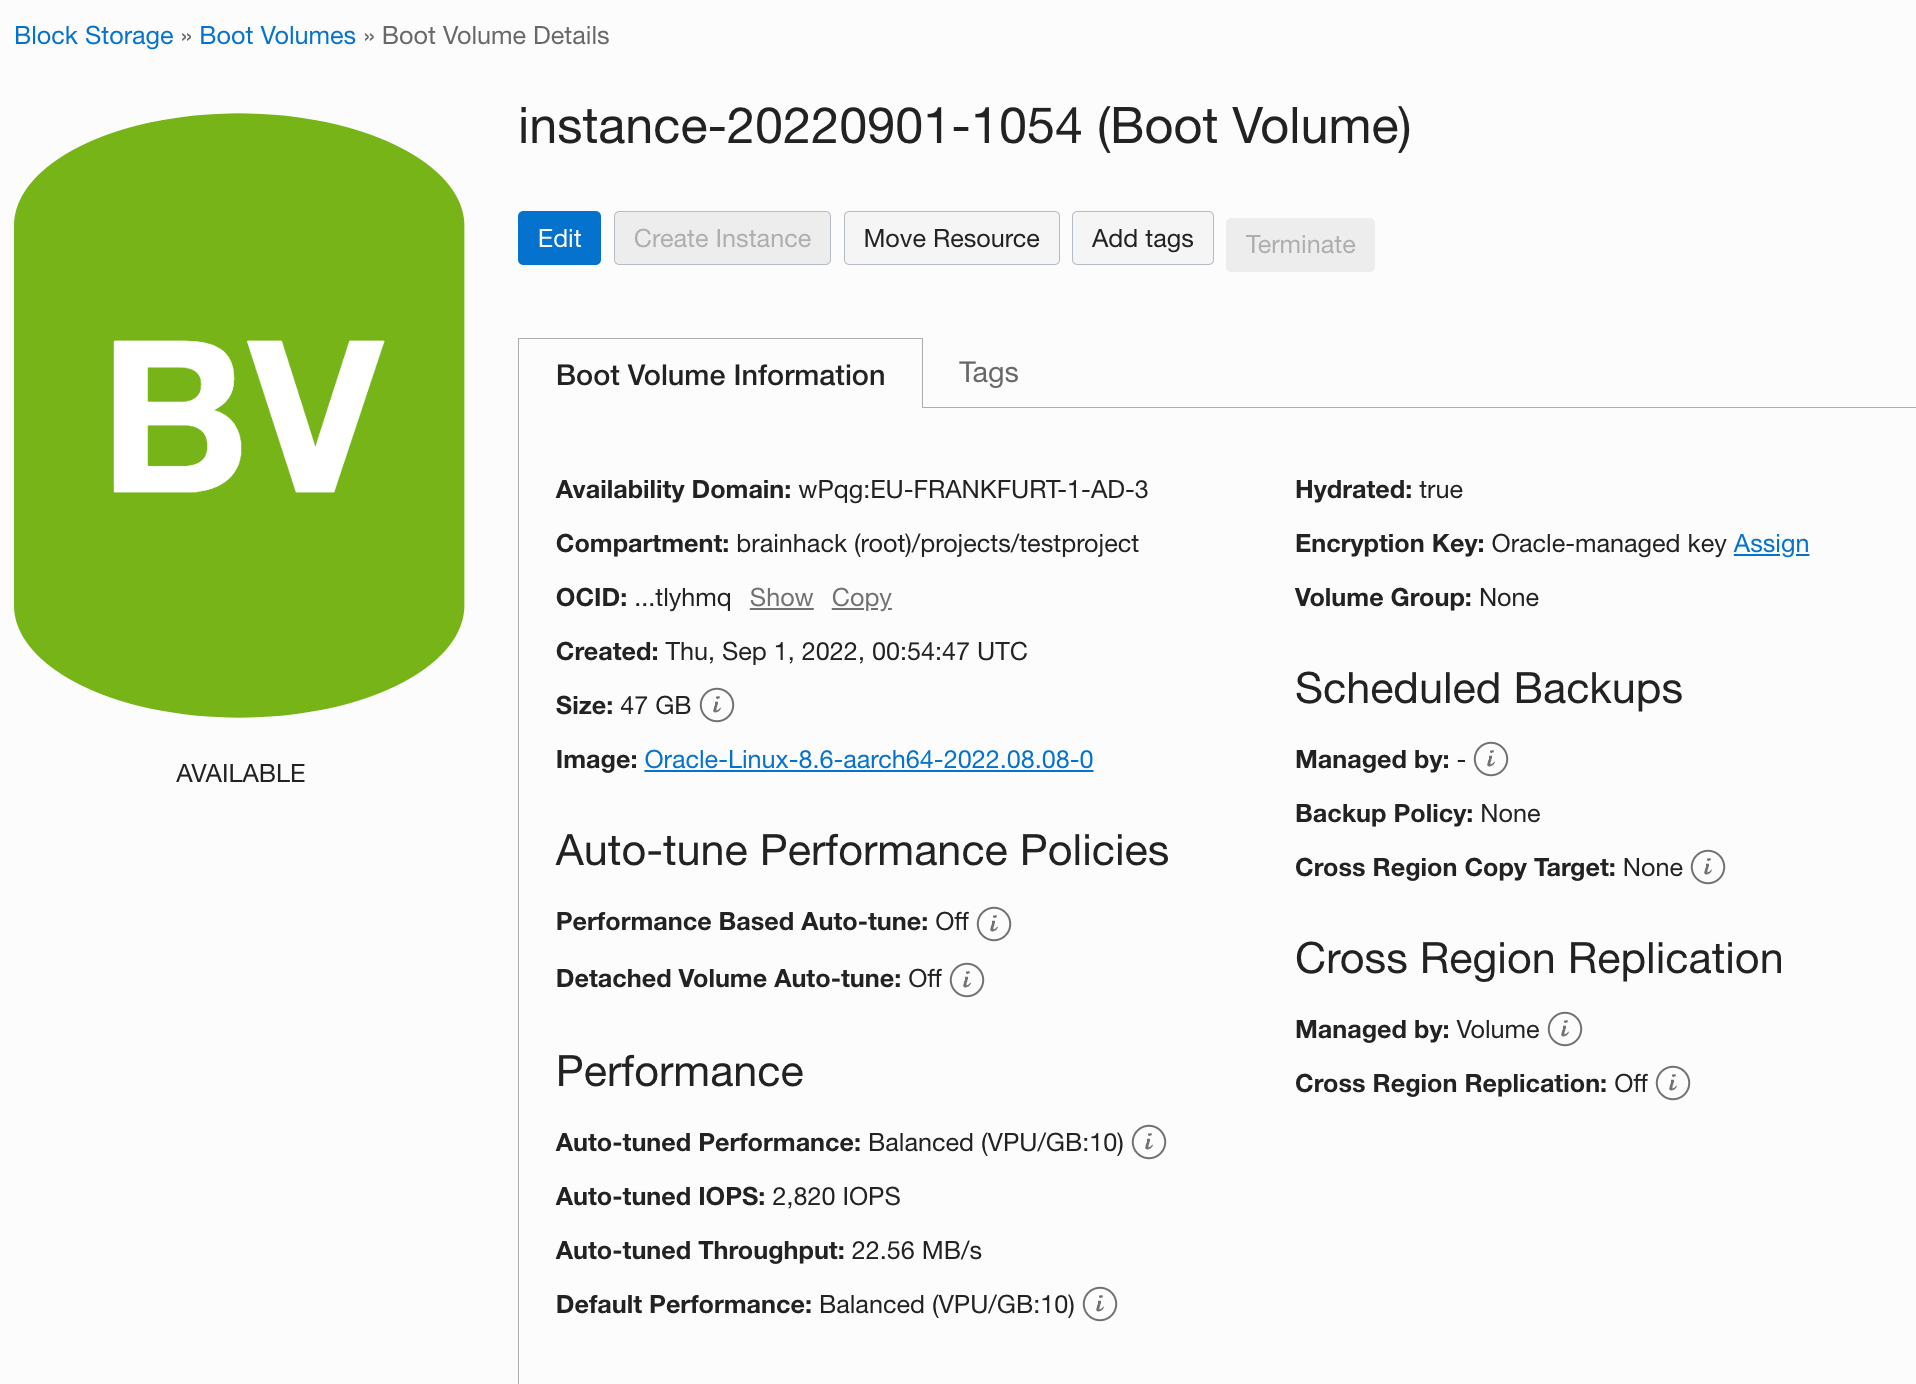
Then click on the boot volume name and click the Edit button:
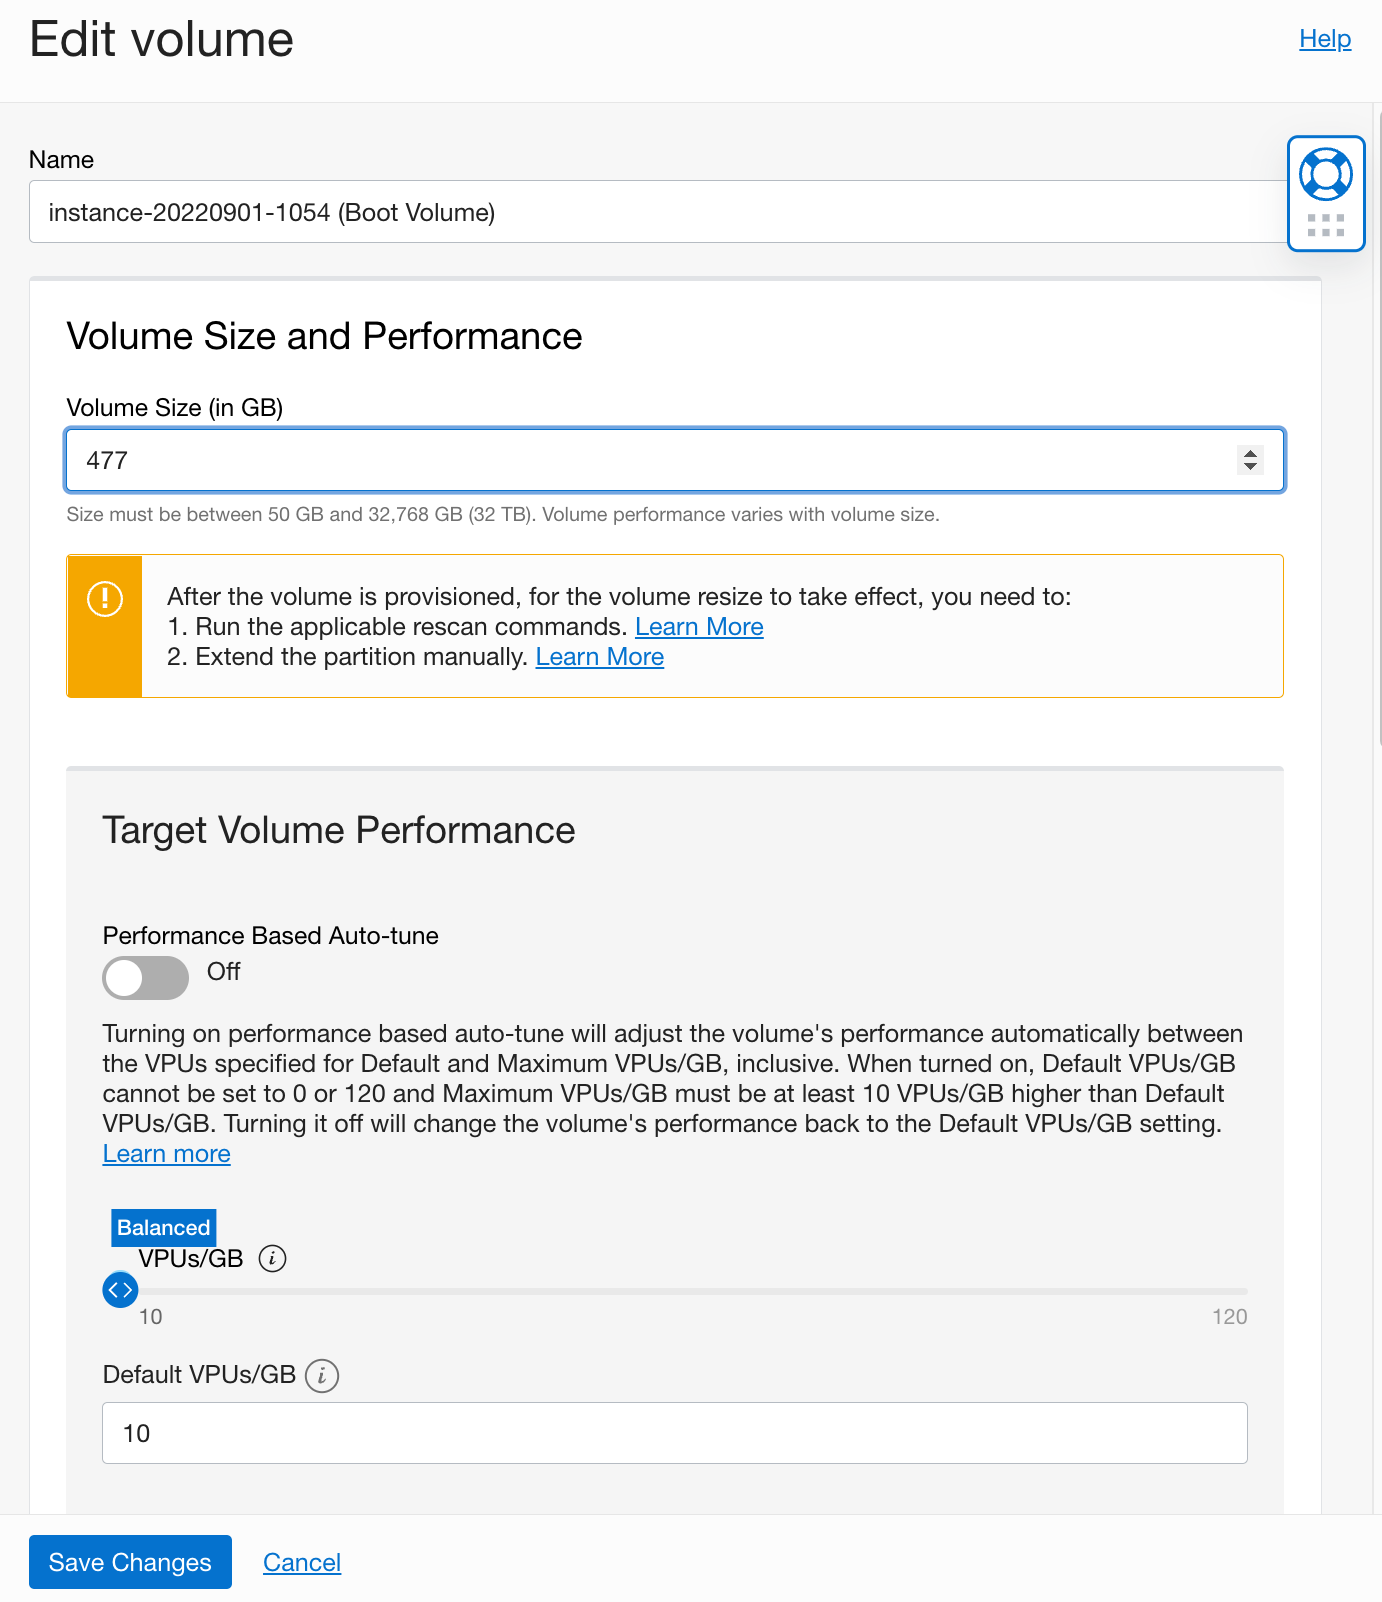
Now set the desired size and click Save Changes:
Then login to the instance and expand the disk again to the new size:
sudo dd iflag=direct if=/dev/oracleoci/oraclevda of=/dev/null count=1
echo "1" | sudo tee /sys/class/block/`readlink /dev/oracleoci/oraclevda | cut -d'/' -f 2`/device/rescan
sudo /usr/libexec/oci-growfs -y
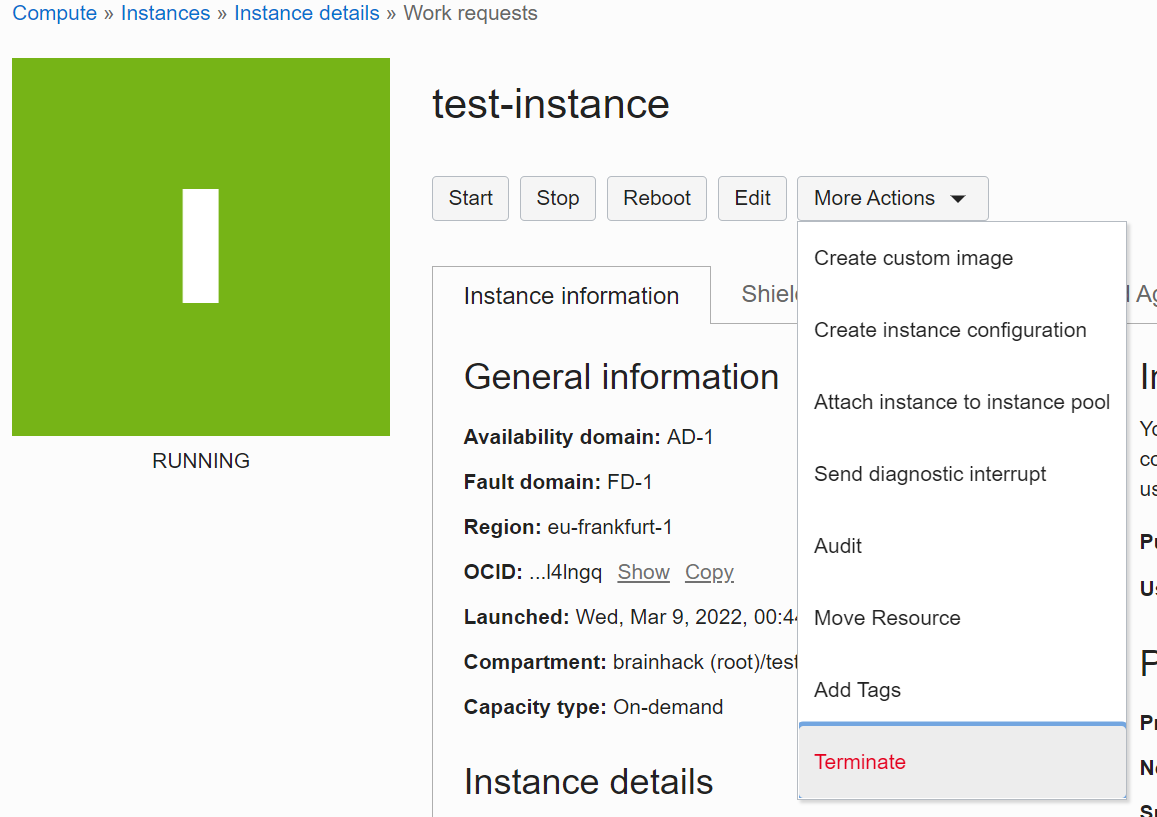
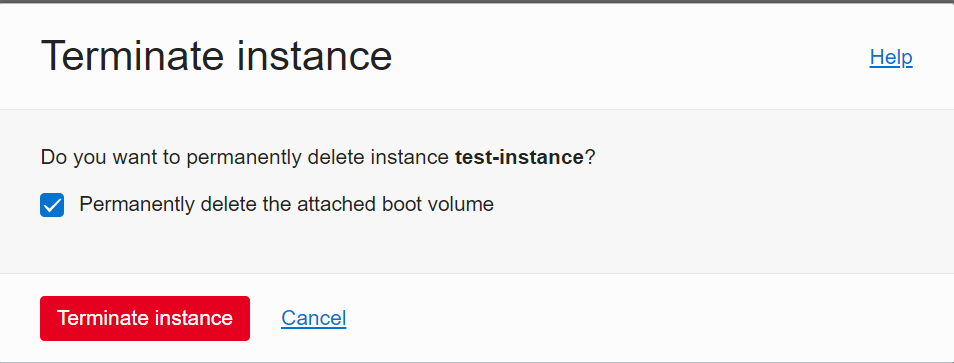
Terminate the instance
If you don’t need the machine anymore, you can Stop it (you don’t pay for the compute anymore, but the disk stays and you can start it back up later) or Terminate it (everything gets removed, including the boot volume if you want to):
To cleanup the storage as well, you can select
Permanently delete the attached boot volume and click Terminate Instance.
If you aim to update the version of the Python that comes as default with VM or install environment you could install Miniconda by following below commands:
curl -o /tmp/miniconda.sh https://repo.anaconda.com/miniconda/Miniconda3-latest-Linux-x86_64.sh;
bash /tmp/miniconda.sh -b;
miniconda3/bin/conda init
this installation will give you all the necessary packages to start with building your own environment and project.
2 - Notebooks
Notebook service
Overview
The notebook service is like Google Colab, but without the time or resource
limitations.
Starting a notebook environment
Select the geographic region where you want to run this (e.g. closest to you).
!!! Important: If you want to use GPUs you need to select a region that has GPUs availabe!!!!
- Nvidia GPUs V100 are available in Tokyo, London, (Seoul)
- Nvidia GPUs P100 are available in Frankfurt
- Nvidia GPUs V100 AND P100 are available in Ashburn
- CPU only instances are availabe in Sydney, Zurich, Stockholm, Singapore, Hyderabat, Marseille, Santiago, Toronto, Sao Paulo
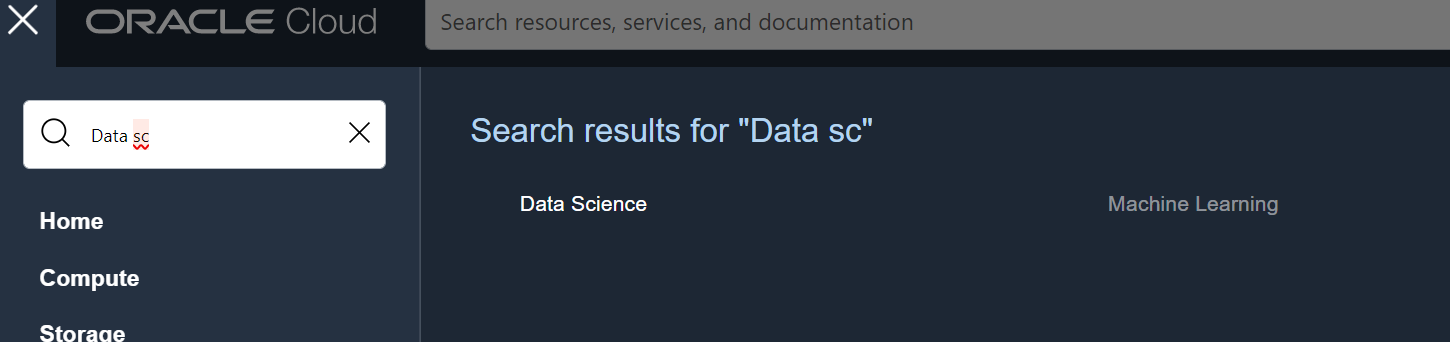
Then search for Data Science under Machine Learning
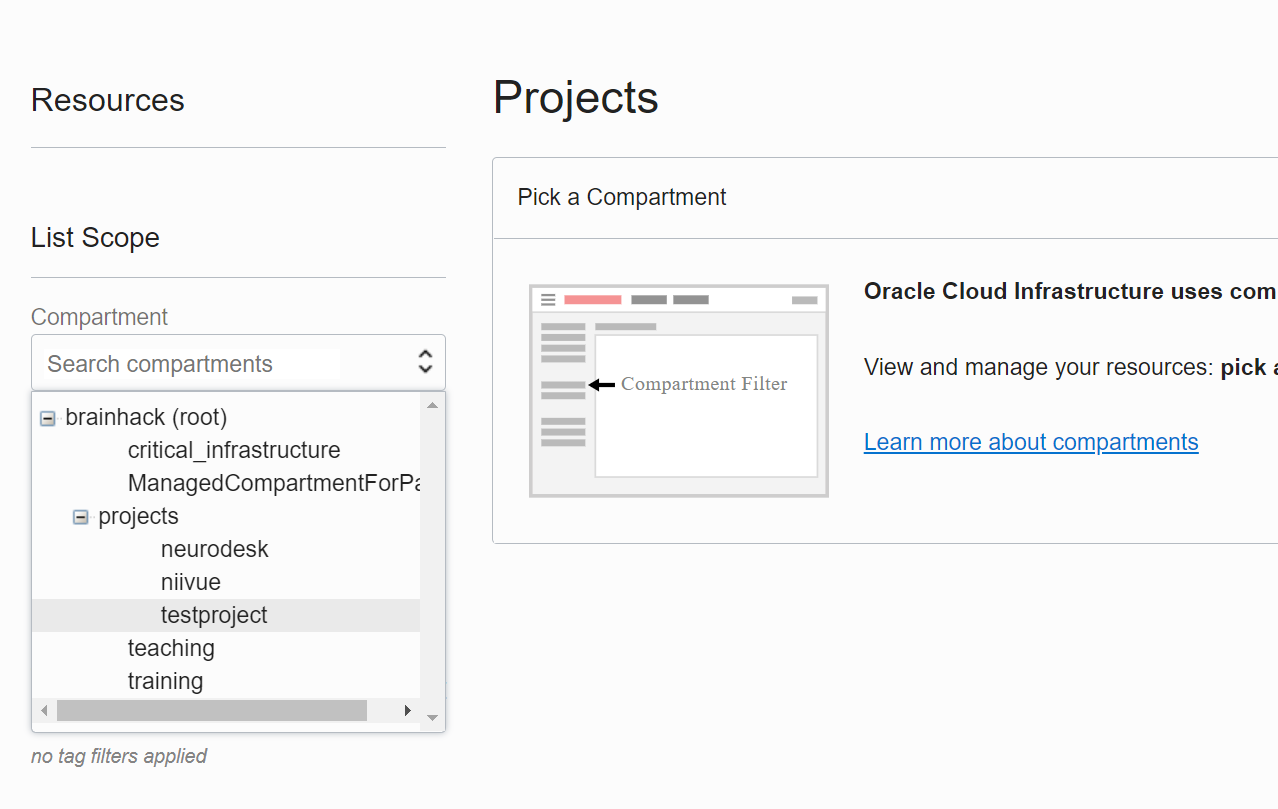
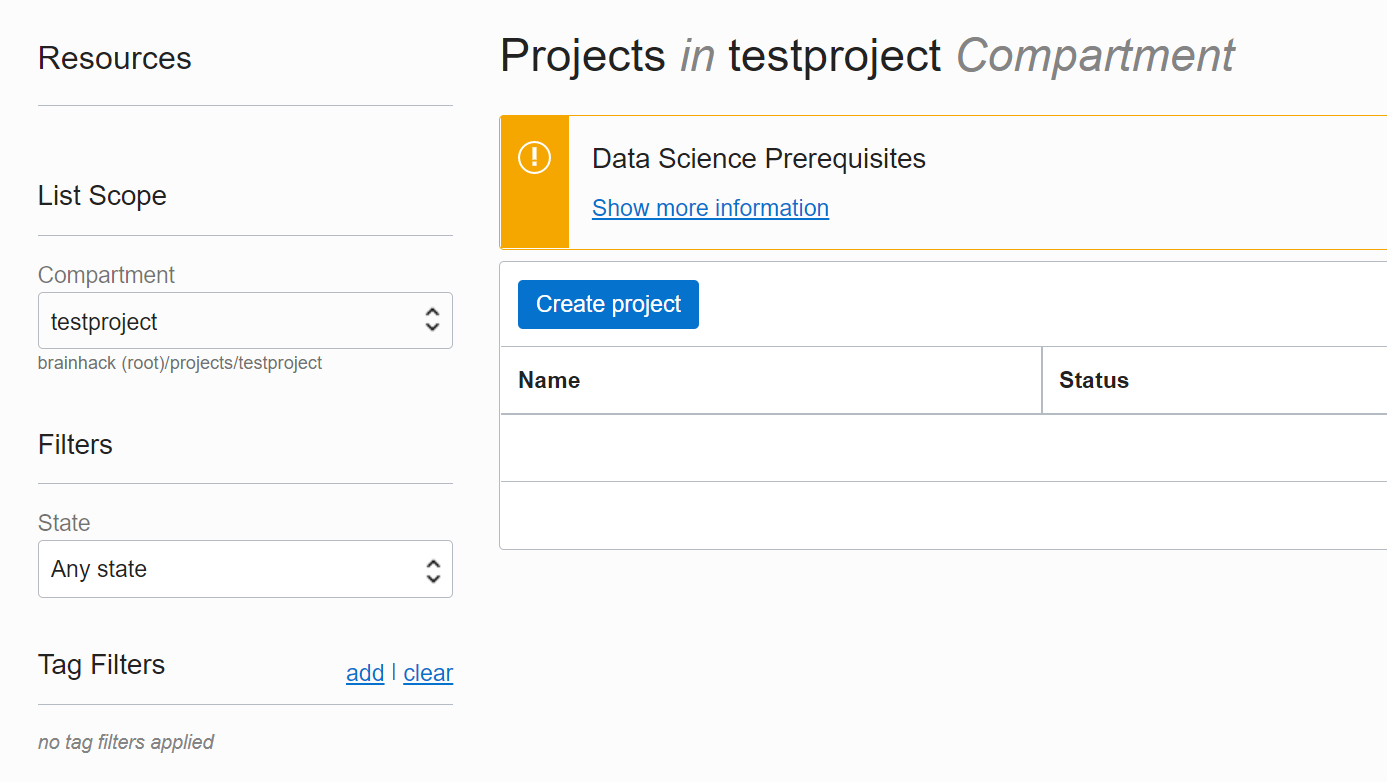
then select your project compartment (in this example testproject)
then click on create project:
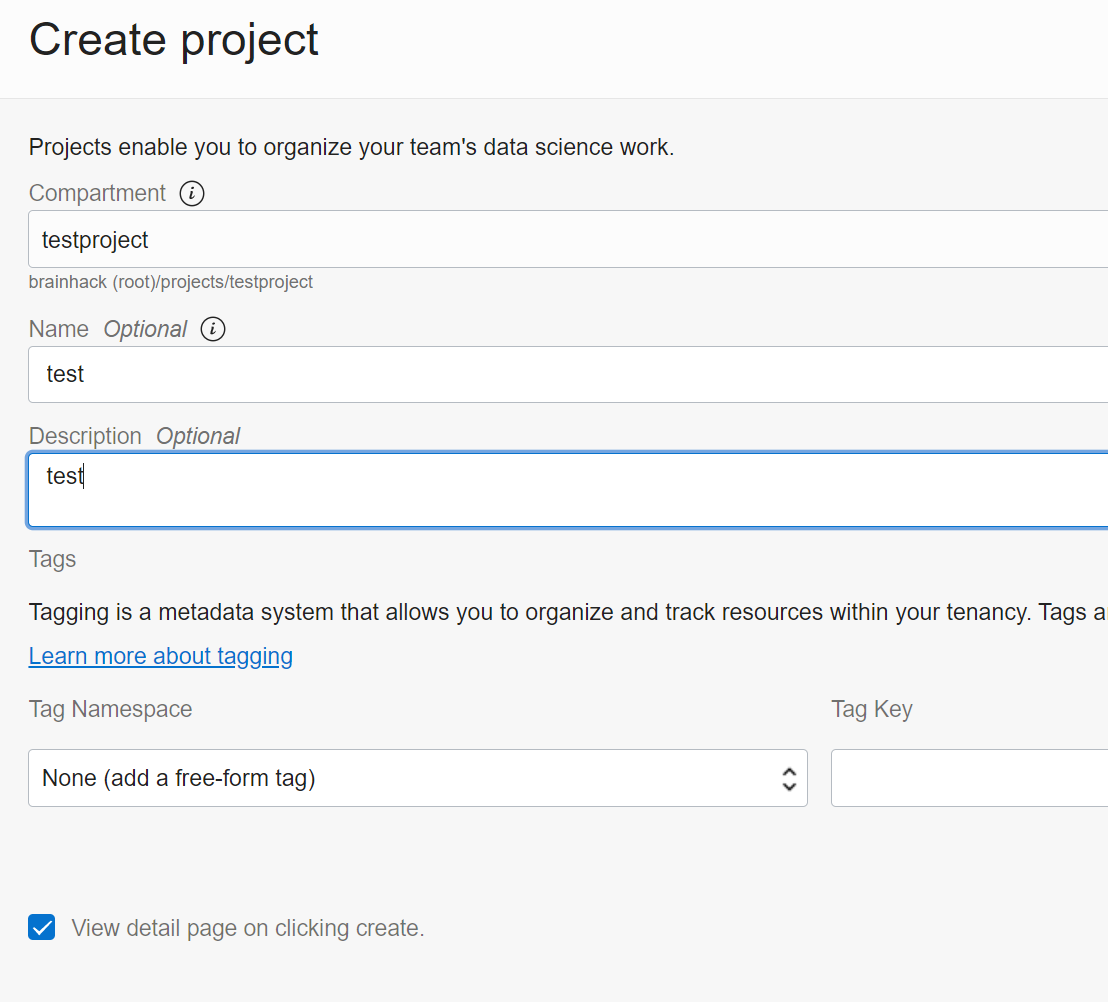
enter a Name and a Description
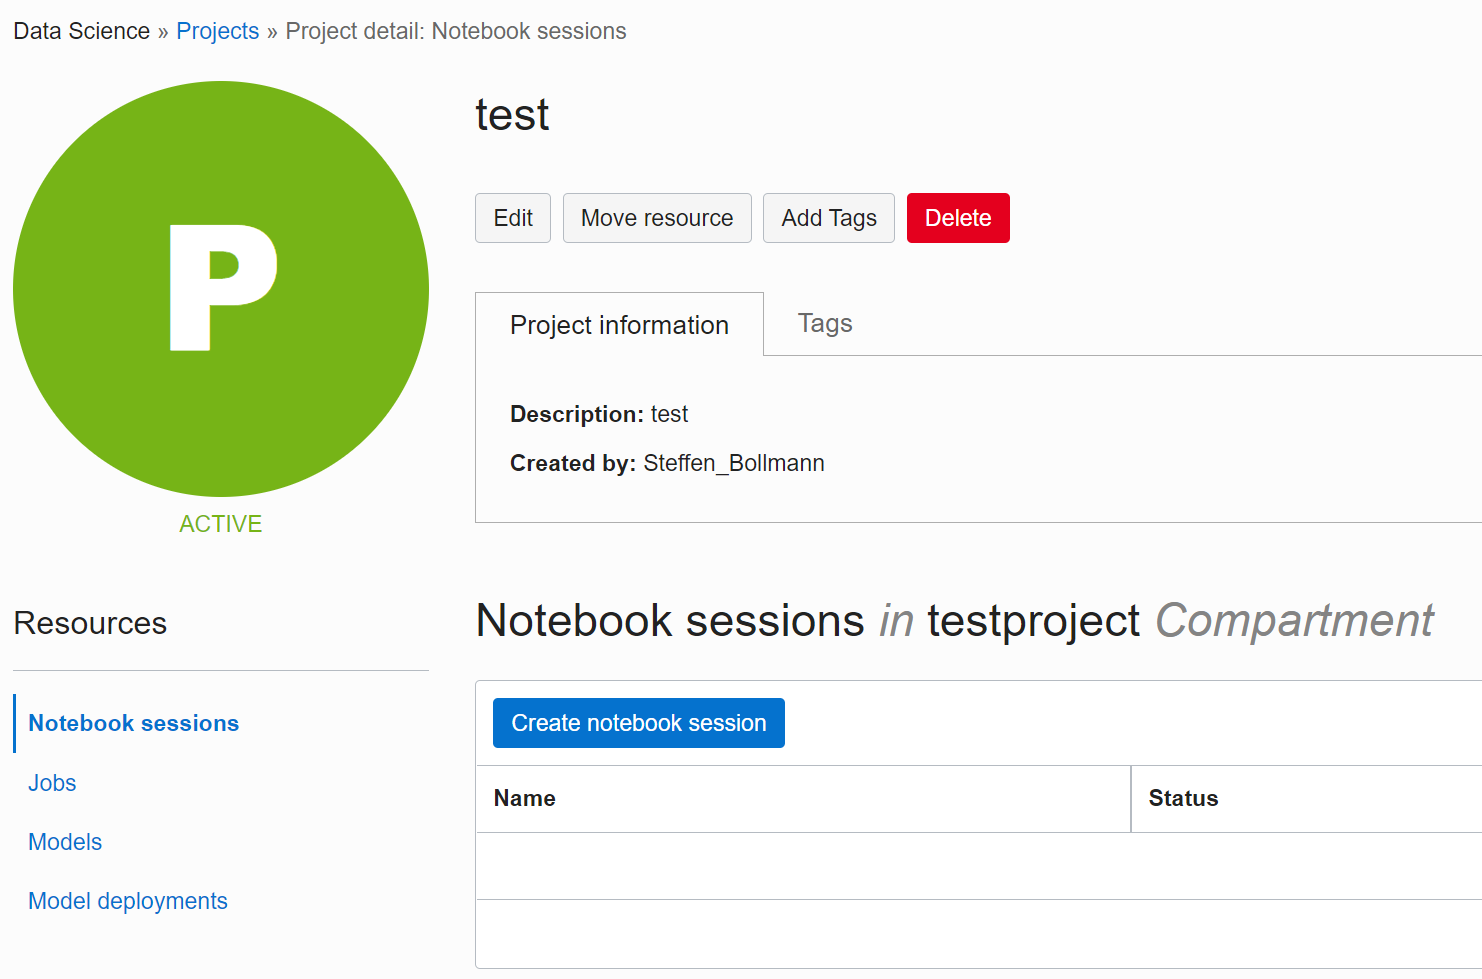
then click Create notebook session
Name the notebook session and select which resources you need:
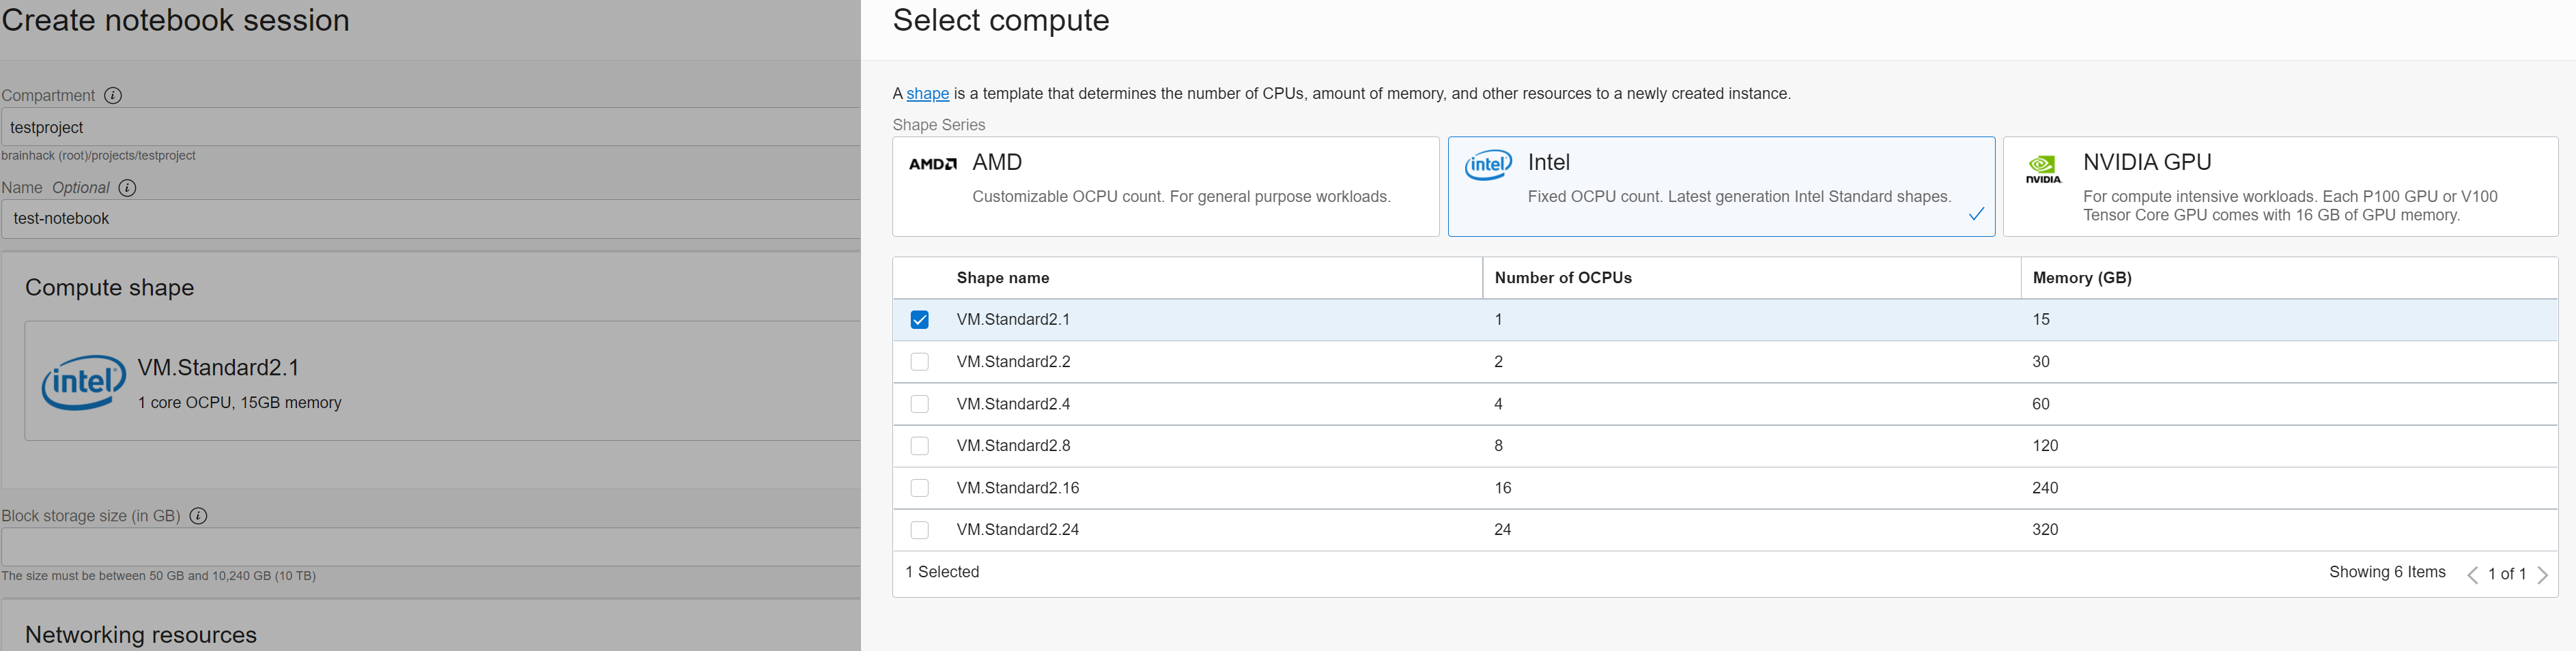
Set how much disk space you want under Block storage size (in GB), leave the Default networking and hit Create
It will now create everything for you:

Once this is done (it will take 2-3minutes), you can open the notebook environment with a click on Open:
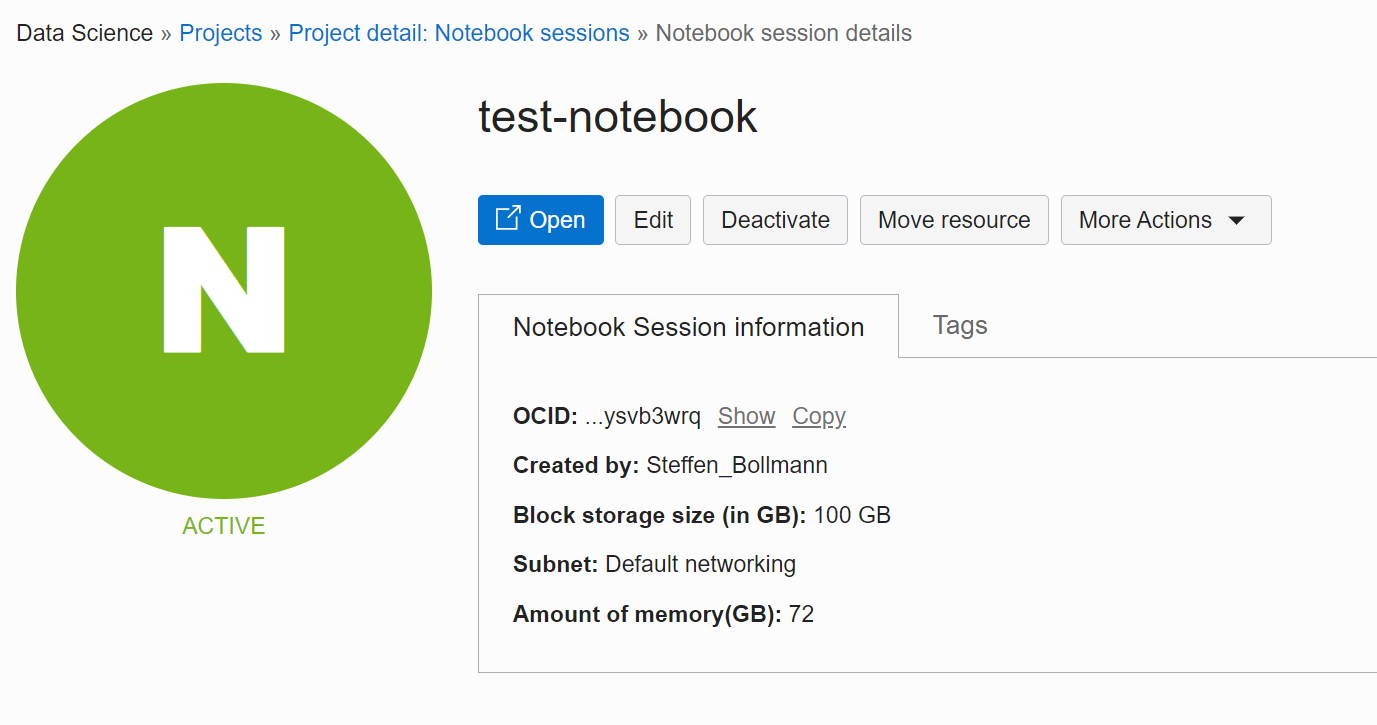
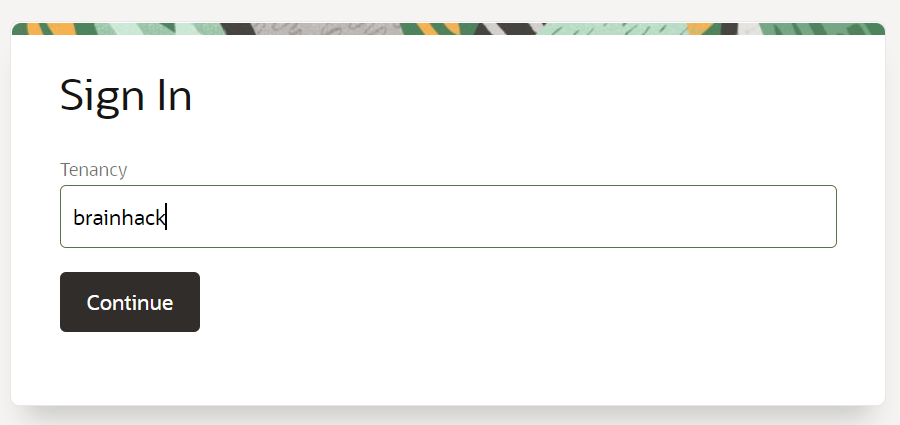
Then you have to log in - leave Tenancy as brainhack and click Continue:
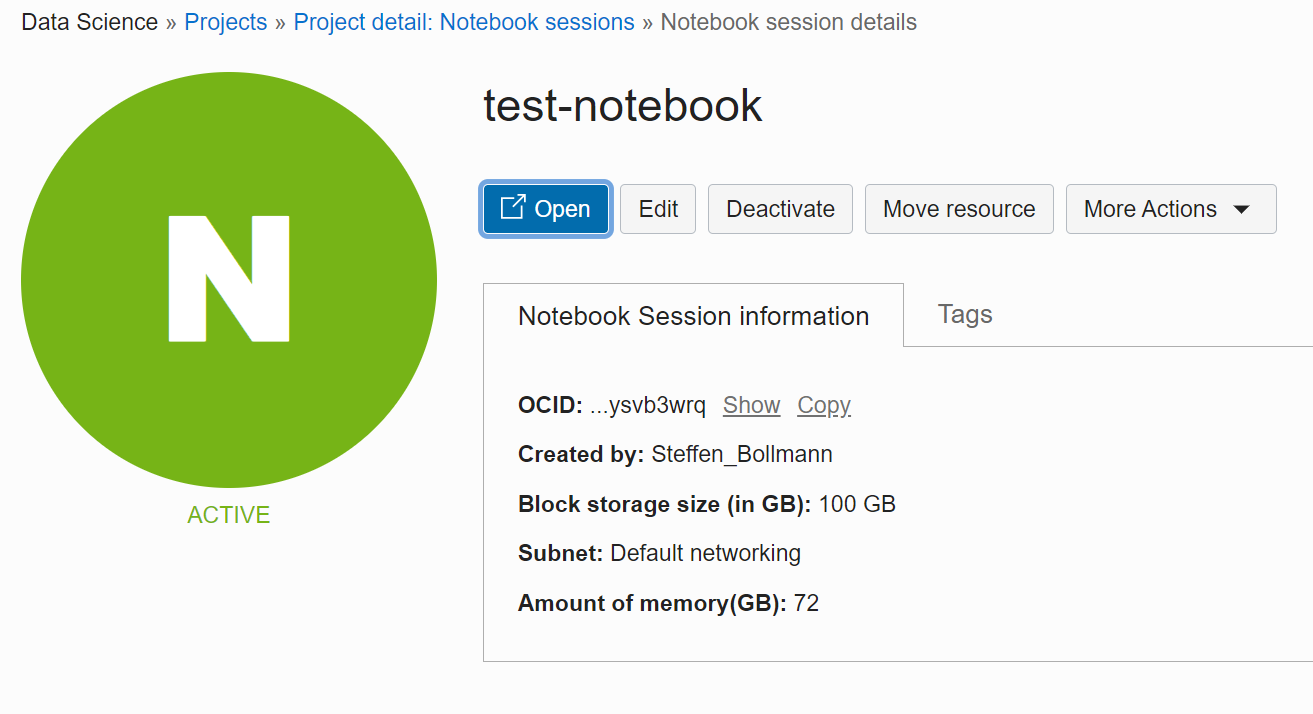
and you have a fully configured notebook environment :)

The notebook environment uses Oracle Linux as a base image, so if you want to install additional packages use:
sudo yum update
sudo yum install ...
Hint for collaborating with multiple people: Multiple users can login to the same notebook system and work on separate notebooks simultaneously, but avoid editing the same notebook file - otherwise you risk overwriting your changes:

Clean up for the day
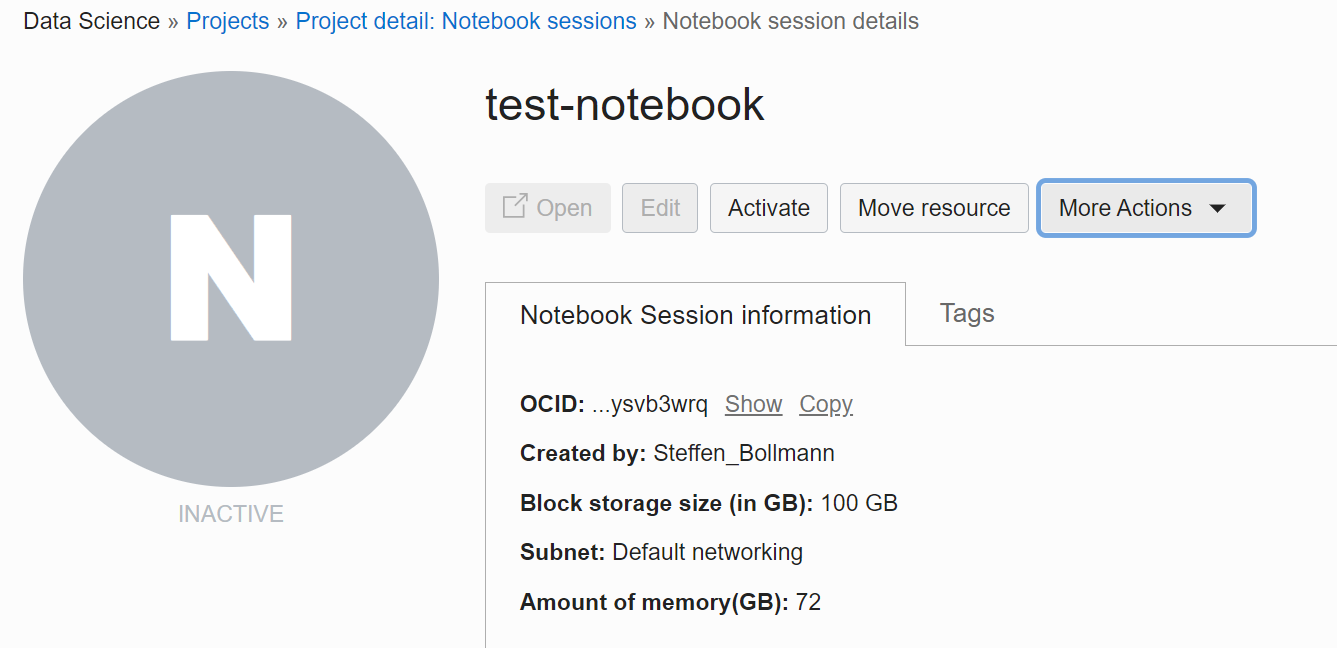
When completed for the day, you can save costs (especially important when using GPUs!) by deactivating the environment:
Close the window and hit Deactivate
This will shut down the compute instances but keep your data - so if you want to continue later, a click on Activate will bring everything back :)
When reactivating you could even change the resources provided for the environment (e.g. adding a GPU or changing to a CPU only environment to save costs) :)
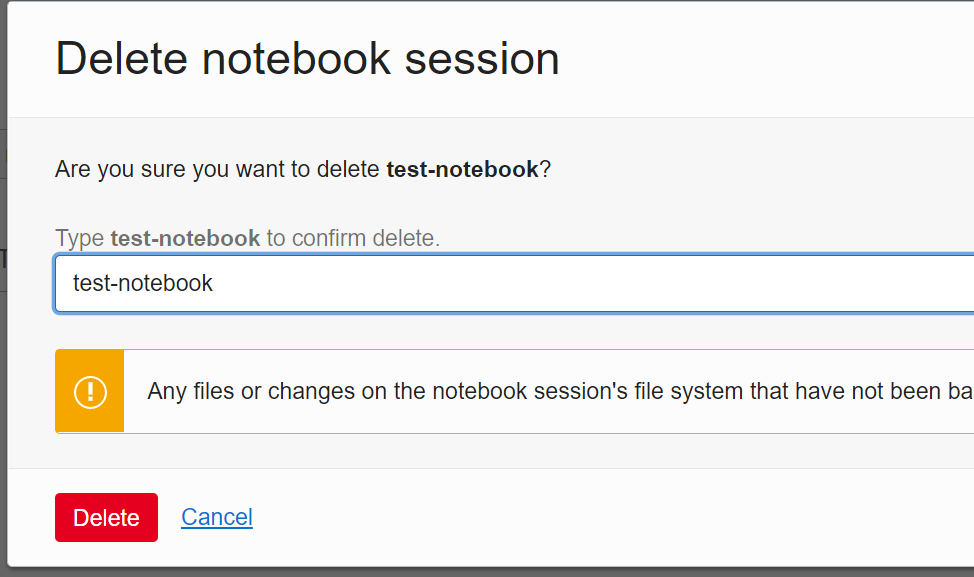
Clean up for good
If you don’t need the notebook environment anymore you can delete everything (including the data) by More Actions -> Delete
A quick confirmation and a click on Delete will remove everything:
3 - Github action runner
Github action runner
Overview
This section describes how to setup a Github action runner on the cloud that you
can then use to run huge Github workflows that wouldn’t run in the hosted
runners :)
Create a new VM or HPC
See our VM or HPC Tutorials.
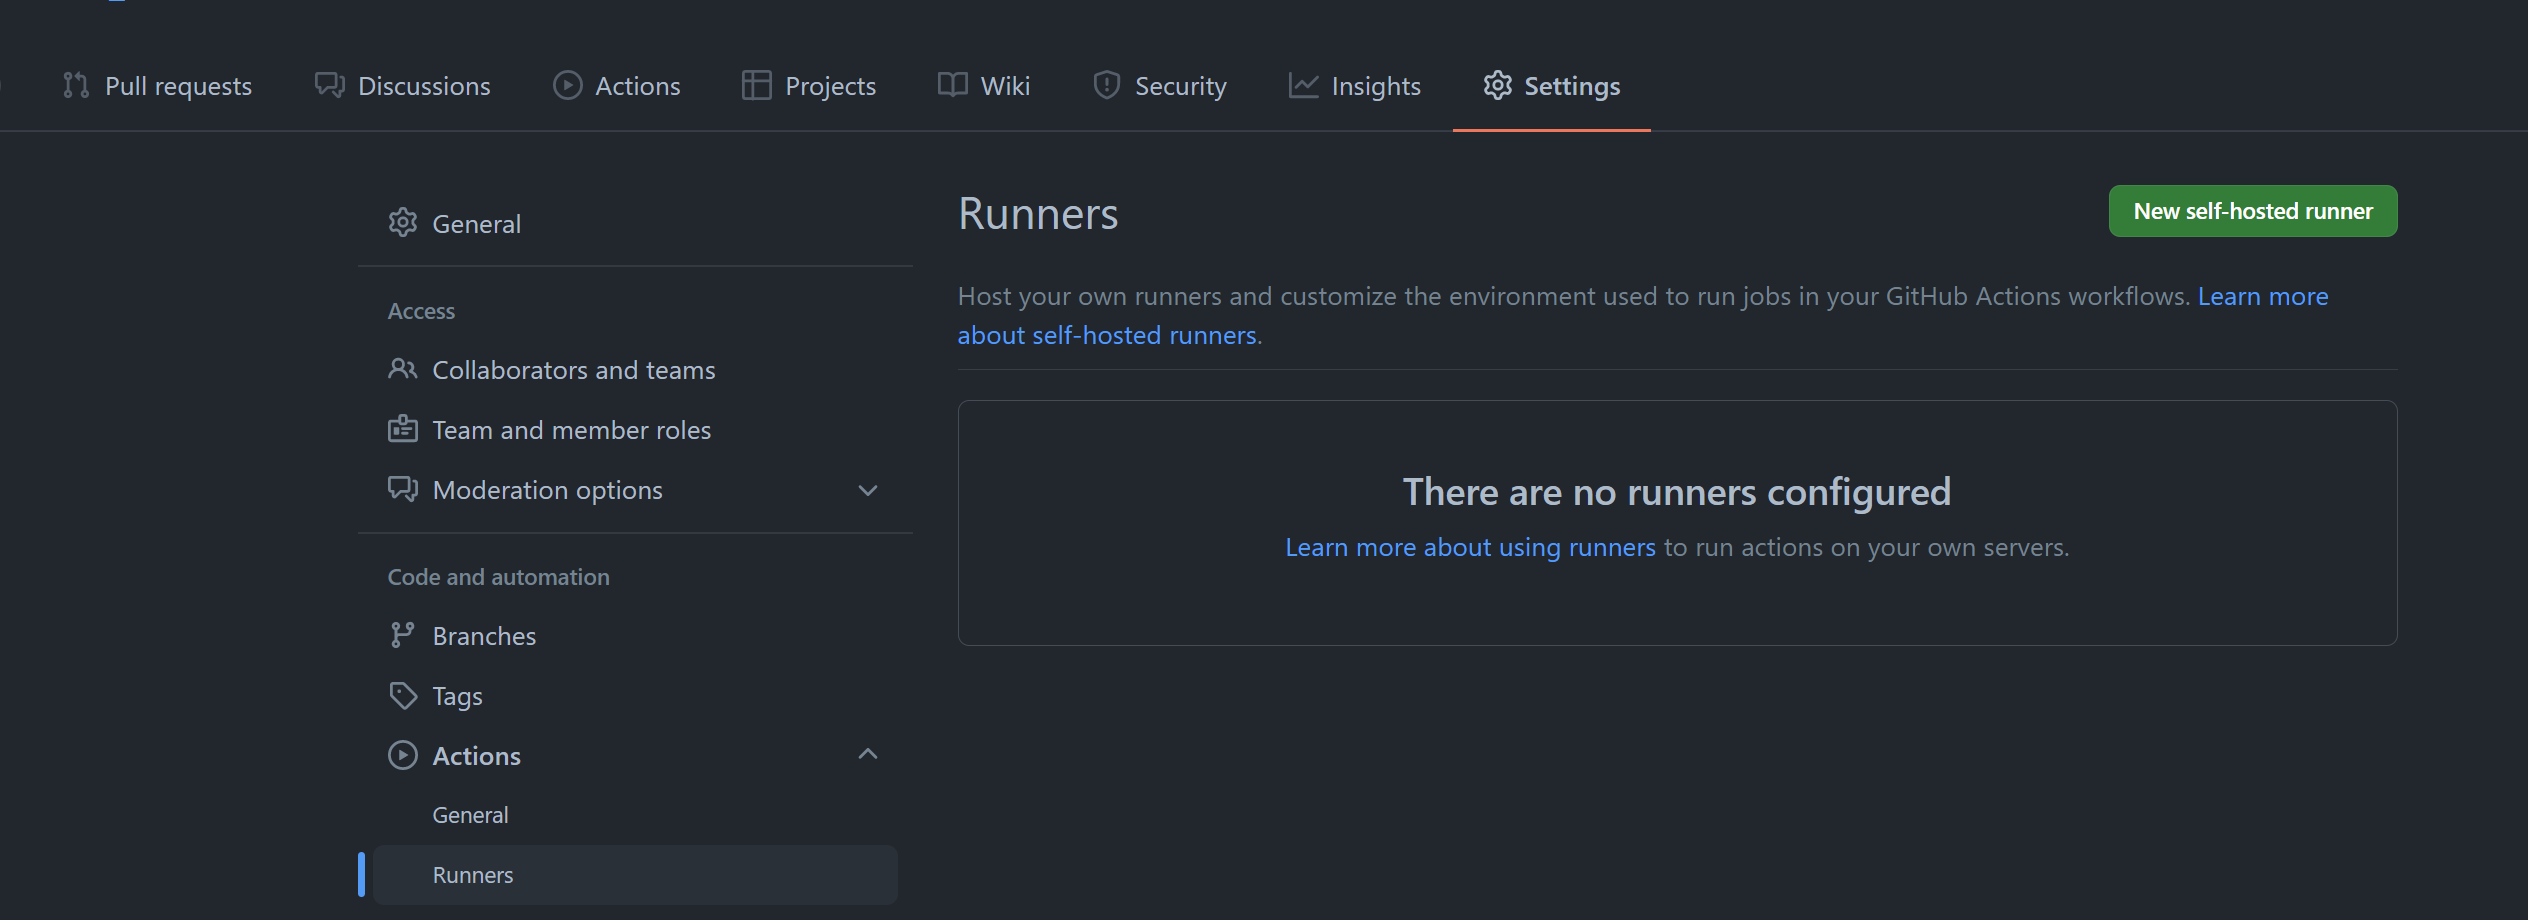
Go to the repository settings and under Actions you will find Runners where you can add a self-hosted runner:
After clicking on New self-hosted runner and selecting Linux you can copy and paste the first section to the VM created in Step 1:
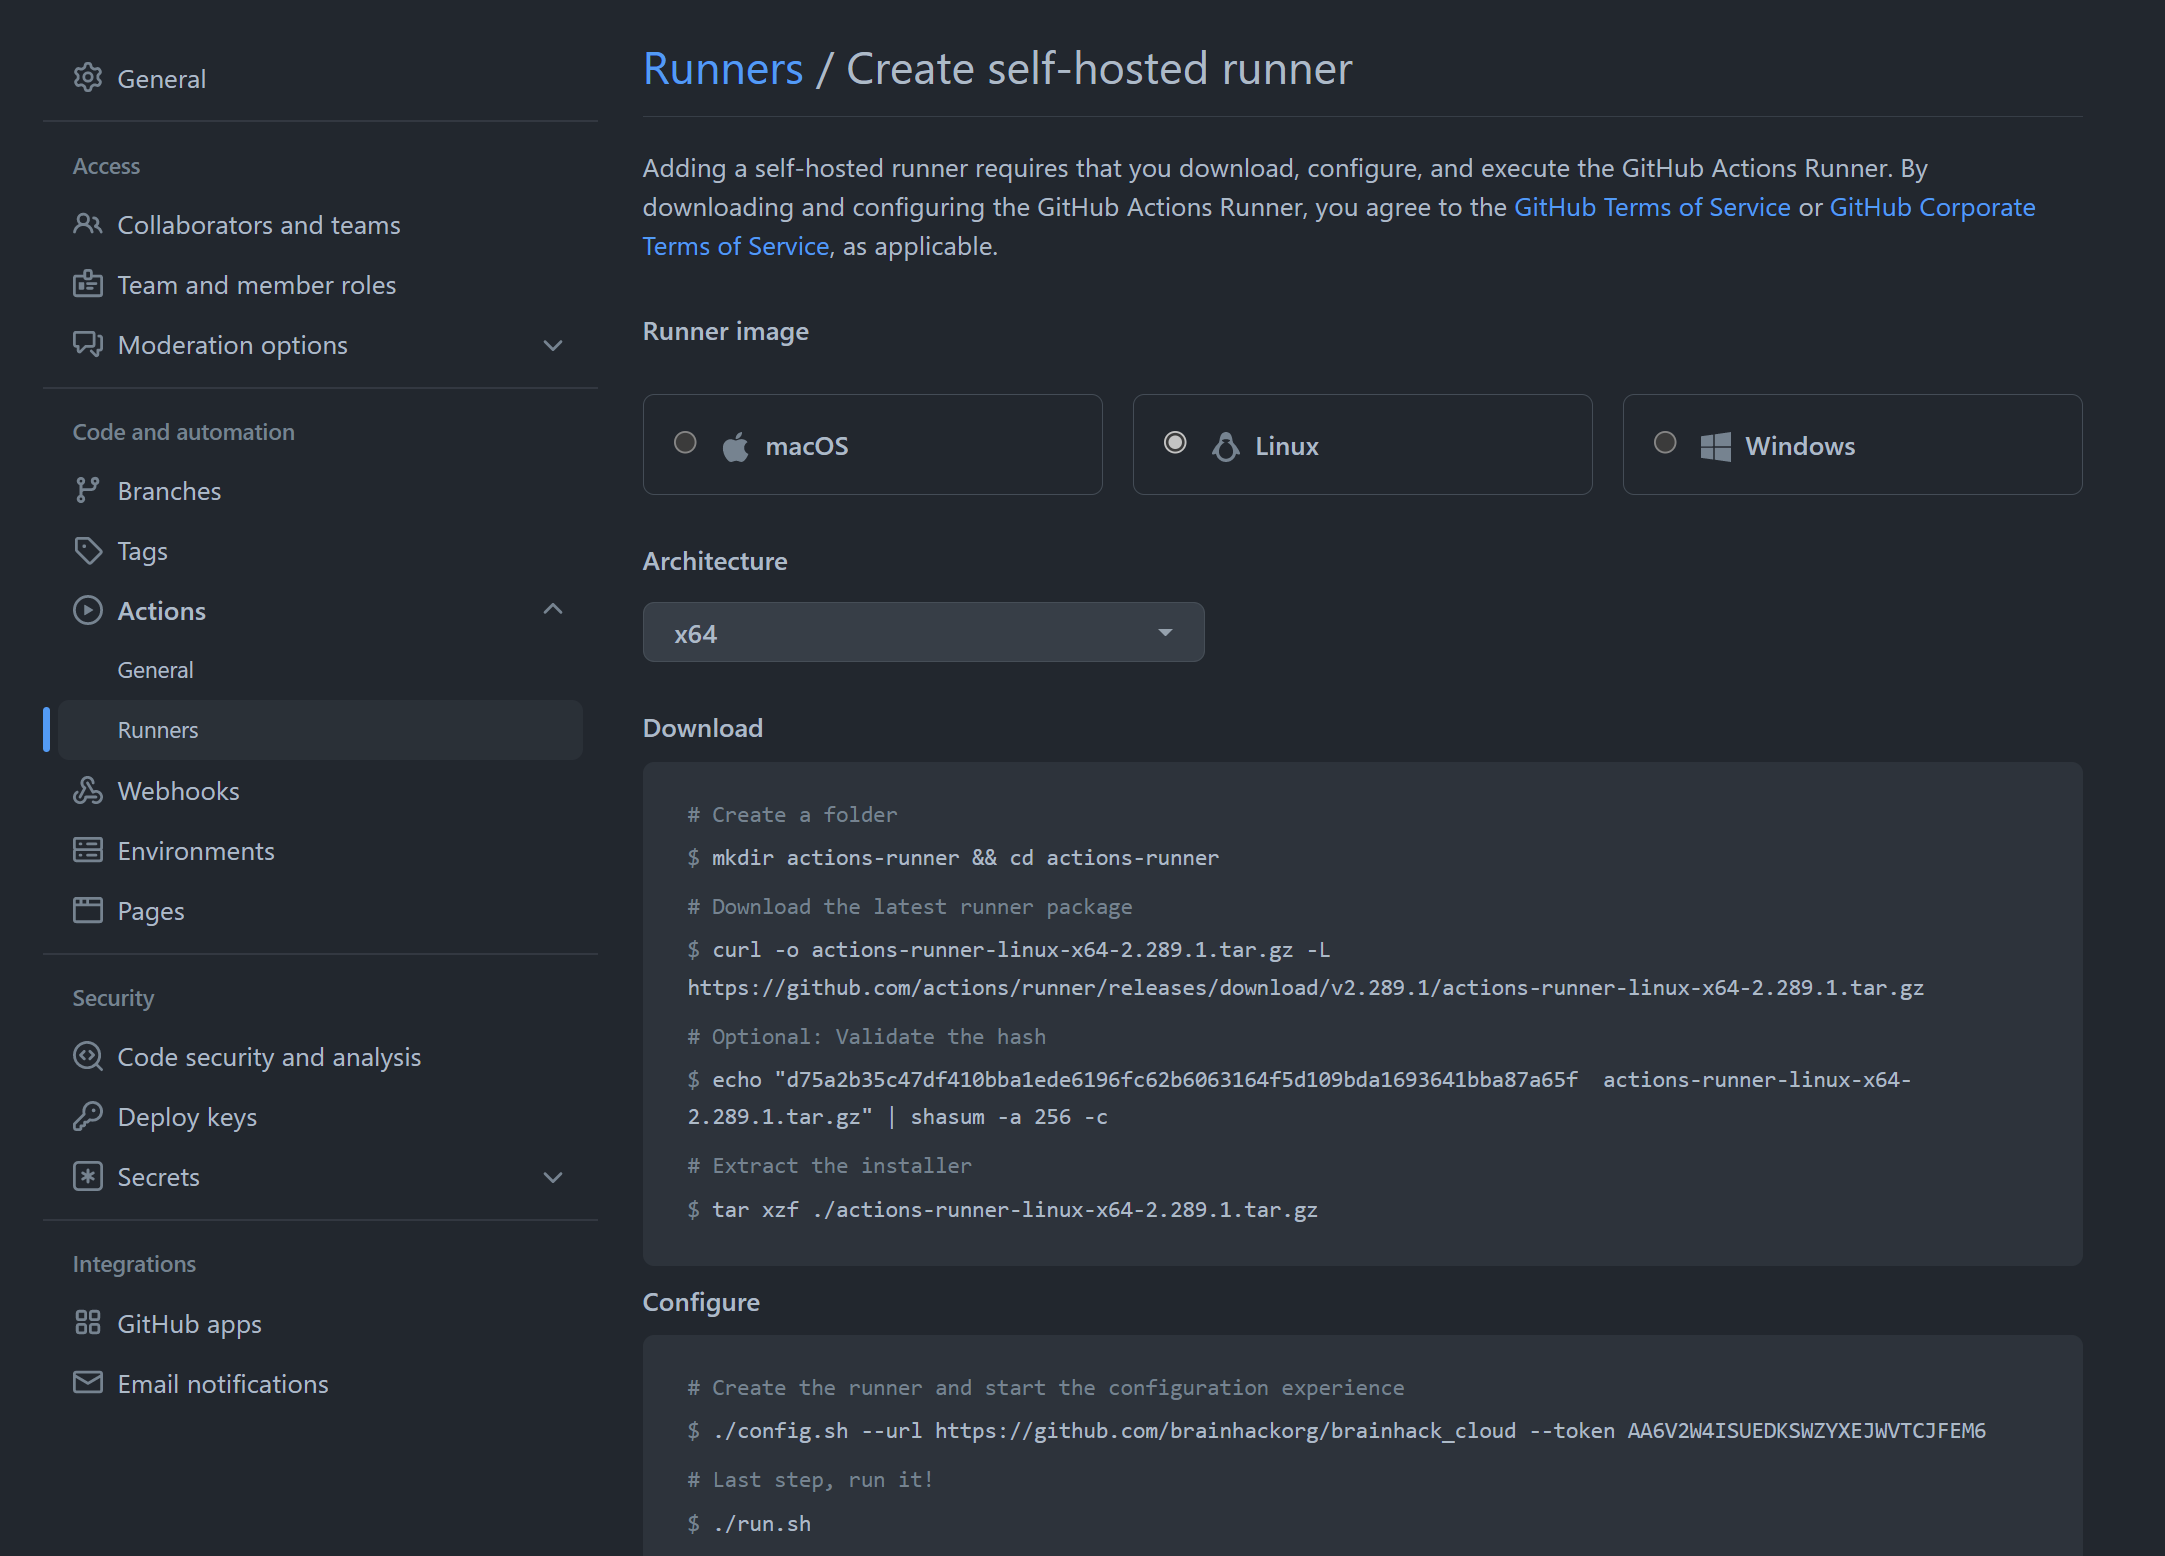
run the commands listed on that page in your VM and accept the defaults.
To keep the session running you can use either tmux:
sudo install tmux
tmux new -s runner
./run.sh
CTRL-B d
Or as an alternative start it as a service, because this will then survive restarts of the VM:
sudo ./svc.sh install
sudo ./svc.sh start
Use custom runner in Action
# Use this YAML in your workflow file for each job
runs-on: self-hosted
Here is an example: https://github.com/QSMxT/QSMxT/blob/master/.github/workflows/test_segmentation_pipeline.yml
Using cirun.io
The next level to the above workflow is to create the runners on-demand instead of letting them run all the time. This will be more cost effective and it lets you run multiple CI workflows in parallel :). Cirun.io is a wonderful free service that lets us do this!
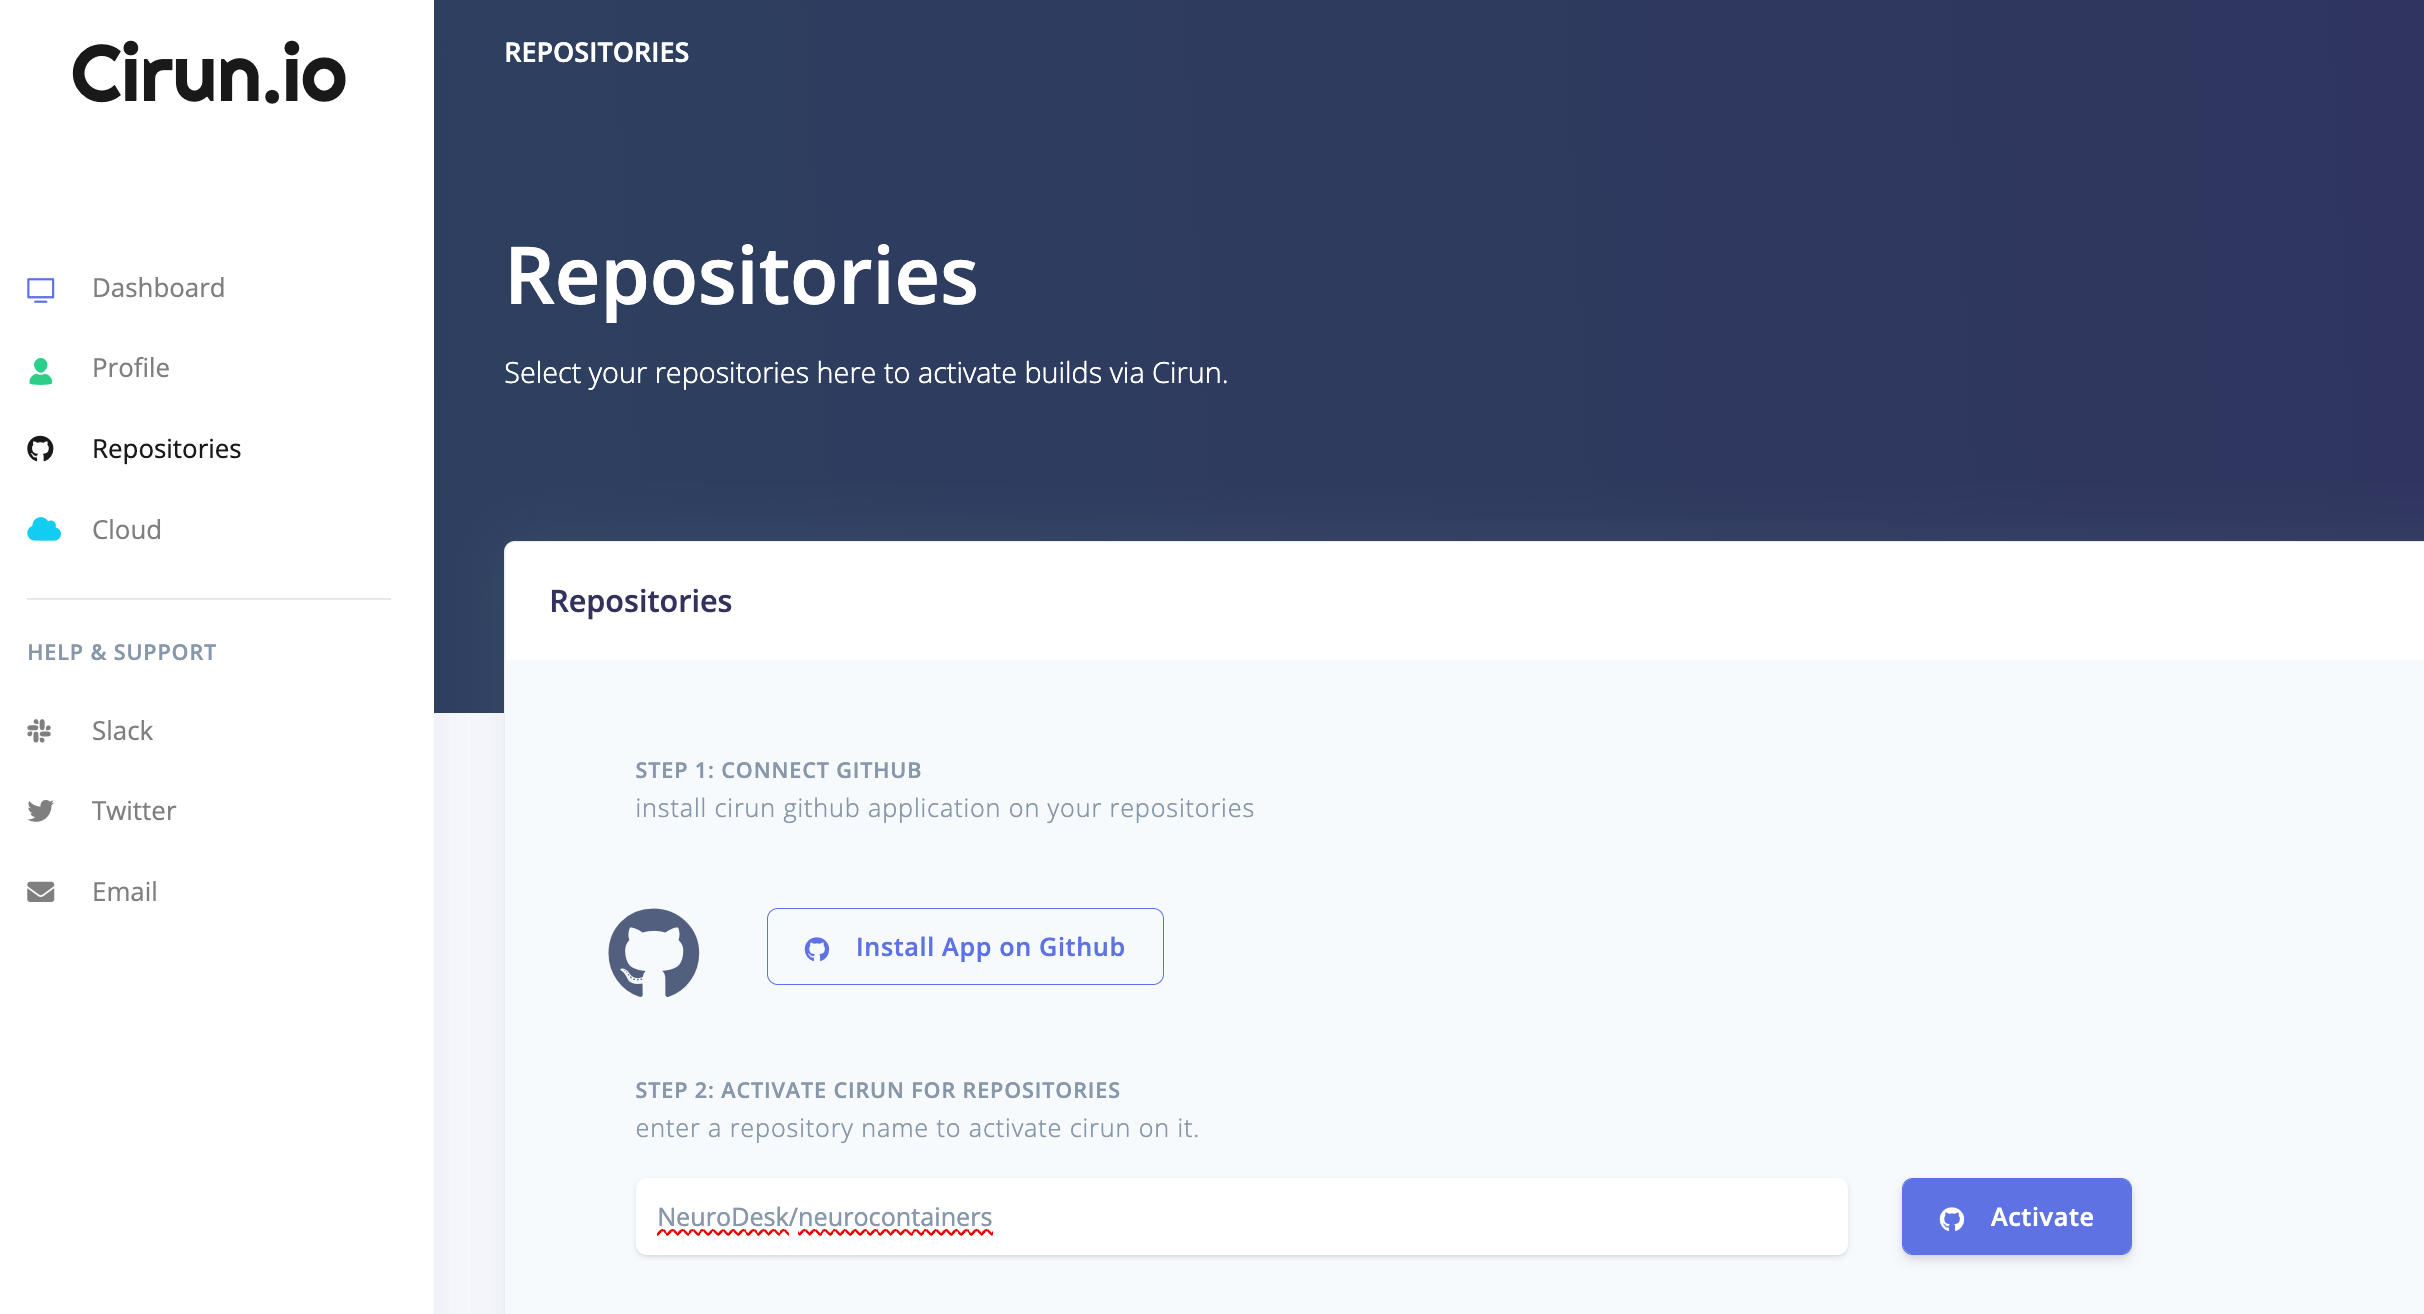
First, sign up to cirun.io: https://cirun.io/auth/login
Second, make sure your brainhack cloud user account is in the group “cirun” (open github issue or indicate this in your request)
Then you need to link your cirun.io account to your github account and to the repository that should trigger the ciruns:
Then you need to create an API key for cirun inside oracle cloud. Go to your User Settings (little user icon in the top right corner) and then “API Keys”. Then add an API Key, download the private key and copy the Configuration File Preview to cirun and add the compartment id:
[DEFAULT]
user=ocid1.user.oc1..aaaaaaaaj2poftoscirunfororaclecmpcbrmvvescirunfororacle4mtq <<<<<< FILL IN YOUR USER ID HERE!
fingerprint=78:4c:99:1t:3d:1b:a8:ea:f2:dd:cr:01:5r:86:a2:84 <<<< FILL IN YOUR FINGERPRINT HERE!
tenancy=ocid1.tenancy.oc1..aaaaaaaaydlj6wd4ldaamhmhcirunfororaclemocirunfororacle
compartment_id=ocid1.compartment.oc1..aaaaaaaawc7zqarq7xddumdzuatu3bu3ir6ytlkgauyokgxtixj2y6szrd4q
Then copy the private key inside the textbox on cirun and hit save.
Now you need to create a .cirun.yml file at the top level of your github repository:
runners:
  - name: oracle-runner
    cloud: oracle
    instance_type: VM.Standard2.1
    machine_image: ocid1.image.oc1.eu-frankfurt-1.aaaaaaaa6m57xzoztlide4653fjavkm6dpksmz3kaa4gig4h34jod76aapva
    region: eu-frankfurt-1
    labels:
      - oracle
and you need to change the “runs-on” inside your github action from “self-hosted” to “[self-hosted, oracle]”
4 - HPC
High Performance Computing
Overview
Oracle cloud supports High Performance Computing and makes it very easy to setup
your own HPC cluster in the cloud. This tutorial here is a basic introduction to get your started.
This is a tutorial about SLURM on OCI with more background information: SLURM on OCI tutorial
You can find an alternative setup (tailored at deep learning and GPUs here: GPU cluster)
Before you get started
Consider if you actually need High Performance Computing (HPC) for your work. An HPC is a cluster consisting of multiple machines and it uses a head-node (here bastion host) from where jobs are submitted to this cluster using a job engine (for example slurm). If you have many jobs that need to be run independently than the setup described here will work well. A “real” HPC does more on top: There is a high-performance network between machines and it enables to run jobs that combine multiple machines (e.g. MPI). This would be needed if you have a problem that’s so large that a single machine wouldn’t be big enough. In this example here we build a cluster without this advanced networking. Most people will not need an HPC for their work and they should use a single virtual machine, because it requires considerably less setup work and easier to maintain.
Download the Terraform configuration from here as a zip file:
https://github.com/oracle-quickstart/oci-hpc/releases/tag/v2.9.2
Make sure you selected the geographic region where you would like to create the resource (it should be close to you for best latencies).
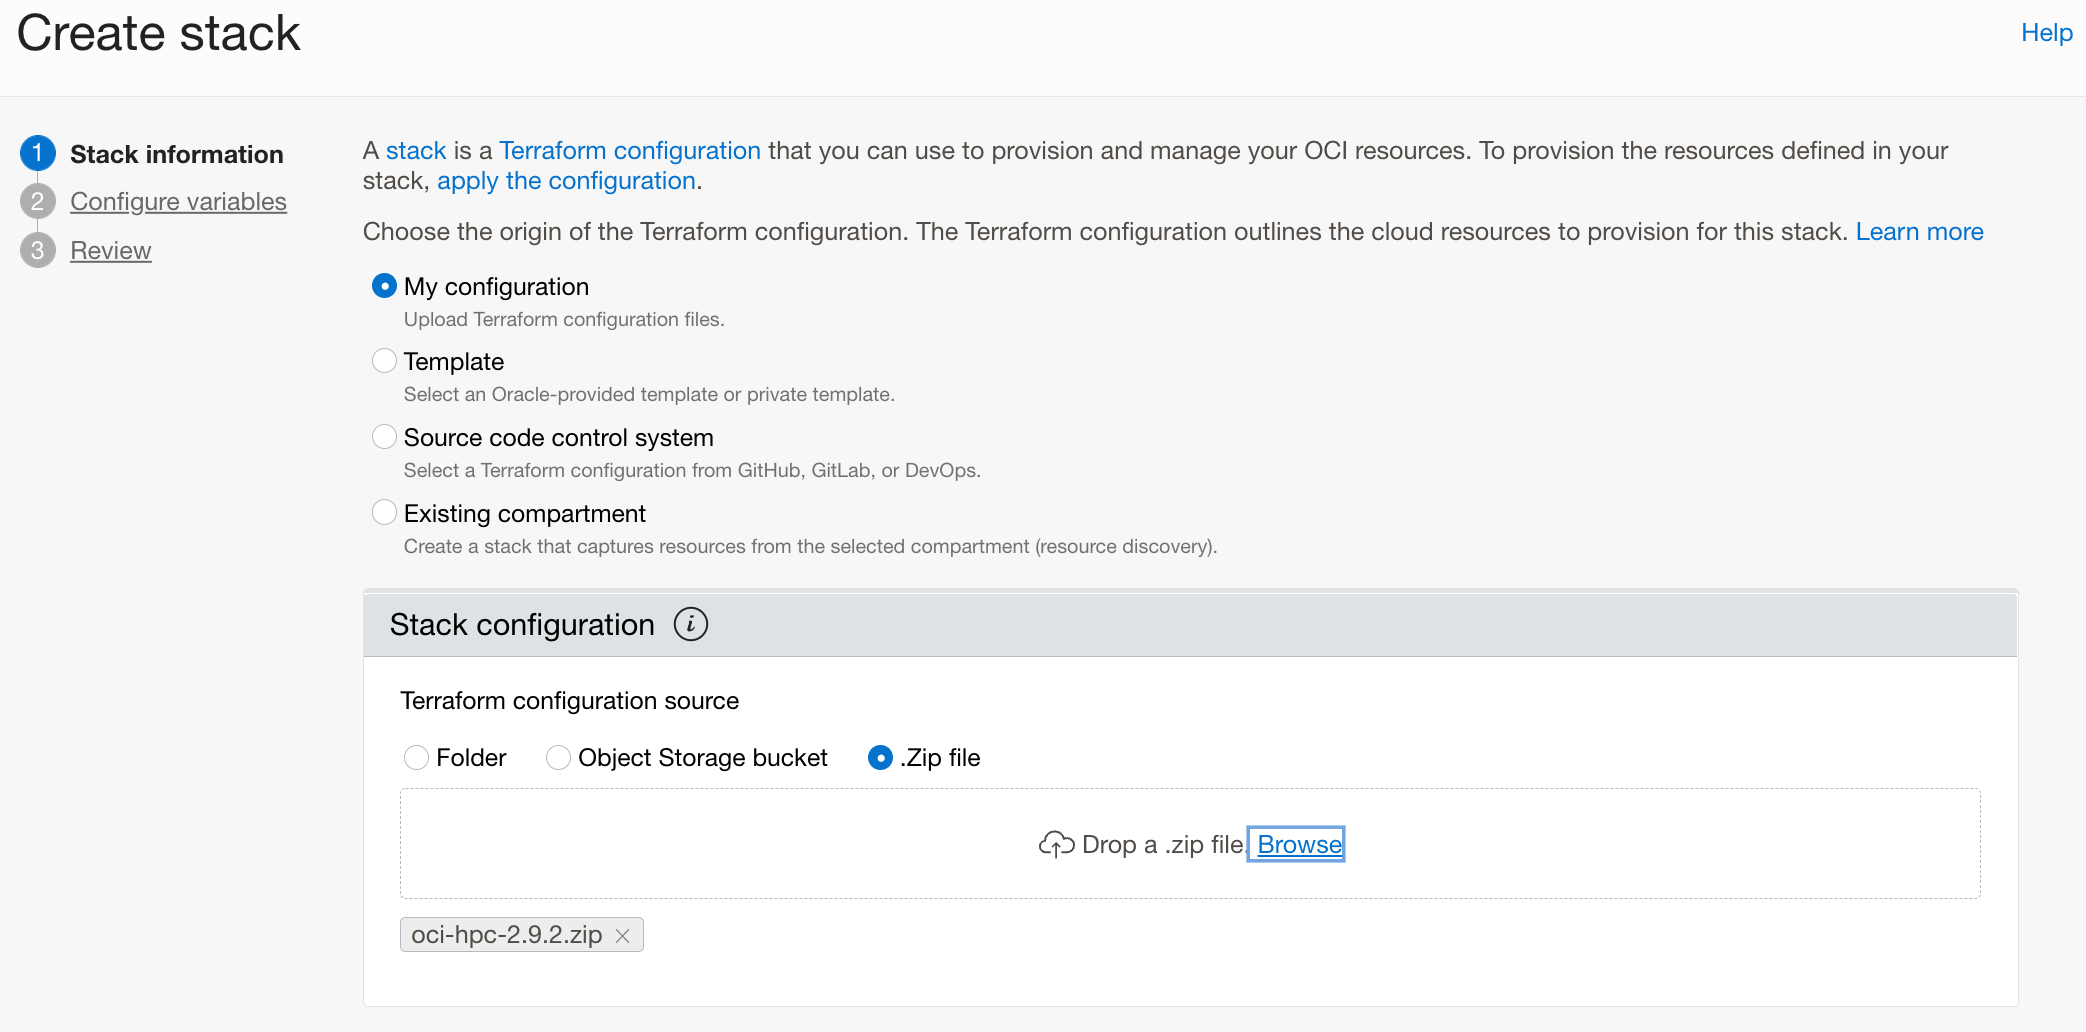
Then go to Stacks under Resource Manager:
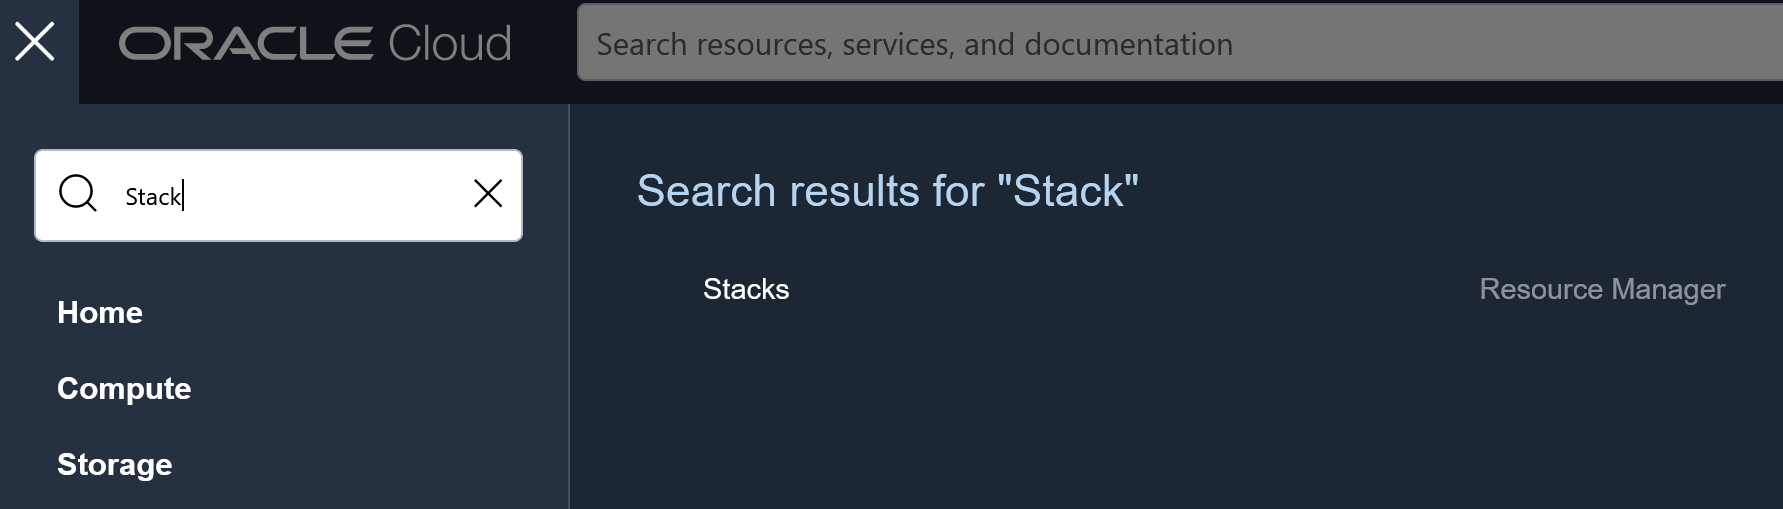
In the List Scope drop down menu, select your project compartment. Click Create Stack and upload the zip file as a Terraform configuration source.
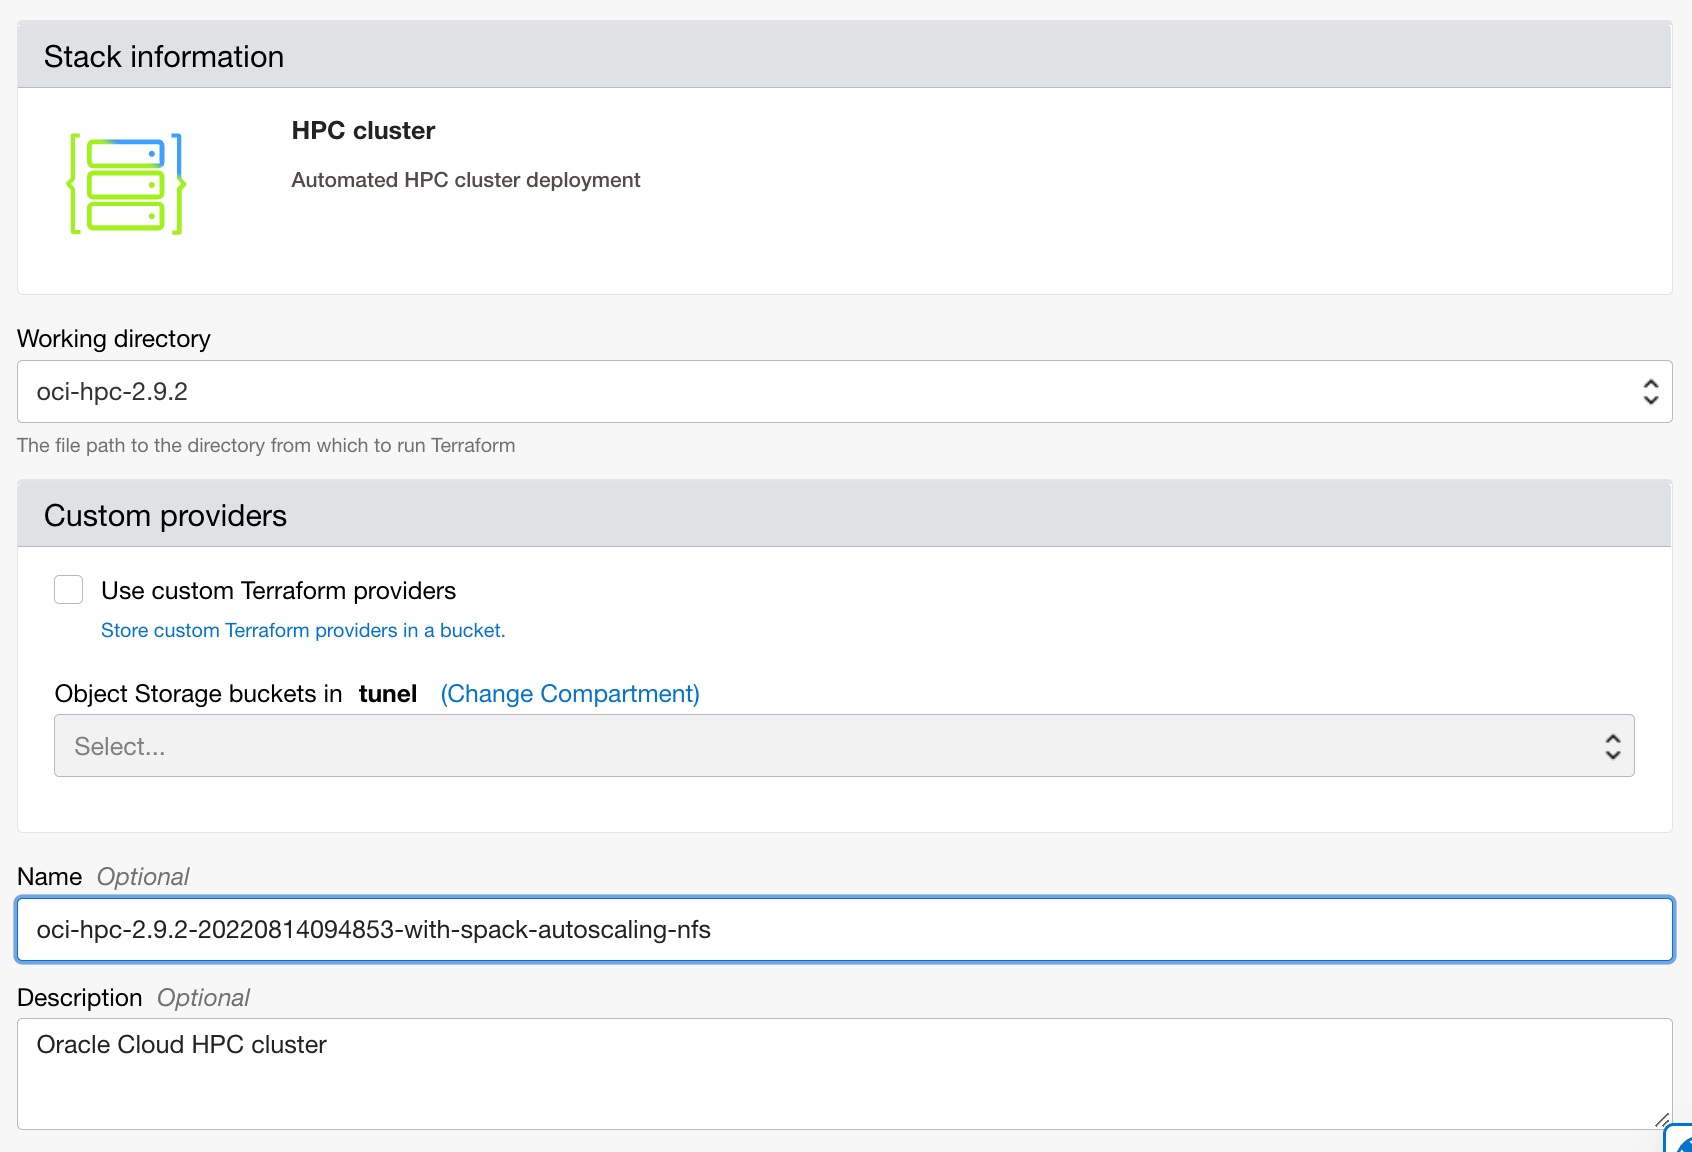
give your cluster a name, but leave the default options for the rest:
Check that the cluster is being created in your compartment again and then hit Next
In cluster configuration you need to add your public SSH key for the opc admin account. Make sure to setup your SSH keys first create a public key

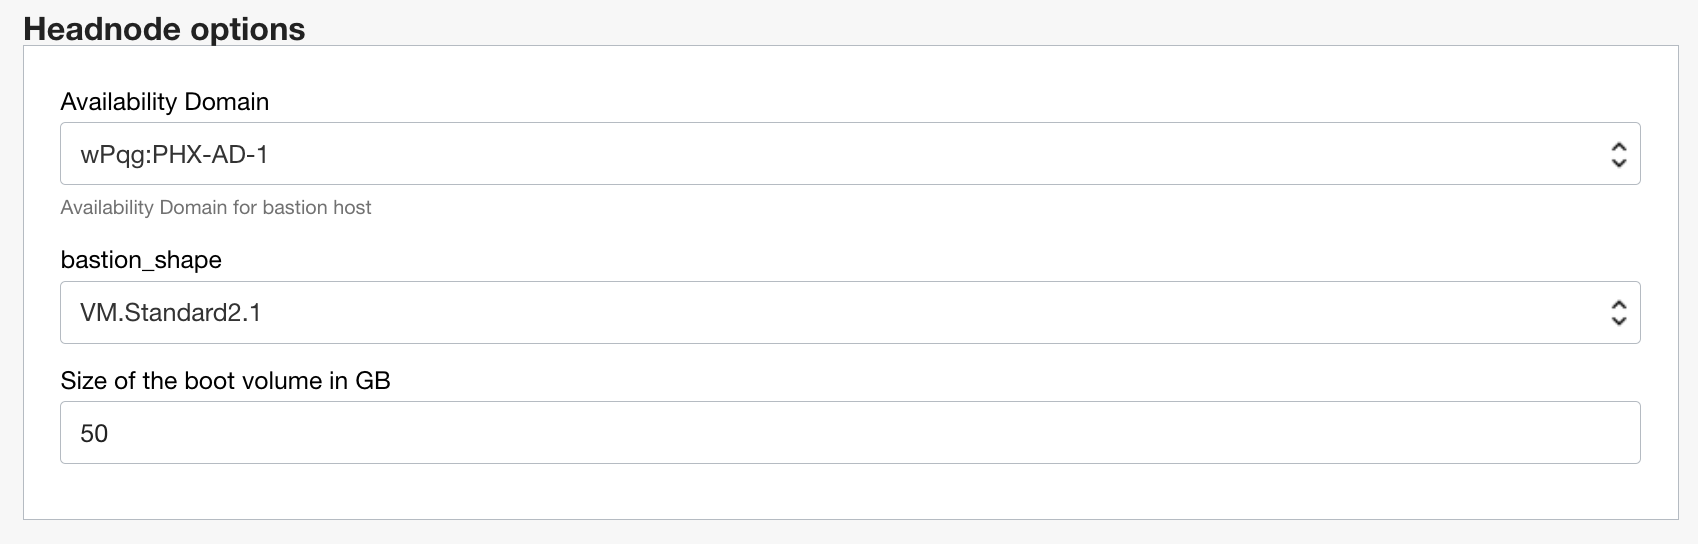
In Headnode options you need to select an Availability Domain. It doesn’t matter what you select there and the options will depend on the geographic region where you launch your HPC. You can keep the headnode default size, or you can select a different flavour:
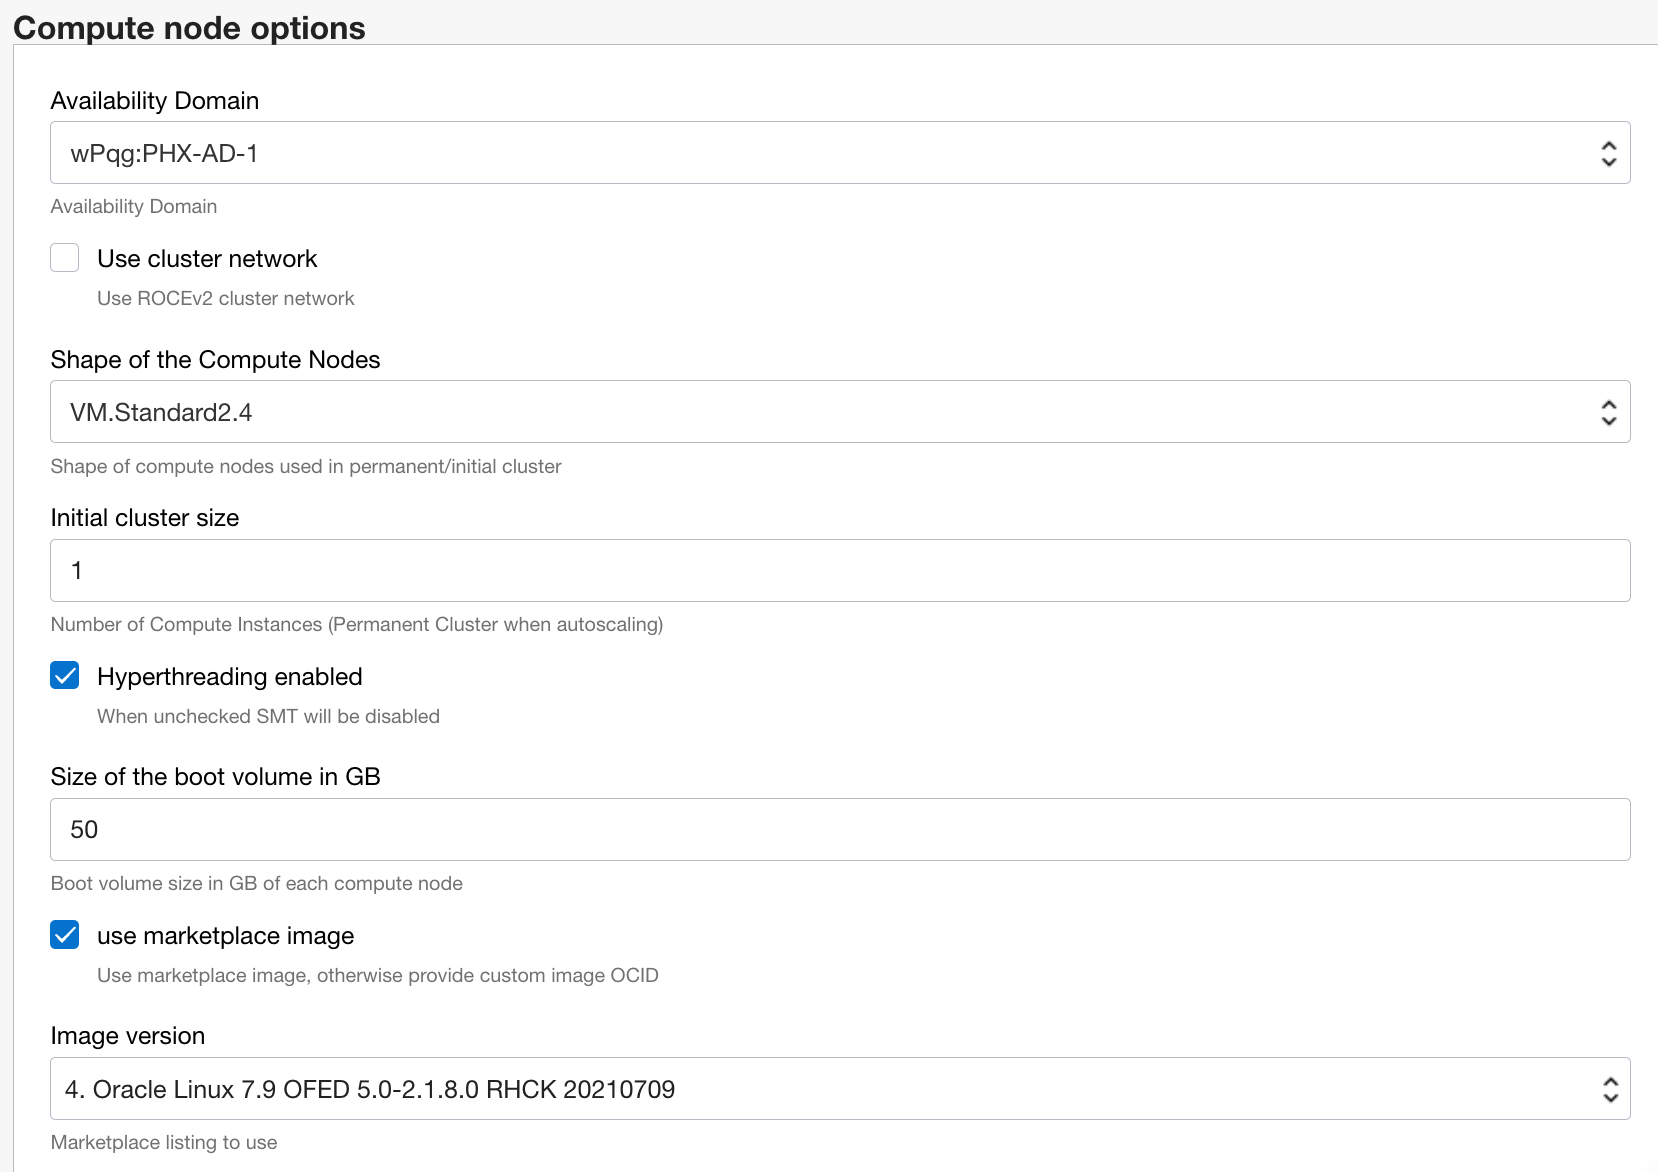
In Compute node options you need to disable Use cluster network (this is for MPI and not required for most people. It requires special network hardware that’s not available in every region. If you need MPI please get in touch and we can help you setting this up). Select a compute node size that fits your problem size. Drop the initial compute size node to 1, because we will scale the cluster using autoscaling.
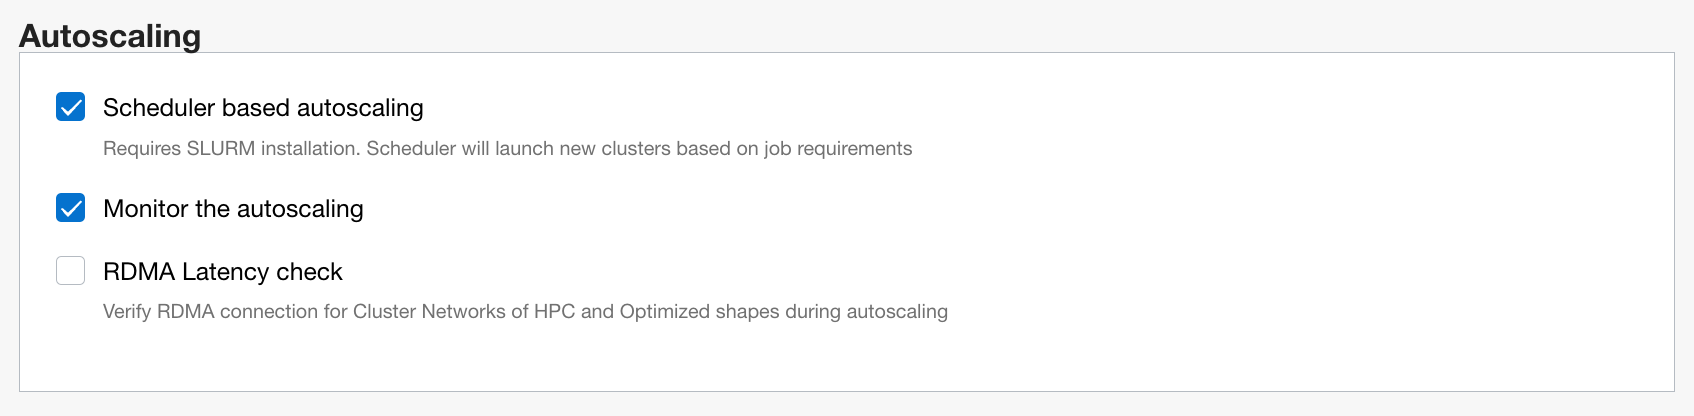
In Autoscaling you should enable scheduler based autoscaling, monitor the autoscaling and disable RDMA latency check if you are not using MPI.
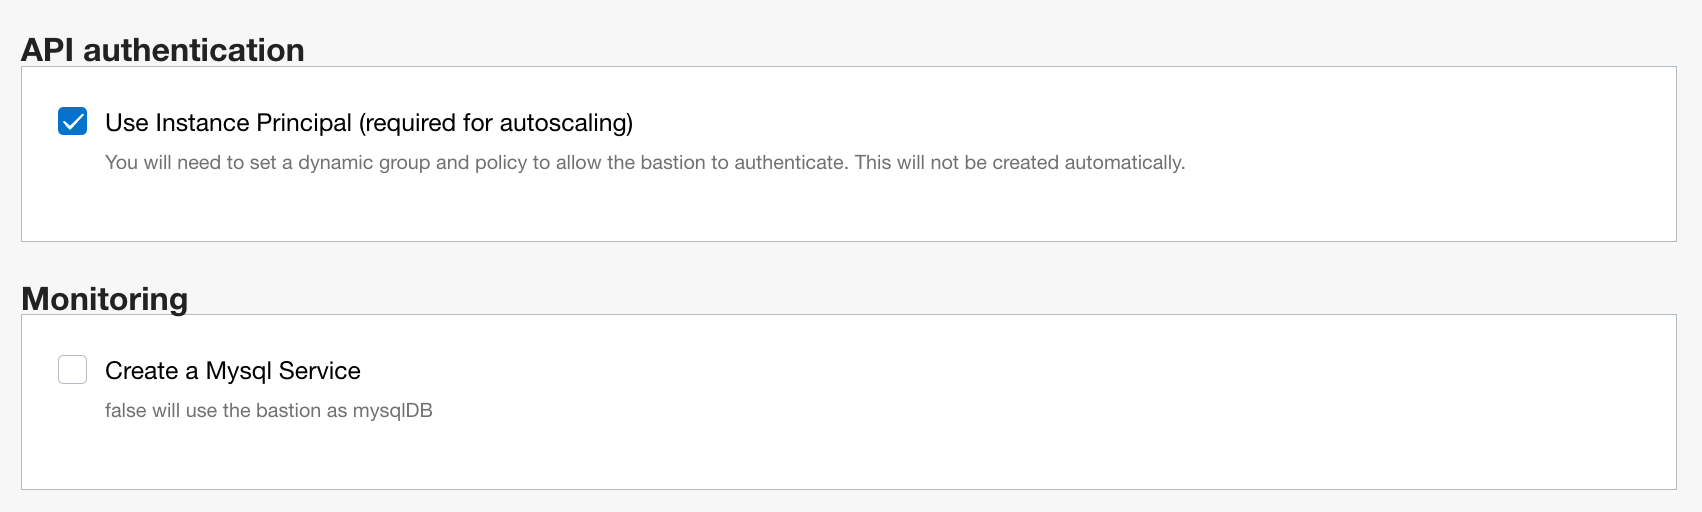
For API authentication and Monitoring leave the defaults:
For Additional file system accept the defaults:

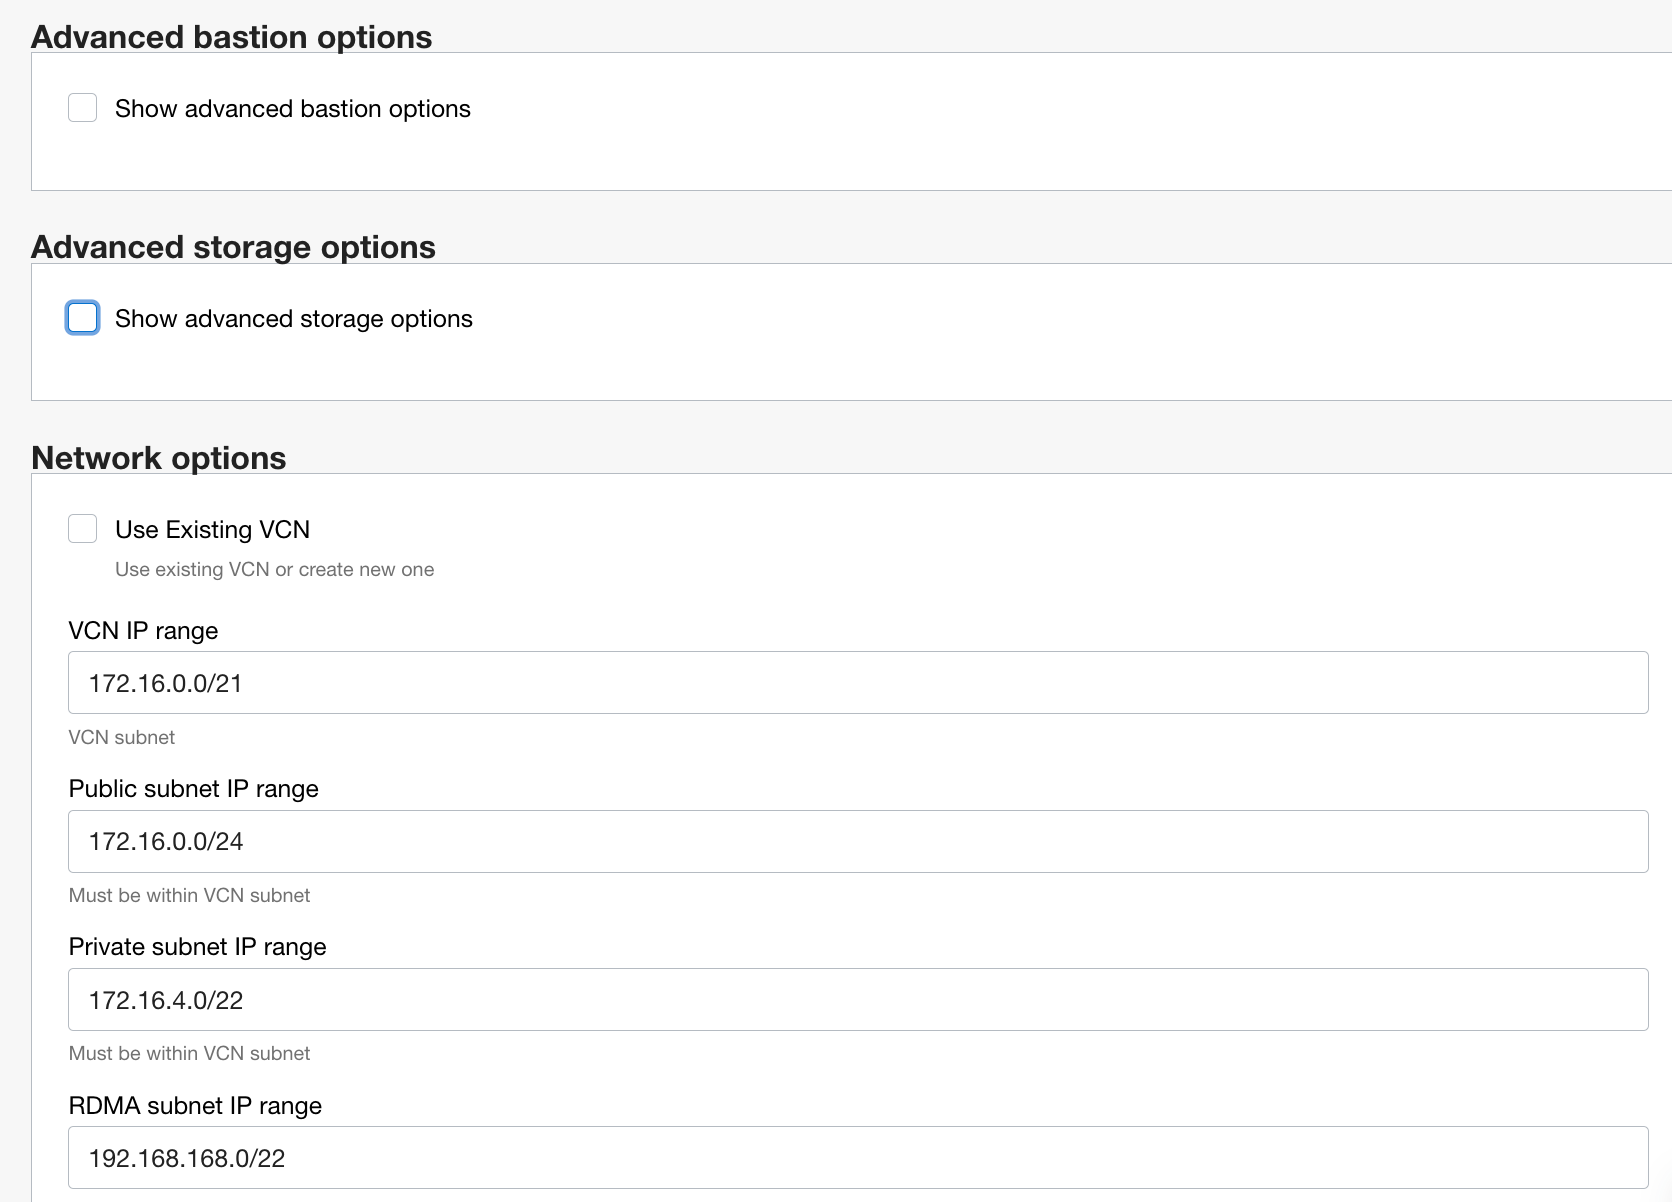
For Advanced bastion options, Avanced storage options and Network options you can accept the defaults:
For Software enable Install Spack package manager in addition to the defaults:
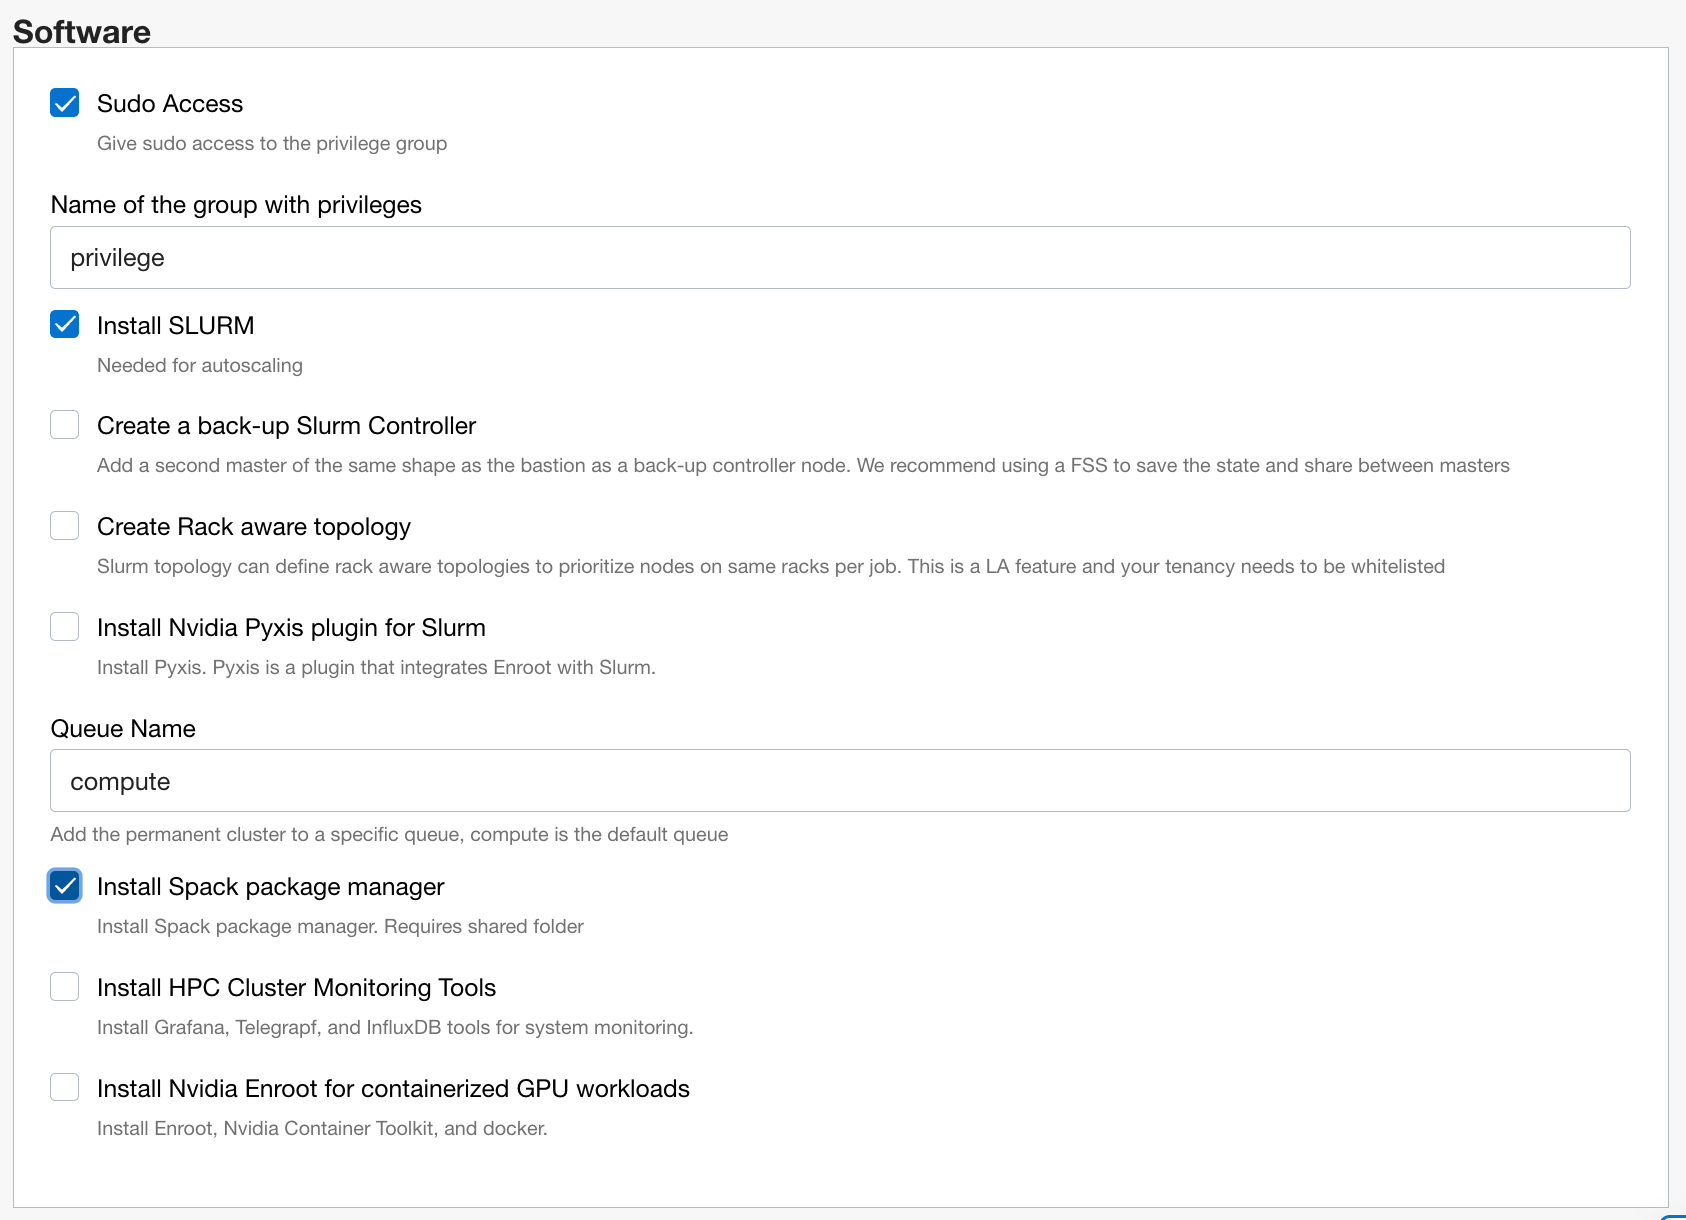
Then hit next and on the next page scroll to the end and tick Run apply:
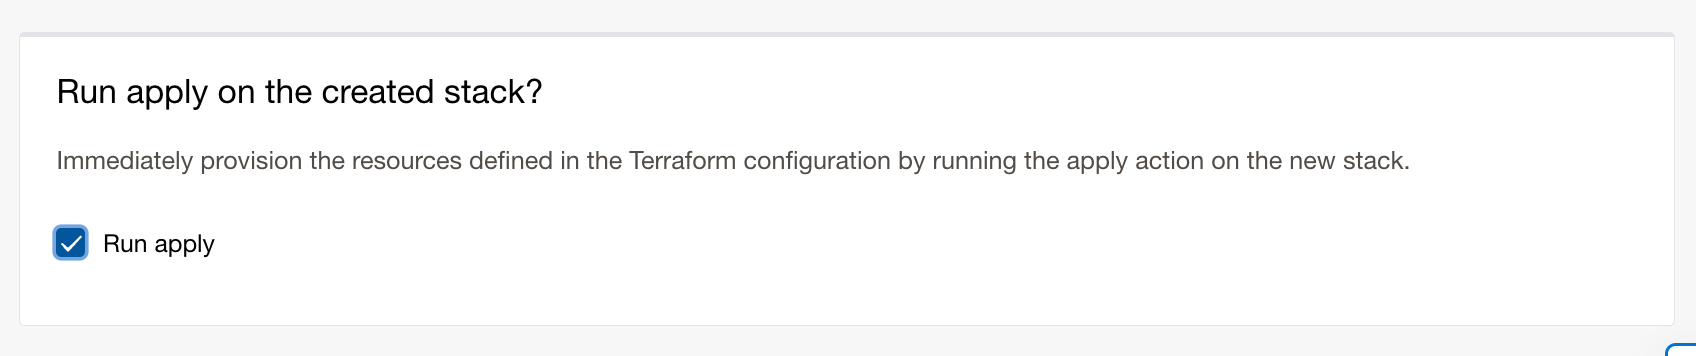
Then hit Create
This will then create a custom HPC for your project (it will take a couple of minutes to complete).
Once everything is done you find the bastion IP (the “head node” or “login node”) under Outputs:
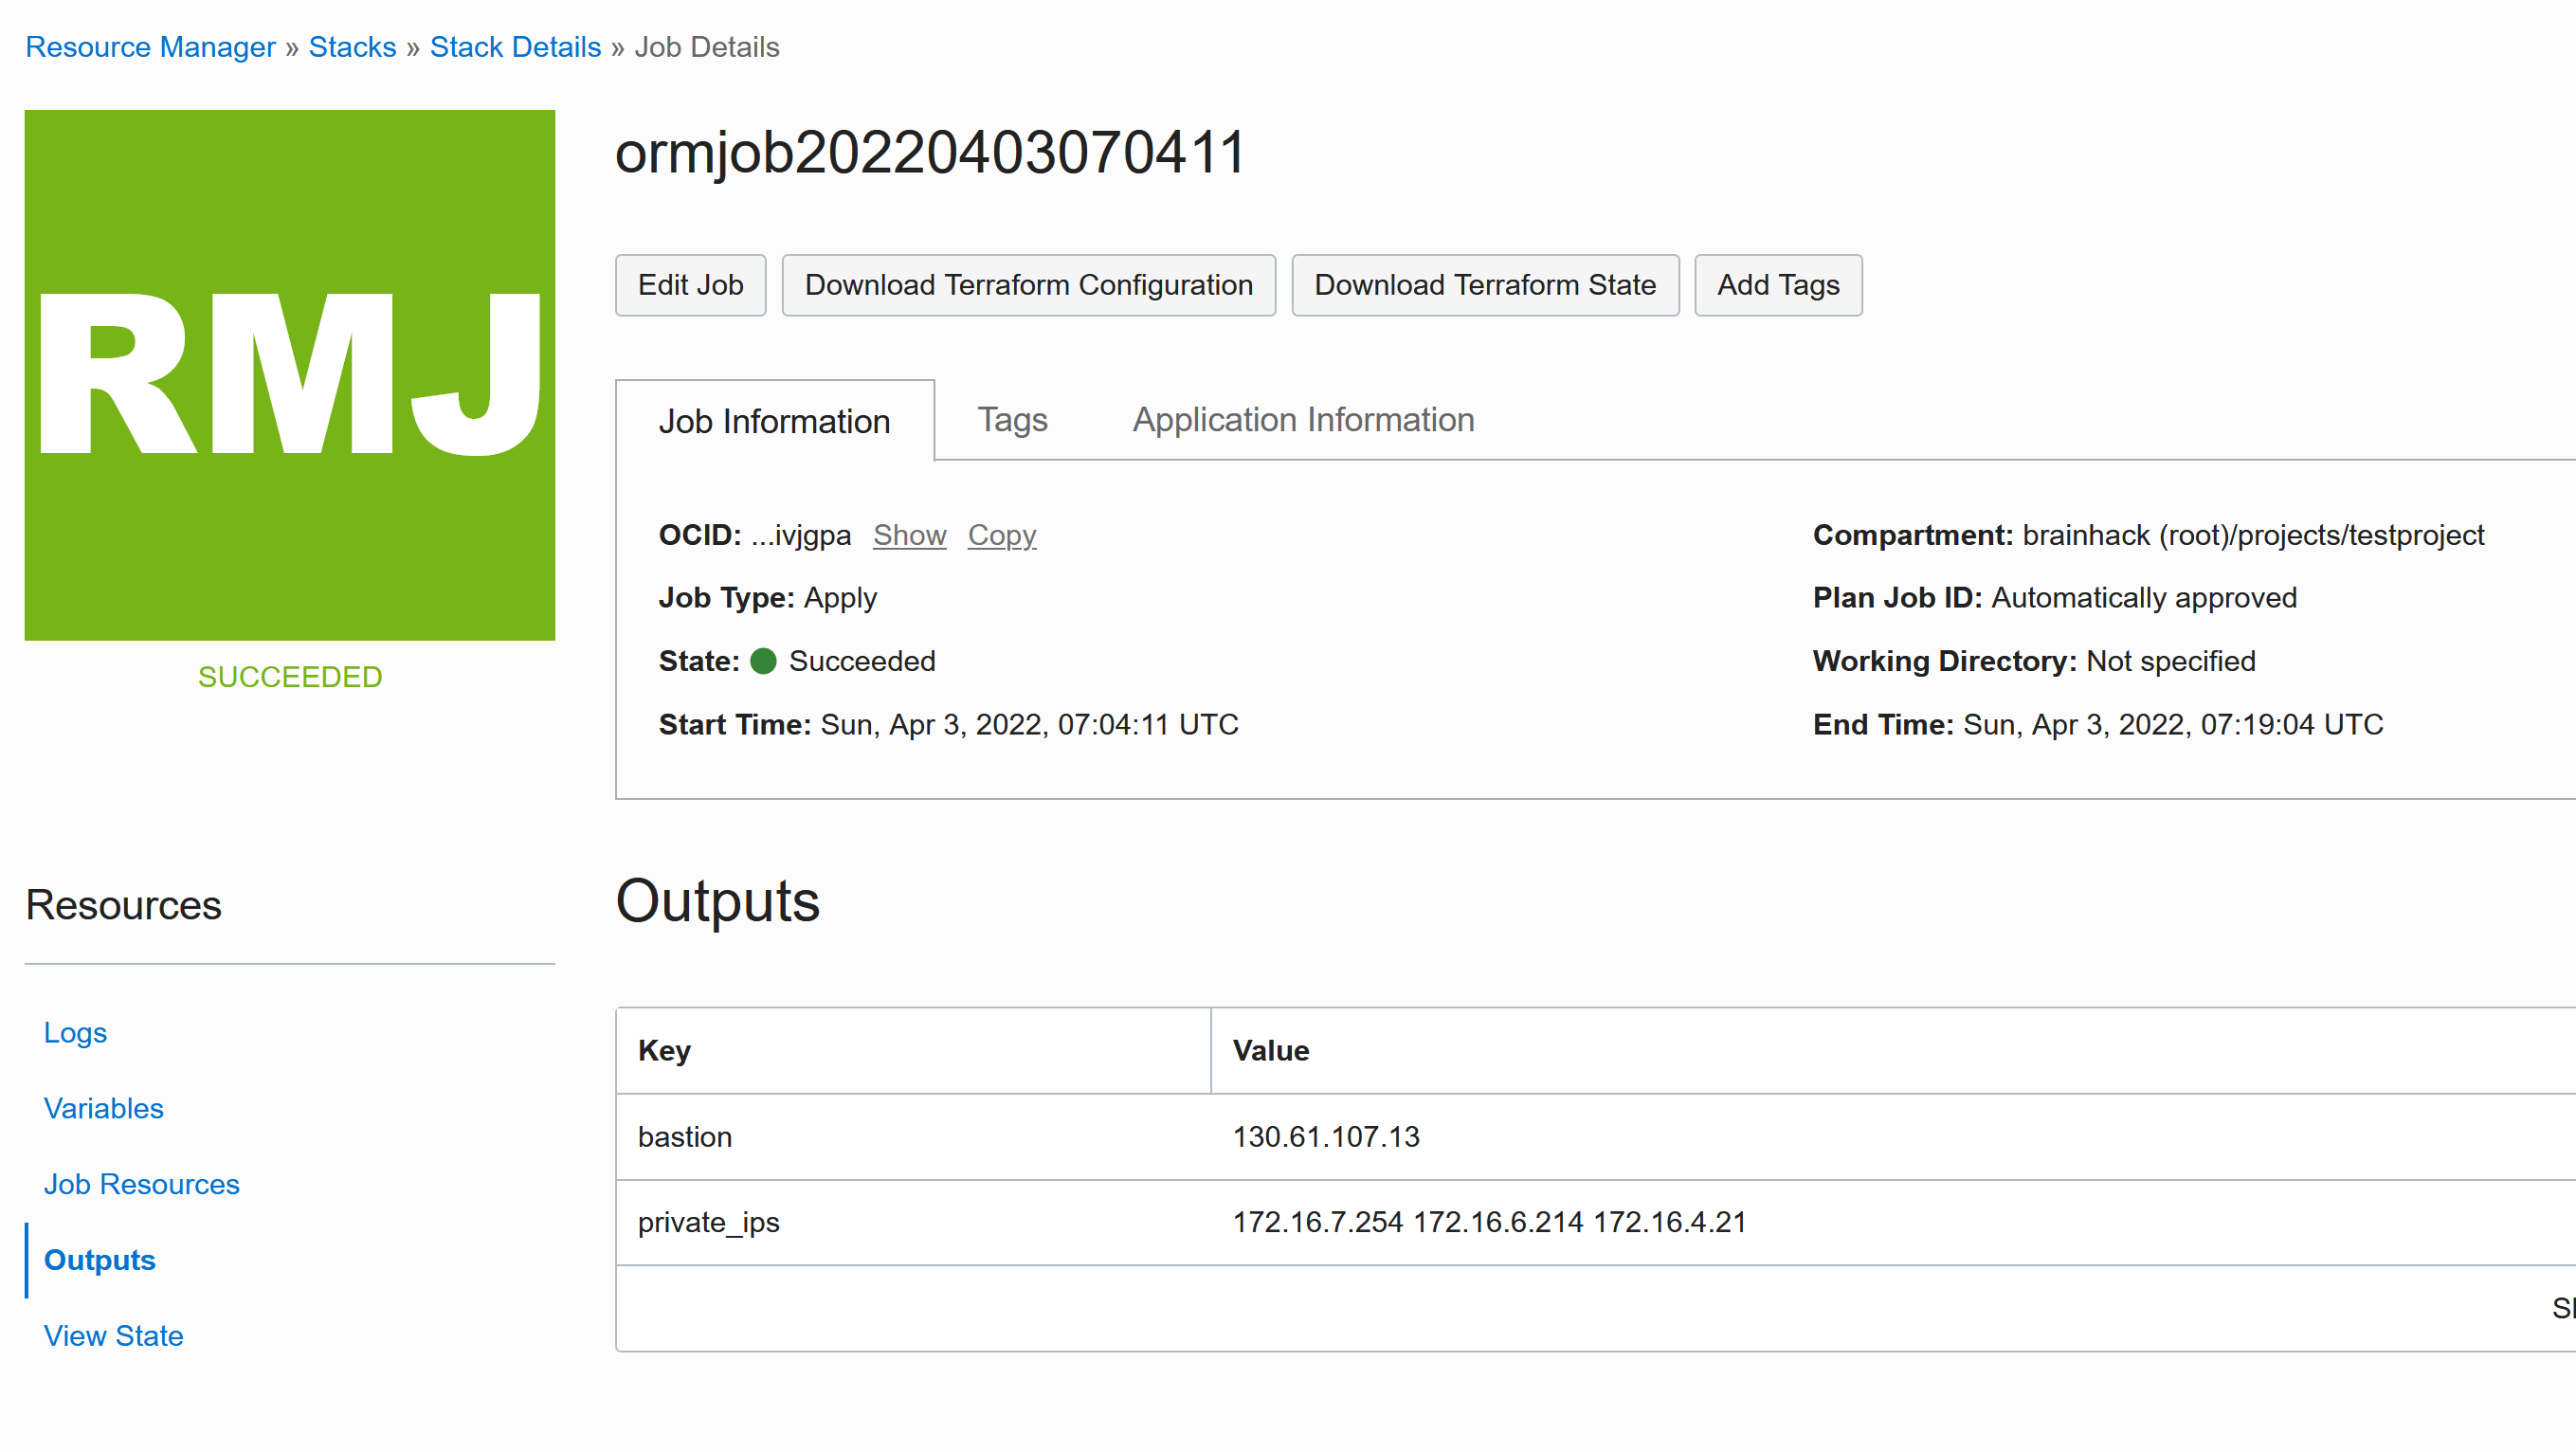
You can now ssh into the HPC as follows:
Be aware that this “opc” account is the admin account with sudo access of the cluster and should not be used to perform analyses. It is better to create a user account to perform the work in:
Once logged in with the opc account, you can create normal cluster users using the cluster command:
These users can then login using a password only and do not require an SSH key.
There is a shared file storage (which can also be configured in size in the stack settings) in /nfs/cluster
More information can be found here:
https://github.com/oracle-quickstart/oci-hpc
Configuring node memory
When you first submit jobs using sbatch, if you followed the above setup you may find you recieve the following error:
error: Memory specification can not be satisfied
This is happening as the RealMemory for each node (e.g. the amount of memory each compute node may use) has not yet been specified and defaults to a very low value. To rectify this, first work out how much memory to allocate to each node by running scontrol show nodes and looking at FreeMem.
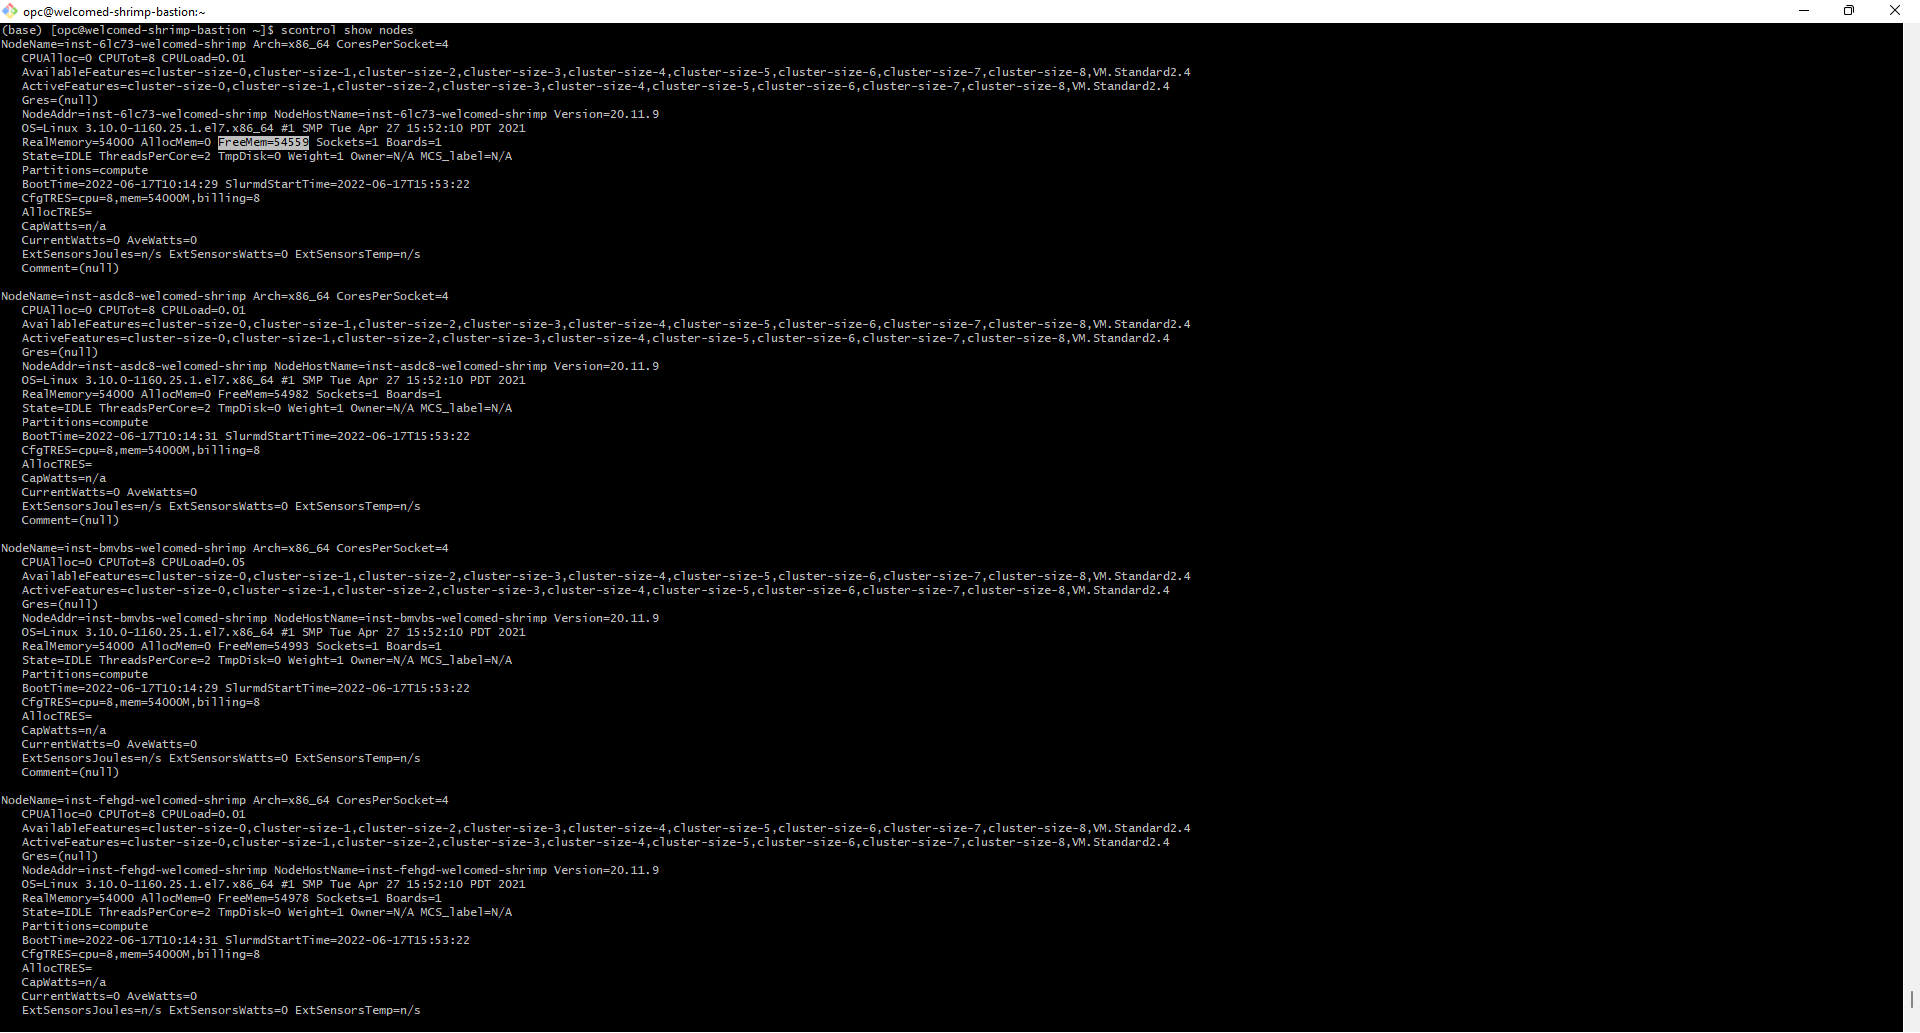
To change the RealMemory, you must edit the slurm configuration file (which may be found in /etc/slurm/slurm.conf). Inside the slurm configuration file you will find several lines which begin NodeName=. These specify the settings for each node. To fix the error, on each of these lines, add RealMemory=AMOUNT where AMOUNT is the amount of memory you wish to allow the node to use.
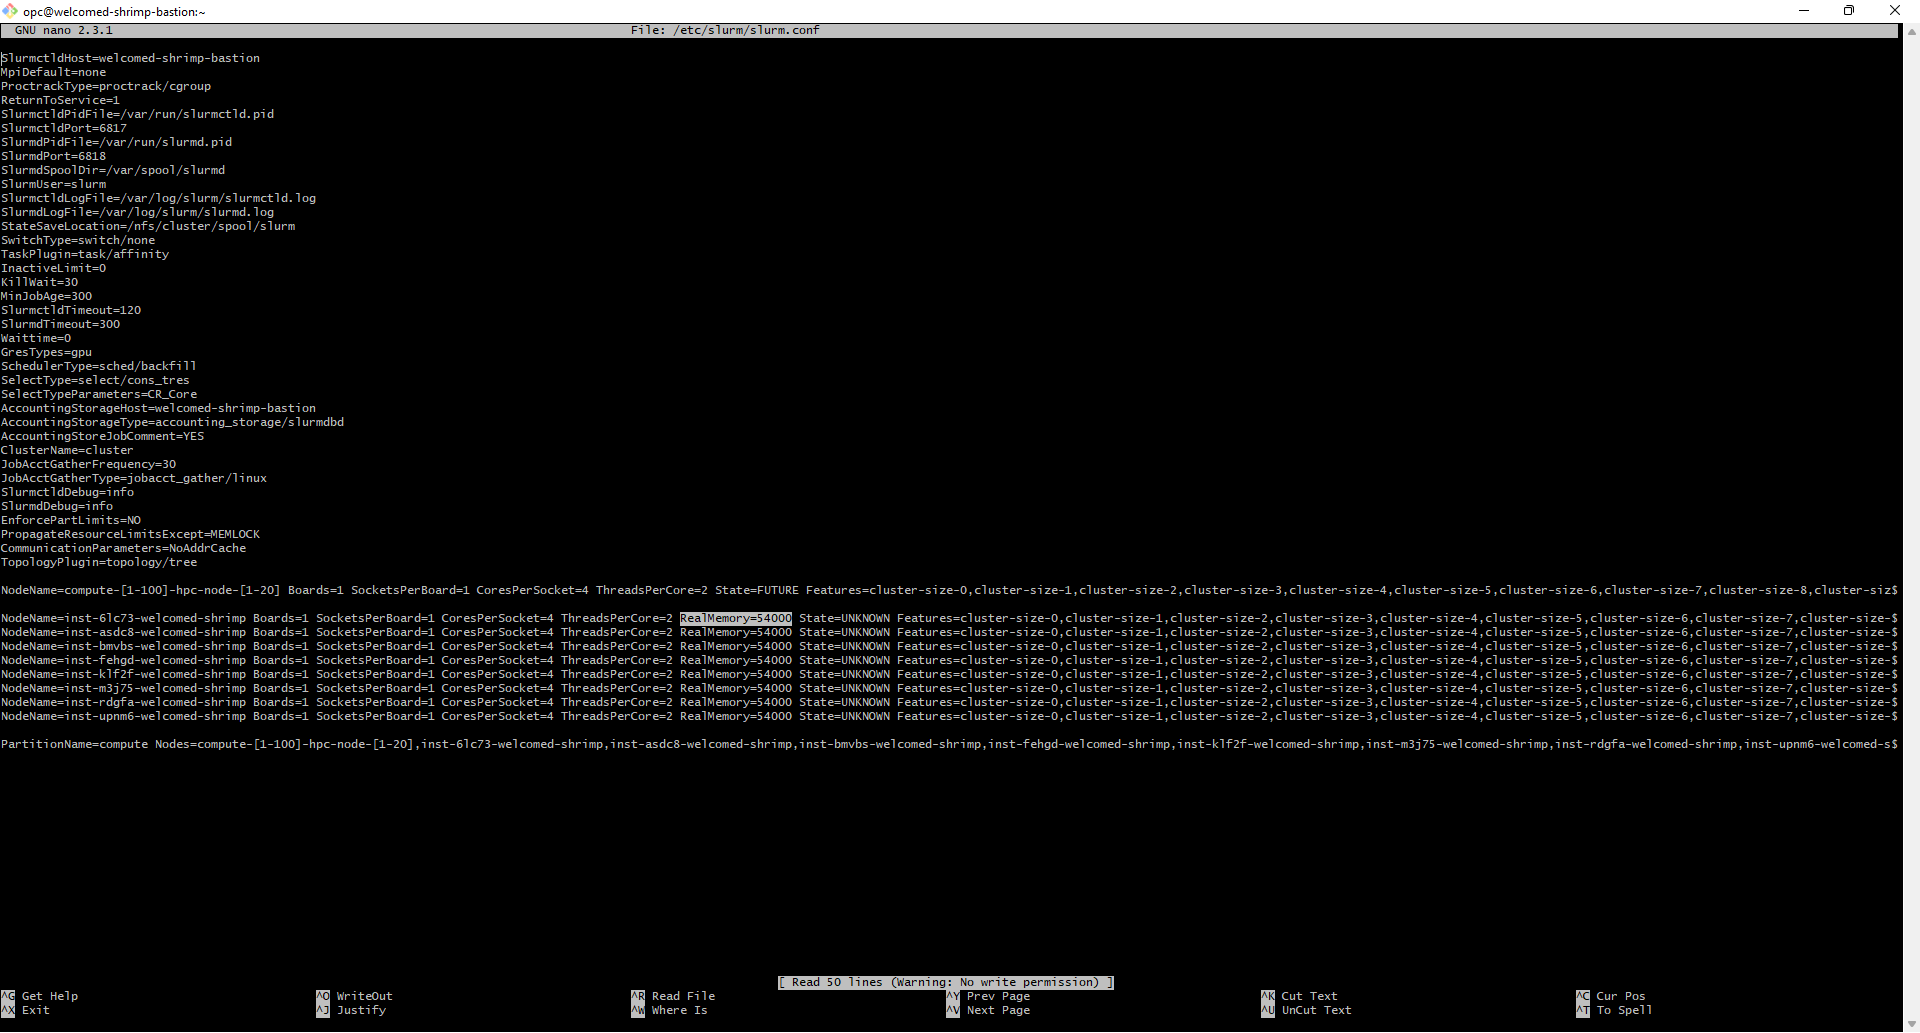
Once you have done this, you must reconfigure slurm by running the following command:
sudo scontrol reconfigure
Configuring X11 forwarding
If you want to use graphical aplications you need to install:
sudo yum install install mesa-dri-drivers xorg-x11-server-Xorg xorg-x11-xauth xorg-x11-apps mesa-libGL xorg-x11-drv-nouveau.x86_64 -y
sudo vi /etc/ssh/sshd_config
change to:
X11Forwarding yes
X11UseLocalhost no
then
sudo systemctl restart sshd

# or
sudo service sshd restart
For full functionality, you may also need to add PrologFlags=X11 to your /etc/slurm/slurm.conf, along with enabling the following
additional parameters in you /etc/ssh/sshd_config:
AllowAgentForwarding yes
AllowTcpForwarding yes
X11Forwarding yes
X11DisplayOffset 10
X11UseLocalhost no

On you main node, to restart slurm:

```console
sudo slurmctld restart
And on your worker nodes:
sudo service slurmd restart
After you’ve updated slurm, you can confirm the Prolog setting has taken:
sudo scontrol reconfigre; sudo scontrol show config | grep PrologFlags
And also check that x11 works!
Troublehsooting: Editing a deployd stack fails
This can have many reasons, but the first one to check is:
Error: 409-Conflict, The Instance Configuration ocid1.instanceconfiguration.oc1.phx.aaaaaaaabycbnzxq4uskt4f7mklp4g4fcqk4m42aabj2r2fkchjygppdudua is associated to one or more Instance Pools.
This means that the Instance Pool blocks the terraform script. To get it back working you need to destroy the stack first and then rebuild it.
Another option is that the resource type you used is not supported:
Error: 400-InvalidParameter, Shape VM.Standard1.4 is incompatible with image ocid1.image.oc1..aaaaaaaamy4z6turov5otuvb3wlej2ipv3534agxcd7loajk2f54bfmlyhnq
Suggestion: Please update the parameter(s) in the Terraform config as per error message Shape VM.Standard1.4 is incompatible with image ocid1.image.oc1..aaaaaaaamy4z6turov5otuvb3wlej2ipv3534agxcd7loajk2f54bfmlyhnq
Here, I selected a shape that is too “small” and it fails. It needs at least VM.Standard2.4
Installing Custom Software
If you don’t want to use spack (or cannot) then a good strategy is to install under /nfs/cluster, add any relevant “bin” directories it to your path, and install there.
As an example we will install go:
$ cd /nfs/cluster
$ wget https://go.dev/dl/go1.19.linux-amd64.tar.gz
$ sudo tar -C /nfs/cluster -xzf go1.19.linux-amd64.tar.gz
$ rm go1.19.linux-amd64.tar.gz
And then add the go bin to your bash profile (vim ~/.bash_profile) as follows:
export PATH=/nfs/cluster/go/bin:$PATH
and when you open a new shell or source ~/.bash_profile you should be able to see go on your path:
$ which go
/nfs/cluster/go/bin/go
$ go version
go version go1.19 linux/amd64
Further, since it’s located in the /nfs/cluster directory, it will be available on other nodes! Here is how to see the other nodes you have:
$ sinfo
PARTITION AVAIL  TIMELIMIT  NODES  STATE NODELIST
compute*     up   infinite      1   idle compute-permanent-node-941
And then shell into one, and also find the go binary.
$ ssh compute-permanent-node-941
Last login: Sun Aug 14 02:30:01 2022 from relative-flamingo-bastion.public.cluster.oraclevcn.com
$ which go
/nfs/cluster/go/bin/go
Install Singularity
First, system dependencies. Follow the example above in install custom software to install Go.
Next, install Singularity dependencies. These will need to be installed to each node.
sudo yum groupinstall -y 'Development Tools'
sudo yum install libseccomp-devel squashfs-tools cryptsetup -y
sudo yum install glib2-devel -y
Ensure Go is on your path (as shown above). Then install Singularity. We will install from source.
Important ensure you don’t have anything (e.g., pkg-config) loaded from spack, as this can interfere with installing Singularity using system libs. Also note that installing with system libs is a workaround for spack singularity not working perfectly (due to setuid). This means you’ll need to do these steps on each of your head login and worker nodes.
You can do the same with an official release.
Note that you don’t need to compile this on the nfs node - you can compile it anywhere and make install
to /nfs/cluster.
$ git clone https://github.com/sylabs/singularity
$ cd singularity
$ git submodule update --init

# You can also set prefix to be it's own directory, e.g., /nfs/cluster/singularity-<version>
$ ./mconfig --prefix=/nfs/cluster
$ cd ./builddir
$ make
$ make install
Once you install, make sure you add the newly created bin to your path (wherever that happens to be). E.g.,
that might look like:
export PATH=/nfs/cluster/go/bin:/nfs/cluster/bin:$PATH
And then when you source your ~/.bash_profile you can test:
$ which singularity
/nfs/cluster/bin/singularity
Advanced: Use MPI networking
Your first need to request access to those resources with this
form.
Then follow the above instructions, but leave Use cluser network activated and RDMA options enabled.
5 - Neurodesk
Neurodesk
Overview
This section describes how to setup a Neurodesk instance on the cloud. Neurodesk provides a containerised data analysis environment to facilitate reproducible analysis of neuroimaging data. Software included can be found here: https://www.neurodesk.org/applications/
Create a new VM
See our VM tutorial
See our Docker documentation
Follow the official Neurodesk instructions for running the latest container
https://www.neurodesk.org/docs/neurodesktop/getting-started/cloud/